Sie können Termine für sich und für andere Nutzer anlegen sofern Sie Bearbeitungsrechte am ausgewählten Kalender besitzen. Dies können sowohl Einzeltermine als auch Terminserien mit verschiedenen Wiederholungszyklen sein.
Um einen neuen Termineintrag zu erstellen, gehen Sie wie folgt vor:
Öffnen Sie den Kursbaustein Kalender. Klicken Sie doppelt auf einen Bereich im Kalender. Es öffnet sich nun das Fenster zum Erstellen eines neuen Termins. Entsprechend der Position, die Sie angeklickt haben, werden bereits einige Daten zum Termin automatisch gefüllt. | |
Geben Sie einen Titel und optional einen Ort und eine Beschreibung für den neuen Termin an. Prüfen Sie anschließend die eingetragenen Daten zum Termin in den Feldern Start und Ende. Wenn es sich um einen ganztägigen Termin handelt, dann prüfen Sie die Checkbox Ganztägig unterhalb der Felder Start und Ende. Diese sollte für ganztägige Termine aktiviert sein. | |
Konfigurieren Sie nun bei Bedarf den gewünschten Wiederholungszyklus und ein Enddatum zu diesem Zyklus.
Es stehen Ihnen folgende Optionen zur Verfügung ...
| Der Termin wird niemals wiederholt und findet nur einmalig am angegebenen Datum zur gewählten Uhrzeit statt. | | Der Termin findet jeden Tag zur gleichen Uhrzeit statt. | | Der Termin findet jeden Tag von Montag bis Freitag mit Ausnahme des Wochenendes statt. | | Der Termin findet jede Woche am gleichen Tag zur gleichen Uhrzeit statt. | | Der Termin findet alle zwei Wochen am gleichen Tag zur gleichen Uhrzeit statt. | | Der Termin findet einmal im Monat am gleichen Tag zur gleichen Uhrzeit statt. | | Der Termin findet einmal im Jahr im gleichen Monat, am gleichen Tag und zur gleichen Uhrzeit statt. |
WarningBei einem sich wiederholenden Termin müssen Sie in jedem Fall ein neues Datum im Textfeld Bis eintragen. Andernfalls wird nur ein Einzeltermin angelegt. | |
Sie können für den neuen Termin oder Terminzyklus eine Erinnerung konfigurieren. InformationDie Nachricht zum Termin wird jedoch nur per Mail versandt, wenn Sie den Kalender abonniert haben. Die Mail enthält Angaben zum Termintitel, die Termindaten und wenn angegeben, den Ort des Termins. Die Beschreibung wird nicht übertragen. | |
Entscheiden Sie nun über die Sichtbarkeit des Termins.
Hier haben Sie folgende Möglichkeiten ...
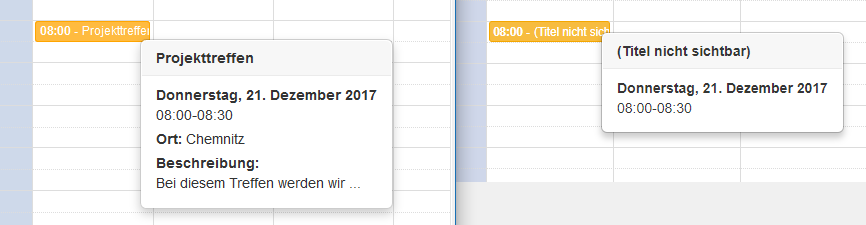
| Der Termin wird für alle Teilnehmer sichtbar und in deren Kalender eingetragen. | Nur Datum und Zeit anzeigen | Nutzer mit erweiterten Rechten sehen auch mit dieser Einstellung alle Angaben zum Termin. Für einen Nutzer ohne erweiterte Berechtigungen wird für diesen Termin aber nur das Datum und die Uhrzeit im Kalender angezeigt.
Ein Beispiel ...
| | Der Termin ist nur für sie selbst sichtbar. Er wird nicht in den Kalendern der anderen Nutzer synchronisiert. Jedoch können vereinzelt andere Nutzer mit erweiterten Rechten einen solchen Termin sehen, wenn er in einem Kurs oder Gruppenkalender eingetragen wurde. |
Klicken Sie auf die Schaltfläche Speichern, um den Erstellvorgang abzuschließen. | |
InformationNeue Termine können Sie nur in Systemkalendern anlegen (Kurskalender, Gruppenkalender), nicht in importierter Kalendern.