Calendar

Last modified by Carina Enke on 17.01.2024

Usage: Learners' View

Overview

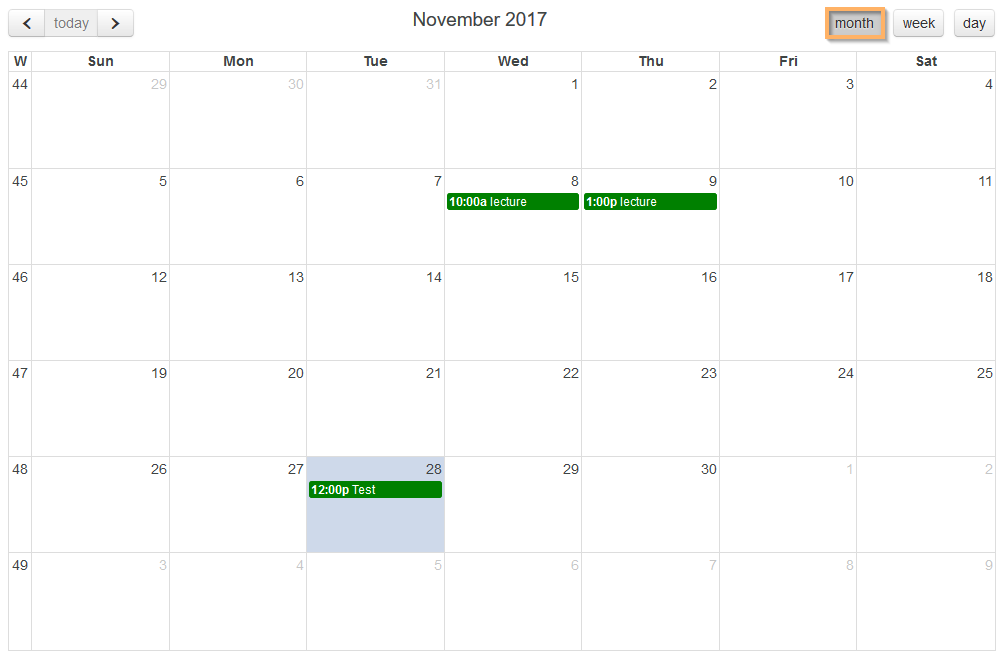
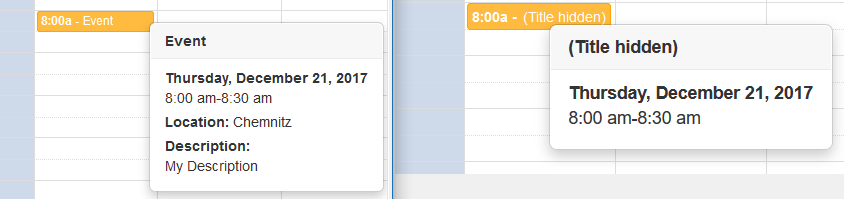
In the course element Calendar , your monthly, weekly, or daily appointments are displayed, depending on the selected view. All existing appointments are colour-coded in order to ensure clarity.

To make sure you never miss an appointment, you can also embed the calendar in a personal calendar.

Kursbaustein Kalender - Überblick_en.png

Functions for users

As a user, you have access to the following functions in a course element of the type Calendar :

Subscribe to calendar


You can subscribe to course elements to get automatically informed about changes.

How to do that?

To subscribe to a course element, proceed as follows:

  1. Open the relevant course and go to the desired course element.
  2. Click the Subscribe button in the upper right corner of the course element view.

Example: Subscribing to a course element File discussion

Kursbaustein Dateidiskussion - Abonnieren_en.png


3. If you have already subscribed to this course element, you will see the button Unsubscribe. Click this button if you want to cancel the subscription.

Kursbaustein Dateidiskussion - Abo beenden_en.png

For further information about the general configuration options for receiving notifications, refer to the page Subscriptions and notifications.
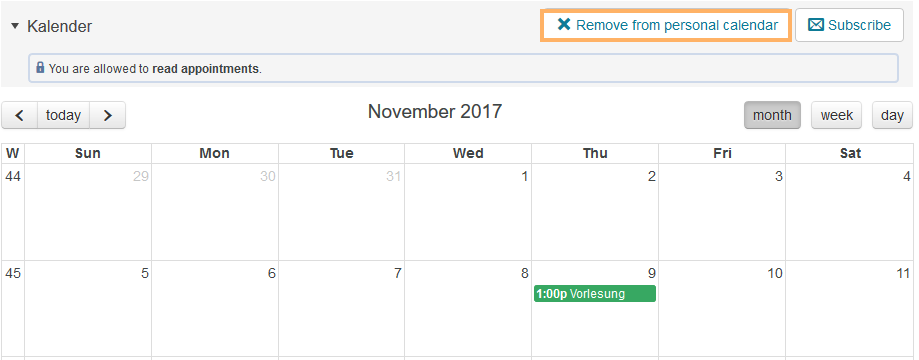
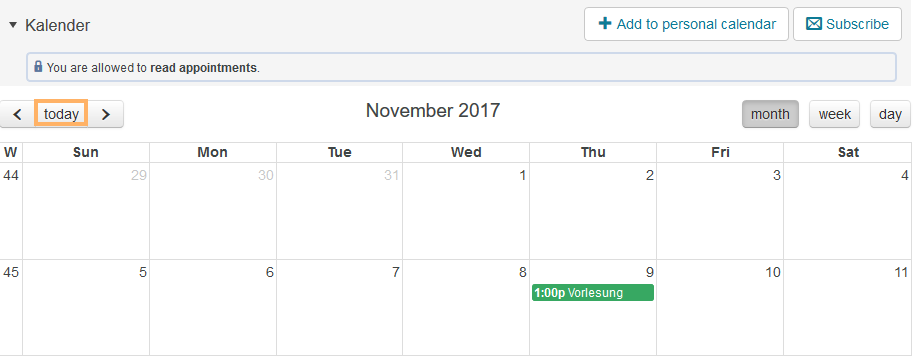
 

Add to personal calendar

Remove from personal calendar

The status of this button indicates whether or not the calendar has already been added to the personal calendar.

Add to personal calendar ...

If the Add to Personal Calendar button is displayed, you can add the calendar to your personal calendar by clicking on it.

Kursbaustein Kalender - Schaltfläche Zum persönlichen Kalender hinzufügen_en.png

Remove from personal calendar ...

If the Remove from personal calendar button is displayed, the calendar has already been added to the personal calendar. To remove the calendar from the personal calendar, click on this button.

Kursbaustein Kalender - Schaltfläche Aus dem persönlichen Kalender entfernen_en.png

Calendar navigation


Use the navigation aid in the upper left corner of the calendar to navigate to the desired date in the selected view:

Icon_Kalender Navigation_en.png

The navigation aid allows you to quickly navigate to the next/previous day, the next/previous week, or the next/previous month. Moreover, you can navigate to the current date with just one click.

How to do that?

Icon_zurück.png Icon_vorwärts.png

Click on the left arrow to navigate to the previous day, week, or month. The right arrow, in contrast, will take you to the next day, week, or month.

The navigation depends on the calendar view (day, week, or month) you selected. 

Kursbaustein Kalender - Pfeile_en.png

Icon_heute_en.png

Click on today to navigate to the current date.

Kursbaustein Kalender - Heute_en.png

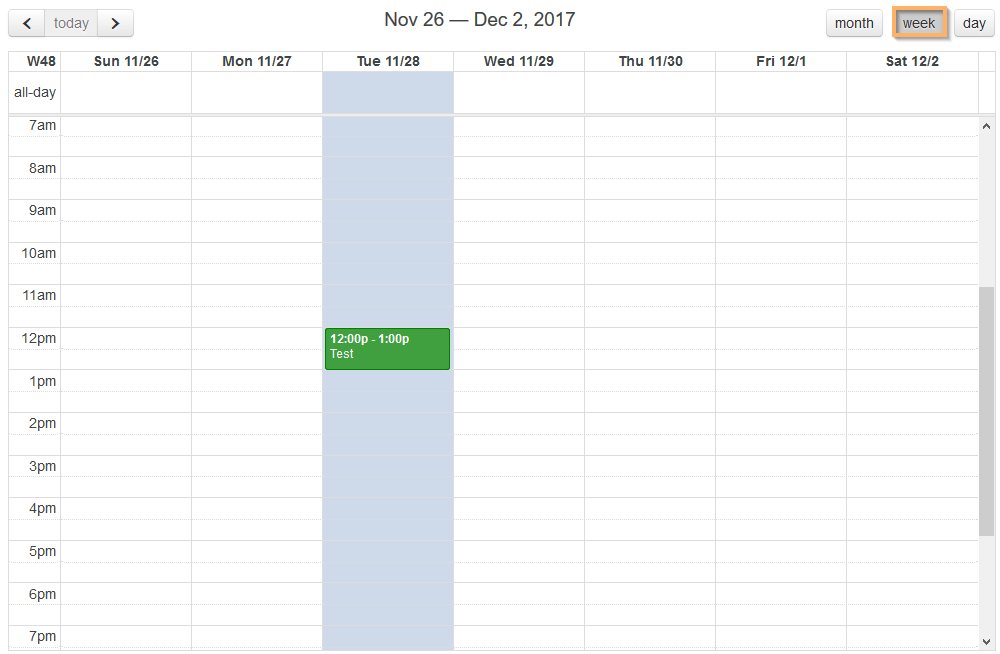
To maintain a good overview of upcoming appointments, you can switch between different views. Use the buttons in the upper right corner of the calendar:

Icon_Monat_en.png

The monthly overview gives you an overview of the entire current month

Example ...
  1. Open the course element Calendar .
  2. Click on month in the calendar navigation.

Kursbaustein Kalender - Monat_en.png

Icon_Woche_en.png

The weekly overview allows you to view all upcoming appointments in the current week.

Example ...
  1. Open the course element Calendar .
  2. Click on week in the calendar navigation.

Kursbaustein Kalender - Woche_en.png

Icon_Tag_en.png

The daily overview gives you an overview of the current day

Example ...
  1. Open the course element Calendar .
  2. Click on day in the calendar navigation.

Kursbaustein Kalender - Tag_en.png


Appointment management

A course supervisor can assign extended rights for this course element to you. This will make the appointment management functions, such as the creation and editing of appointments, available for this calendar.

Functions of the appointment management ...

Create appointment

You can create appointments for yourself and for other users, provided you have the right to edit the selected calendar. This includes single appointments as well as recurring appointments with different repetition cycles.

Create new appointment ...

To create a new appointment, proceed as follows:

  1. Open the course element Calendar.
  2. Double-click an area in the calendar. The window for creating a new appointment opens. Depending on where you click, some appointment information might be filled in automatically.

Kalender - Neuer Termin_en.png

3. Enter a title and optionally a location and a description for the new appointment.

4. Then check the data in the fields Start and End.

5. In the case of an all-day appointment, select the checkbox next to All day below the fields start and end. This option should be enabled for all-day appointments.


Kalender -  Titel Ort und Beschreibung zum neuen Termin_en.png

6. If necessary, configure the desired repetition cycle and an end date for this cycle.

You can choose from the following options ...

Never

The appointment is never repeated and takes place only once on the specified date at the selected time.

Daily

The appointment takes place every day at the same time.

Monday to Friday

The appointment takes place every day from Monday to Friday, not including weekends.

Weekly

The appointment takes place every week on the same day at the same time.

Biweekly

The appointment takes place every other week on the same day at the same time.

Monthly

The appointment takes place every month on the same day at the same time.

Yearly

The appointment takes place once a year in the same month, on the same day, and at the same time.

In the case of a recurring appointment, you must enter a new date in the text field Until. Otherwise, only a single appointment will be created.

Kalender - Wiederholungszyklen festlegen_en.png

7. You can configure a reminder for the new appointment or recurring appointment.

However, the reminder for the appointment will only be sent by email if you have subscribed to the calendar. The email contains information about the appointment title, appointment data, and if indicated, the place of the appointment. The description will not be transmitted.

Kalender - Erinnerung festlegen_en.png

8. Now decide on the visibility of the appointment

You have the following options ...

Public event

The appointment will be visible to all participants and added to their calendar.

Show only date and time

Users with extended rights will still see all information about this appointment. Users without extended rights, however, will only see the date and time of this appointment in the calendar.

Example ...
Kalender -Termin mit ausgeblendetem Titel_en.png

Private event

The appointment is only visible to you personally. It is not synchronised in the calendars of other users. Only other users with extended rights may see such an appointment if it has been added to a course or group calendar.

Kalender - Sichtbarkeit zum Termin_en.png

9. Click on Save to complete the creation process.

You can only create new appointments in system calendars (course calendar, group calendar), not in imported calendars.

Edit appointment or recurring appointment 

An already created appointment or a recurring appointment can easily be edited at any time. 

How to do that?
  1. Open the course element Calendar.
  2. Double-click the appointment you want to edit. The window Edit event opens.
  3. Make your desired changes and click on Save to complete the editing process.

Kursbaustein Kalender - Termin bearbeiten_en.png

Delete appointment or recurring appointment

An already created appointment or a recurring appointment can easily be deleted at any time. 

How to do that?
  1. Open the course element Calendar.
  2. Double-click the appointment you want to delete. The window for editing an appointment opens.
  3. Click on Delete. The appointment will be deleted immediately without showing a delete confirmation prompt.

    If the appointment you want to delete is part of a recurring appointment, the following window will appear:

    Kalender - Terminserie löschen_en.png

    You have the option to edit the recurring appointment, delete a single appointment which is part of the recurring appointment, or delete the recurring appointment.

Kalender - Termin bearbeiten und löschen_en.png

Calendar list


Users with the right to edit the selected calendar also have the following options:

Icon_Kalender importieren_en.png

Import calendar

How?


Icon_Bearbeiten.png

Edit calendar

How


Icon_X.png

Delete calendar

How?


Configuration: Authors' View

In the course editor

The following functions are available to you in the course editor:

Add a course element calendar

Click to open instructions on how to add a course element ...

To integrate a course element into your course, proceed as follows:

1

Open the course you want to edit.

Use the pencil icon at the top of the page to open the editing mode.

Kurs-zum Editor wechseln_en.png

2

Select a course element from the menu on the right.

Kurseditor-KB auswählen_en.png

3

In the new window, you can define the position of the new course element within your course structure (left navigation pane). The available positions are marked with an insert icon.

To insert the new course element into an existing substructure, you need to open the substructure by clicking on the small triangle symbol next to its title. The area will open and you will again see insert icons at the positions which are available.

Click on the insert icon at the desired position within the structure. The selected area will be highlighted.

Confirm your choice with Insert course element.

Kurseditor-KB in tree einfügen_en.png

4

The element will be inserted into the course structure at the selected position.

Depending on the course element, you have to make additional configurations or add content in order to complete the configuration.

For these changes to take effect, you must publish the course. The course element will then also become available in the course view.

Kurseditor-KB konfigurieren_en.png


General configuration settings

In the course editor, you will find the following configuration tabs:

Title and description

Configuration options in the tab title and description ...

Kurseditor - Tab Titel und Beschreibung_en.png

Elements

Description

Title

You need to enter a title for the course element. The title can comprise a maximum of 100 characters. All special characters and numbers are permitted. The title will appear in the navigation menu of the course and also as a heading in the content area.

Changes to the title of the first course element, the so-called main course node ...
 If you change the title of the first course element, the new content will only be applied to the main course node and then displayed in the opened course. If you wish to edit the course title or description, you can do so using the more settings menu of the course.

Subtitle

You can enter a subtitle for the course element with a maximum of 255 characters. All special characters and numbers are permitted. The title will appear as a tooltip in the navigation menu and - if selected and configured accordingly - as a subtitle in the content area.

Description

Here you can describe the course element. The description will appear in the content area below the title.

Depending on the settings configured in the element Display, this additional text is displayed to the user when opening the course element. The user can expand or collapse the view of the text.


Display

Define which information about the course element should be displayed in the course view. In addition to the content, you can optionally display the title and description. All course elements are provided with a reasonable presetting, which mostly includes the setting Title, description and content. You can adjust this setting in accordance with the options available for each course element.

Set link for this course element

Each course element can be accessed via fixed link addresses. Therefore, an internal and an external URL is assigned to each course element. These direct links to concrete elements can be used within courses or provided to learners. The URLs are located below the title and description of the element and will appear upon selecting Set link for this course element.  

  • External link: To refer to this course element from outside of the course or learning platform, you can use the external link and insert it, for example as a href attribute, into the desired HTML page.
  • Internal link: To set a link to another course element within the same course, you can insert the internal link as a href attribute into the desired HTML page.

ID

You will need the ID number of the course element (on the bottom right), for example, if you wish to use the expert mode in the visibility or access tab.

VisibilityIf necessary, restrict the visibility of the course element here. For more information, see the Visibility help page.
Access If necessary, restrict the visibility of the course element here. For more information, see the Access help page.

Multilingualism

In this tab, different translations can be added to individual course element areas.

In the course view

Course authors have access to all functions available to users. For more information, refer to the section Functions for users.

Users with extended rights can also:

Manage appointments in the calendar

Create appointment


You can create appointments for yourself and for other users, provided you have the right to edit the selected calendar. This includes single appointments as well as recurring appointments with different repetition cycles.

Create new appointment ...

To create a new appointment, proceed as follows:

  1. Open the course element Calendar.
  2. Double-click an area in the calendar. The window for creating a new appointment opens. Depending on where you click, some appointment information might be filled in automatically.

Kalender - Neuer Termin_en.png

3. Enter a title and optionally a location and a description for the new appointment.

4. Then check the data in the fields Start and End.

5. In the case of an all-day appointment, select the checkbox next to All day below the fields start and end. This option should be enabled for all-day appointments.


Kalender -  Titel Ort und Beschreibung zum neuen Termin_en.png

6. If necessary, configure the desired repetition cycle and an end date for this cycle.

You can choose from the following options ...

Never

The appointment is never repeated and takes place only once on the specified date at the selected time.

Daily

The appointment takes place every day at the same time.

Monday to Friday

The appointment takes place every day from Monday to Friday, not including weekends.

Weekly

The appointment takes place every week on the same day at the same time.

Biweekly

The appointment takes place every other week on the same day at the same time.

Monthly

The appointment takes place every month on the same day at the same time.

Yearly

The appointment takes place once a year in the same month, on the same day, and at the same time.

In the case of a recurring appointment, you must enter a new date in the text field Until. Otherwise, only a single appointment will be created.

Kalender - Wiederholungszyklen festlegen_en.png

7. You can configure a reminder for the new appointment or recurring appointment.

However, the reminder for the appointment will only be sent by email if you have subscribed to the calendar. The email contains information about the appointment title, appointment data, and if indicated, the place of the appointment. The description will not be transmitted.

Kalender - Erinnerung festlegen_en.png

8. Now decide on the visibility of the appointment

You have the following options ...

Public event

The appointment will be visible to all participants and added to their calendar.

Show only date and time

Users with extended rights will still see all information about this appointment. Users without extended rights, however, will only see the date and time of this appointment in the calendar.

Example ...
Kalender -Termin mit ausgeblendetem Titel_en.png

Private event

The appointment is only visible to you personally. It is not synchronised in the calendars of other users. Only other users with extended rights may see such an appointment if it has been added to a course or group calendar.

Kalender - Sichtbarkeit zum Termin_en.png

9. Click on Save to complete the creation process.

You can only create new appointments in system calendars (course calendar, group calendar), not in imported calendars.


Edit appointment or recurring appointment


An already created appointment or a recurring appointment can easily be edited at any time. 

How to do that?
  1. Open the course element Calendar.
  2. Double-click the appointment you want to edit. The window Edit event opens.
  3. Make your desired changes and click on Save to complete the editing process.

Kursbaustein Kalender - Termin bearbeiten_en.png


Delete appointment or recurring appointment


An already created appointment or a recurring appointment can easily be deleted at any time. 

How to do that?
  1. Open the course element Calendar.
  2. Double-click the appointment you want to delete. The window for editing an appointment opens.
  3. Click on Delete. The appointment will be deleted immediately without showing a delete confirmation prompt.

    If the appointment you want to delete is part of a recurring appointment, the following window will appear:

    Kalender - Terminserie löschen_en.png

    You have the option to edit the recurring appointment, delete a single appointment which is part of the recurring appointment, or delete the recurring appointment.

Kalender - Termin bearbeiten und löschen_en.png


Link, edit, or delete further calendars


Users with the right to edit the selected calendar also have the following options:

Icon_Kalender importieren_en.png

Import calendar

How?


Icon_Bearbeiten.png

Edit calendar

How


Icon_X.png

Delete calendar

How?


As a course supervisor, you can assign extended rights for a course element's additional editing functions to individual or even all course users. These rights can be configured in the tab Access. Further information can be found in the section General configuration settings on this page.