SCORM

Last modified by Anna Paul-Hasenfuss on 05.02.2024

KB_Scorm.png SCORM learning content allows for the exchange of learning content and its reuse in various web-based environments, e.g. in authoring systems or learning platforms. SCORM stands for Sharable Content Object Reference Model. An existing SCORM 1.2 resource can be integrated into the platform either as an individual learning resource or a SCORM course element.

SCORM course elements can be assessed. This means that assessment information can be configured and, for example, be displayed in certificates or assessment overviews. Assessment information may also serve as a visibility or access criterion for other course areas.

Usage: Learners' View

Overview

In a course element SCORM, you can start and run stored SCORM resources. You will also receive information on the number of completed attempts and the maximum number of attempts possible for the learning content.

After completing a SCORM attempt, you can view your assessment above the Start SCORM button. The displayed assessment information depends on the settings configured by the course author.

Kursrun-SCORM Überblick_en.png

Functions for users

As a user, you can use the following functions in a SCORM course element:

Start SCORM

To start a SCORM, proceed as follows:  

  1. Open the course element SCORM.
  2. Click on Start SCORM.
  3. Depending on the settings configured by the course author, the SCORM will either open in the same or in a new browser window.

The SCORM can only be opened if the maximum number of possible attempts has not yet been reached.

Kursrun-SCORM starten_en.png


Close SCORM

To close a SCORM, proceed as follows:  

  1. Open the course element SCORM and start a SCORM.
  2. To close the SCORM, click on quit.
  3. Then select the to close the window.

If the SCORM was started in a new browser window, close the entire browser window after selecting quit. Then confirm the information window Close SCORM in the course with OK.

Kursrun SCORM - SCORM schließen_en.png

View assessment

The available assessment information for a course element SCORM will directly be displayed in the course area above the Start SCORM button after closing the SCORM.  

The following information may be displayed depending on the configuration by the course author:  

  • Passed status (provided the SCORM determines a passed status)
  • Score
  • Mark in numbers and words (if the course supervisor manually awards a mark)
  • Your previous solution attempts
  • Assessed attempt (Depending on the configuration, either the best result or the result for the last attempt will be displayed if more than one attempt is possible.)
  • Average assessment (Shows the average score among all users. For this information to be displayed, at least one attempt by yourself and four attempts by other registered course users will be necessary.)

Kursrun-Scorm Durchschnittliche Bewertung_en.png

Configuration: Authors' View

In the course editor

The following functions are available in the course editor:

Add a course element SCORM

Click to open instructions on how to add a course element ...

To integrate a course element into your course, proceed as follows:

1

Open the course you want to edit.

Use the pencil icon at the top of the page to open the editing mode.

Kurs-zum Editor wechseln_en.png

2

Select a course element from the menu on the right.

Kurseditor-KB auswählen_en.png

3

In the new window, you can define the position of the new course element within your course structure (left navigation pane). The available positions are marked with an insert icon.

To insert the new course element into an existing substructure, you need to open the substructure by clicking on the small triangle symbol next to its title. The area will open and you will again see insert icons at the positions which are available.

Click on the insert icon at the desired position within the structure. The selected area will be highlighted.

Confirm your choice with Insert course element.

Kurseditor-KB in tree einfügen_en.png

4

The element will be inserted into the course structure at the selected position.

Depending on the course element, you have to make additional configurations or add content in order to complete the configuration.

For these changes to take effect, you must publish the course. The course element will then also become available in the course view.

Kurseditor-KB konfigurieren_en.png


General configuration settings

In the course editor, you will find the following configuration tabs:
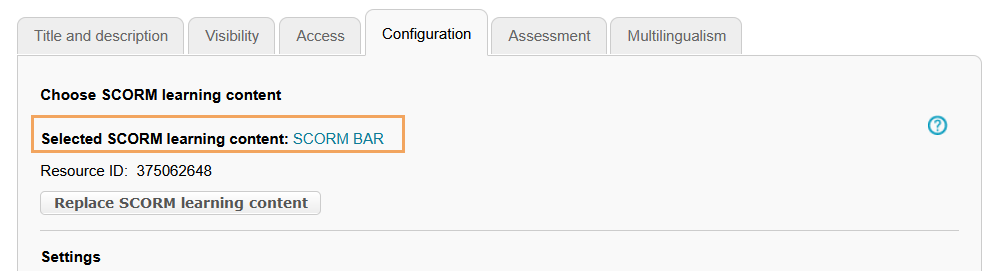
Title and description

Configuration options in the tab title and description ...

Kurseditor - Tab Titel und Beschreibung_en.png

Elements

Description

Title

You need to enter a title for the course element. The title can comprise a maximum of 100 characters. All special characters and numbers are permitted. The title will appear in the navigation menu of the course and also as a heading in the content area.

Changes to the title of the first course element, the so-called main course node ...
 If you change the title of the first course element, the new content will only be applied to the main course node and then displayed in the opened course. If you wish to edit the course title or description, you can do so using the more settings menu of the course.

Subtitle

You can enter a subtitle for the course element with a maximum of 255 characters. All special characters and numbers are permitted. The title will appear as a tooltip in the navigation menu and - if selected and configured accordingly - as a subtitle in the content area.

Description

Here you can describe the course element. The description will appear in the content area below the title.

Depending on the settings configured in the element Display, this additional text is displayed to the user when opening the course element. The user can expand or collapse the view of the text.


Display

Define which information about the course element should be displayed in the course view. In addition to the content, you can optionally display the title and description. All course elements are provided with a reasonable presetting, which mostly includes the setting Title, description and content. You can adjust this setting in accordance with the options available for each course element.

Set link for this course element

Each course element can be accessed via fixed link addresses. Therefore, an internal and an external URL is assigned to each course element. These direct links to concrete elements can be used within courses or provided to learners. The URLs are located below the title and description of the element and will appear upon selecting Set link for this course element.  

  • External link: To refer to this course element from outside of the course or learning platform, you can use the external link and insert it, for example as a href attribute, into the desired HTML page.
  • Internal link: To set a link to another course element within the same course, you can insert the internal link as a href attribute into the desired HTML page.

ID

You will need the ID number of the course element (on the bottom right), for example, if you wish to use the expert mode in the visibility or access tab.

VisibilityIf necessary, restrict the visibility of the course element here. For more information, see the Visibility help page.
Access If necessary, restrict the visibility of the course element here. For more information, see the Access help page.

Configuration

In this tab, you can select or import a SCORM package. Additionally, you can also configure various display settings for the course element.

Detailed instructions are given in the following section Settings in the configuration tab.

Assessment

In this tab, you can configure various assessment settings. Detailed instructions are given in the following section Settings in the assessment tab.

Multilingualism

In this tab, different translations can be added to individual course element areas.

Settings in the configuration tab

In the Configuration tab, you can assign a SCORM package to your course element and specify various configuration options.  

Assign SCORM package

You can:

  • select an existing SCORM package (option 1) or  
  • import a new SCORM package (option 2)
Start the configuration for both variants as follows:

1.

Open the course element SCORM.

Switch to the Configuration tab in the course editor and click on Select or import SCORM learning content.

Kurseditor-SCORM wählen oder importieren_en.png

2.

A page with the function to import a new SCORM package and a list of your existing SCORM packages will open.

Decide on one of the following options:

Kurseditor-Optionen zur Auswahl eines SCORMs_en.png

3a.

(Option 1:) To use an existing SCORM package, select the desired package by clicking on the Icon_Hinzufügen schwarz.png plus icon in the Actions column.

Kurseditor-SCORM-Paket wählen_en.png

3b.

(Option 2:) To import a new SCORM package, click on Import. The system's default upload page will open.

Expand further steps ...

You have the option to import a file or a folder.

  • Select a location for the file/folder you wish to import and upload the file/folder.
  • Enter a title and optionally add a description.
  • Click on Finish to complete the creation process.

The newly imported SCORM package will now automatically be used as a resource for the SCORM course element and displayed under Selected SCORM learning content.

Kurseditor-SCORM-Paket importieren_en.png

4.


5.

The selected SCORM package will now automatically be used as a resource for the SCORM course element and displayed under Selected SCORM learning content.

Publish your course to complete the configuration and to make the SCORM package available to participants.

Kurseditor-gewähltes SCORM-Paket_en.png

SCORM resource settings

Hide in the course menu

If this function is enabled, the course element will not be visible in the navigation on the left. The Start SCORM button can now only be accessed from the course preview or the associated structure pane.

Kurseditor-SCORM-Einstellungen_en.png

Open in new browser window

If this option is enabled, the SCORM will open in a new browser window.
As a consequence, there will, for example, be no need for size adjustments.

Start next SCORM after finish

If several SCORM elements are referenced in the main course navigation, they can be started in sequence using this setting. The user will only need to start the first SCORM.

Show menu

With this option, you can determine whether a navigation menu is to be displayed in the SCORM.

Show navigation buttons

Use this option to allow the user to navigate in the SCORM with Next and Back buttons.

Height/Width/X position/Y Position

Here you can determine the SCORM window's size and position.

Content character set

The learning platform attempts to automatically detect the SCORM's character set. If the Automatically option does not result in the desired display, you can configure the coding of the content using a predefined character set.

JavaScript character set

This option allows to encode the JavaScript code using a predefined character set (the same character set will be used by default for both content and JavaScript).

Functions after adding a SCORM resource

Once a SCORM resource has been added, you have the following options in the course editor ...

Replace SCORM learning content

Click the button to replace the added SCORM resource with another SCORM resource. The same window will open as in the upper section Assign SCORM package. Now you have the same options as described above to add a new SCORM resource.

Kurseditor-Scorm-Paket zugeordnet_en.png

A learning resource of the type SCORM is not an independent learning resource, i.e. it must be integrated into a course element SCORM. Further information on independent learning resources as well as tutorials on their creation and management are provided in the section Learning resources.


Settings in the assessment tab

In the Assessment tab, you have the option to define general assessment settings for the SCORM course element.

Configure assessment settings ...


Transfer score from SCORM

If this option is enabled, the score achieved in the SCORM learning content will be transferred to the learning platform, and the user will see the assessment information area in the course view.

If the option is disabled, no assessment information will be transmitted. The user can only see the number of their attempts in the course view but no further assessment information. Hence, the assessment information for this SCORM element is also not available in the assessment tool for this user.

Kurseditor - Scorm Tab Bewertung_en.png

Score needed to pass

This function allows you to specify the score which is needed to pass the learning content.

User can only advance score

If this option is enabled, the score of your second attempt will only be applied if  it is higher than the score of your first attempt. If this option is disabled, the score of your second attempt will be applied in any case (regardless of your previous score).

Count attempts only if score is transferred

If you deactivate this function, every start of the SCORM is counted as an attempt.

Maximal attempts

Use this option to define how often the user is allowed to start a SCORM.

Show average assessment

This function allows the user to see the average score among all users after completing the SCORM. The average is calculated when there are at least five completed attempts.

Use certificates

Enable this option if the user is to receive a PDF document as evidence for a passed SCORM.

Template for certificates

Here you can select the desired template for the certificate. Apart from the example template, you can also use an individually created template.

Display certificates only for tutors (assessment tool)

If this option is enabled, the PDF files of the certificates can only be accessed via the assessment tool. In all other places, the user can no longer access, view, or download their own certificate.

In the course view

Author functions in the course view

In the course view of a course element SCORM, you have access to all functions available to users. Also, you have the following editing functions.

Assessment Tool

Once a SCORM has transferred points to OPAL, you can view more detailed information on the assessment and its progress in the assessment tool. More information can be found on SCORM-Data in the Assessment Tool.