Zertifikate
 Zusätzlich zu den Leistungsnachweisen können für einen Kurs oder einzelne Kursbausteine Zertifikatsdateien erzeugt werden. Diese kann der Nutzer über einen Link im Leistungsnachweis des Kurses als PDF-Datei herunterladen und ausdrucken.
Über verschiedene Konfigurationsmöglichkeiten können Sie das Aussehen des Zertifikats beeinflussen und die Ansicht bzw. den Ausdruck beschränken.
Unbekanntes Makro: includeplus. Klicke auf diese Nachricht, um Details zu erfahren.
Unbekanntes Makro: scroll-ignore. Klicke auf diese Nachricht, um Details zu erfahren.
Zertifikate anbieten
Um ein Zertifikat automatisch zu generieren und dem Lernenden anzeigen zu lassen, gehen Sie wie folgt vor:
- Öffnen Sie den Kurseditor und navigieren Sie zum gewünschten Kursbaustein. Für ein Zertifikat über den gesamten Kurs ist dies der oberste Kursknoten.
- Wechseln Sie im gewählten Baustein in den Tab Bewertung.
- Aktivieren Sie die Option Zertifikate verwenden.

- Wählen Sie in der Auswahlliste Vorlage für Zertifikate die gewünschte Vorlage für das Zertifikat aus. Neben der Beispielvorlage können Sie auch individuell erstellte Vorlagen verwenden. Individuell erstellte Vorlagen werden in der Auswahlliste zuerst angezeigt.
- Wenn Sie die Option Zertifikate nur für Betreuer anzeigen aktivieren, können die PDF-Dateien der Zertifikate nur noch durch Verantwortliche über das Bewertungswerkzeug aufgerufen werden. Ein einfacher Nutzer hat keinen Zugang zu diesem Bereich und kann das eigene Zertifikat somit nicht ansehen, ausdrucken oder herunterladen.
Individuelle Zertifikatsvorlagen verwenden
- ==
Individuelle Kursvorlagen müssen im Ablageordner des Kurses hinterlegt und mit dem betreffenden Kursbaustein verknüpft werden. Öffnen Sie zunächst den Kurs und wechseln Sie in den Kurseditor. Dort wählen Sie im Bereich Editorwerkzeuge den Eintrag Ablageordner. Entscheiden Sie sich entsprechend Ihrer Zertifikatsvorlage für einen der folgenden Wege:
Eine oder mehrere Zertifikatsdateien mit einem beliebigen Namen:
Erstellen Sie zunächst im Kursablageordner einen neuen Ordner mit dem genauen Titel certificate_templates.
Kopieren Sie alle HTML-Vorlagen sowie alle in diesen Vorlagen referenzierten Bilder und CSS-Dateien in den Ordner certificate_templates.
Schließen Sie den Ablageordner.
Eine einzelne Vorlage mit dem vorgeschriebenen Dateinamen certificatetemplate.html (bitte alles in Kleinbuchstaben schreiben):
Laden Sie die HTML-Datei mit diesem festgelegten Dateinamen in den Kursablageordner oder den zugeordneten Ressourcenordner des Kurses hoch.
Alle in der Vorlage referenzierten Bilder und CSS-Dateien müssen ebenfalls in den Kursablageordner / Ressourcenordner kopiert werden.
- Schließen Sie den Ablageordner.
Wählen Sie nun bei der Konfiguration des Kursbausteins im Tab Bewertung genau diese Vorlage in der Liste Vorlage für Zertifikate aus.
Platzhalter
Bei der Erstellung der Zertifikatsvorlage können abhängig von der Konfiguration der Lernplattform verschiedene Platzhalter in der HTML-Datei verwendet werden. Diese werden dann im Zertifikat des jeweiligen Nutzers mit den entsprechenden Daten des Kurses oder Nutzers gefüllt.
Eine solche Zertifikatsvorlage können Sie mit dem integrierten HTML-Editor bspw. direkt im Kursablageordner erstellen und gestalten. Wenn Sie eine Zertifikatsvorlage mit einem externen Editor erstellt und hochgeladen haben, warnt das System vor möglichen Informationsverlusten, falls Sie die Datei mit dem integrierten Editor bearbeiten möchten.
%%COURSE_TITLE%% | Name des Kurses für den das Zertifikat ausgestellt wird. |
%%COURSENODE_TITLE%% | Titel des Kursbausteins zu dem das Zertifikat erstellt wird. |
%%CERTIFICATE_DATE%% | Datum, zu welchem der Leistungsnachweis erfüllt wurde. Die Formatierung des Platzhalters orientiert sich an der gewählten Sprache des Nutzers. Sie kann aber mit folgenden Optionen angepasst werden: |
%%GRADE%% | Ausgabe des Prädikats einer Note |
%%GRADE:###:LANG=de%% | Ausgabe des deutschen Prädikats der Note zum angegebenen Kursbaustein |
%%GRADE:###:LANG=en%% | Ausgabe des englischen Prädikats der Note zum angegebenen Kursbaustein |
%%MARK%% | Note des gesamten Kurses |
%%MARK:###%% | Note des Kursbausteins mit der ID ### (dieser muss bewertbar sein) |
%%ROOT_NODE_SHORT_TITLE%% | Kurzer Titel aus dem Kurs-Root-Knoten |
%%ROOT_NODE_TITLE%% | Titel aus dem Kurs-Root-Knoten |
%%METADATA:moduleduration%% | Kurs-Metadatum: Dauer des Moduls |
%%METADATA:moduleects%% | Kurs-Metadatum: ECTS |
%%METADATA:moduleexam%% | Kurs-Metadatum: Prüfungen |
%%METADATA:modulelevel%% | Kurs-Metadatum: Niveau |
%%METADATA:modulelink%% | Kurs-Metadatum: Link zum Modul |
%%METADATA:modulemethods%% | Kurs-Metadatum: Lehr-/Lernformen |
%%METADATA:modulename%% | Kurs-Metadatum: Name des Moduls |
%%METADATA:modulenumber%% | Kurs-Metadatum: Modulnummer |
%%METADATA:moduleresponsible%% | Kurs-Metadatum: Verantwortlicher der Weiterbildung |
%%METADATA:moduleversion%% | Kurs-Metadatum: Version |
%%METADATA:moduleworkloadpresence%% | Kurs-Metadatum: Präsenzzeit |
%%METADATA:moduleworkloadprivate%% | Kurs-Metadatum: Selbststudienzeit |
%%METADATA:moduleworkloadtotal%% | Kurs-Metadatum: Gesamtworkload |
%%PASSED%% | Gibt "Bestanden" bzw "Passed" im Zertifikat aus, je nach Nutzersprache zum Zeitpunkt des Bestehens. |
%%PROPERTY:birthDay%% | Geburtsdatum mit folgenden Optionen:
|
%%PROPERTY:email%% | E-Mail-Adresse |
%%PROPERTY:firstName%% | Vorname |
%%PROPERTY:institutionalName%% | Institution |
%%PROPERTY:institutionalUserIdentifier%% | Matrikelnummer (systemabhängig verfügbares Metadatum) |
%%PROPERTY:lastName%% | Nachname |
%%PROPERTY:orgUnit%% | Organisationseinheit |
%%SALUTATION:LANG=de%% | Anrede (deutsch) |
%%SALUTATION:LANG=en%% | Anrede (englisch) |
%%SCORE%% | Punkte des gesamten Kurses |
%%SCORE:###%% | Punkte des Kursbausteins mit der ID ### (dieser muss bewertbar sein) |
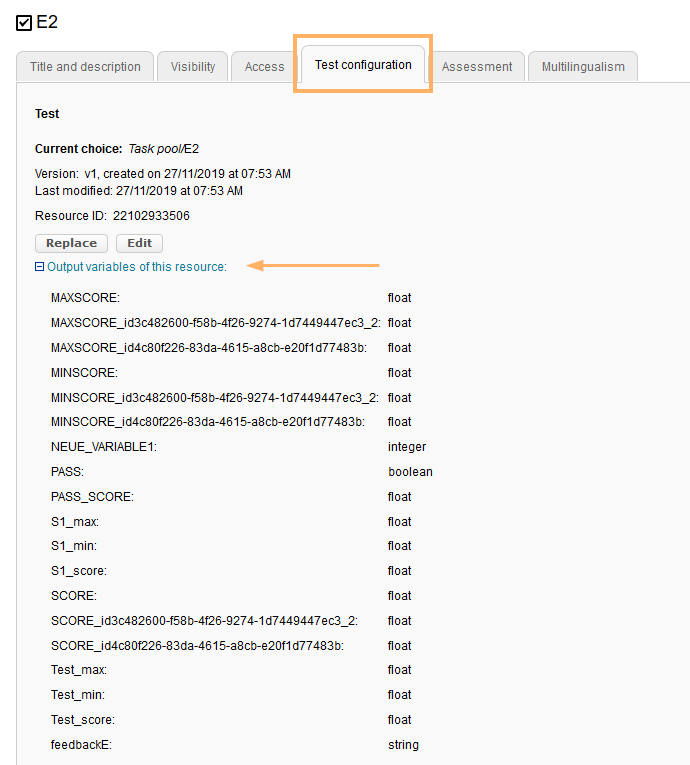
%%OUTCOME:[Variablenname]:###%% | Ausgabewert eines ONYX-Tests Weitere Informationen zur Nutzung dieses Platzhalters ...Dieser Platzhalter ist nutzbar für alle im Bereich eines Kursbausteins Test im Tab Test-Konfiguration>"Ausgabevariablen dieser Ressource" angezeigten Variablen, wie bspw. MAXSCORE, PASS_SCORE, SCORE, PASS, sowie für individuelle Test- und Sektionsvariablen vom Typ Text oder Numerisch.
Die Angabe der Kursbaustein-ID im Platzhalter ist immer dann zwingend notwendig, wenn das Zertifikat Ausgabewerte zu einem anderen Kursbaustein enthalten soll. Dies ist beispielsweise der Fall, wenn das Zertifikat zu einem Kursbaustein Struktur erstellt wird und dabei Ausgabewerte zu einem Kursbaustein Test abgerufen werden sollen. Wird das Zertifikat direkt zum Kursbaustein Test erstellt, von dem die Nutzerwerte angezeigt werden sollen, ist die Angabe in der Form %%OUTCOME:[Variablenname]%% ausreichend. |
%%SEMESTER%% | Semester |
%%USERNAME%% | Vor- und Nachname der Person, die das Zertifikat für den Leistungsnachweis erhält. |
Platzhalter | Wert |
|---|
Beispiele
In addition to the Performance results, certificate files can be generated for a course or individual course elements. The user can download these files as a PDF via a link in the performance results section of the course and print them out.
You can use various configuration options to influence the design of the certificate and limit the view or print.
Unbekanntes Makro: includeplus. Klicke auf diese Nachricht, um Details zu erfahren.
Unbekanntes Makro: scroll-ignore. Klicke auf diese Nachricht, um Details zu erfahren.
Offer certificates
To generate a certificate automatically and display it to the learner, proceed as follows:
- Open the course editor and navigate to the desired course element. To receive a certificate for the entire course, go to the top course node.
- In the selected element, switch to the Assessment tab.
- Activate the Use certificates option.
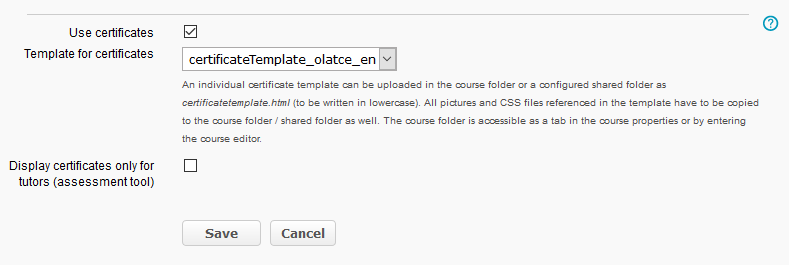
- Choose the desired certificate template from the Template for certificates selection list. Apart from the example template, you can also use individually created templates. The latter will appear at the top of the selection list.
- If you activate the Display certificates only for tutors option, the PDF files of the certificates will only be accessible by tutors via the assessment tool. A simple user does not have access to this area and can thus not view, print, or download their certificate.
Use individual certificate templates
Individual course templates must be saved to the storage folder of the course and linked to the relevant course element. First open the course and switch to the course editor. Then select the Storage folder entry from the Editor tools menu. Choose one of the following options according to your certificate template:
- One or more certificate files with any name:
- First create a new folder with the exact title certificate_templates in the course storage folder.
- Copy all HTML templates as well as all images and CSS files referenced in these templates to the certificate_templates folder.
Close the storage folder.
- A single template with the mandatory file name certificatetemplate.html (all letters in lowercase):
- Upload the HTML file with this specific file name to the course storage folder or the assigned resource folder of the course.
- All images and CSS files referenced in the template must also be copied to the course storage folder / resource folder.
- Close the storage folder.
When configuring the course element in the Assessment tab, select exactly this template from the Template for certificates list.
Placeholder
When creating the certificate template, you can use different placeholders in the HTML file, depending on the configuration of the learning platform. These are then filled in the certificate of the respective user with the corresponding data of the course or user.
You can create and design such a certificate template with the integrated HTML editor e. g. directly in the course storage folder. If you create and upload a certificate template with an external editor, the system will warn you of possible information loss when trying to edit the template with the integrated editor.
Placeholder | Value |
|---|---|
%%COURSE_TITLE%% | Title of the course for which the certificate is issued. |
%%COURSENODE_TITLE%% | Title of the course element for which the certificate is issued. |
%%CERTIFICATE_DATE%% | The date on which the performance results were achieved. The formatting of the placeholder depends on the language selected by the user. It can be adjusted with the following options: |
%%GRADE%% | Display of grades as text |
%%GRADE:###:LANG=de%% | Display of the German grade for the specified course element |
%%GRADE:###:LANG=en%% | Display of the English grade for the specified course element |
%%MARK%% | Mark for the entire course |
%%MARK:###%% | Mark for the course element with the ID ### (the course element must be assessable) |
%%ROOT_NODE_SHORT_TITLE%% | Short title from the course root node |
%%ROOT_NODE_TITLE%% | Title from the course root node |
%%METADATA:moduleduration%% | Course metadata: Duration of the module |
%%METADATA:moduleects%% | Course metadata: ECTS |
%%METADATA:moduleexam%% | Course metadata: Exams |
%%METADATA:modulelevel%% | Course metadata: Level |
%%METADATA:modulelink%% | Course metadata: Link to the module |
%%METADATA:modulemethods%% | Course metadata: Teaching and learning methods |
%%METADATA:modulename%% | Course metadata: Name of the module |
%%METADATA:modulenumber%% | Course metadata: Module number |
%%METADATA:moduleresponsible%% | Course metadata: Person responsible for further education |
%%METADATA:moduleversion%% | Course metadata: Version |
%%METADATA:moduleworkloadpresence%% | Course metadata: Attendance time |
%%METADATA:moduleworkloadprivate%% | Course metadata: Private study time |
%%METADATA:moduleworkloadtotal%% | Course metadata: Total workload |
%%PASSED%% | Displays "Passed" in the certificate, depending on the configured user language at the time of passing. |
%%PROPERTY:birthDay%% | Date of birth with the following options:
|
%%PROPERTY:email%% | Email address |
%%PROPERTY:firstName%% | First name |
%%PROPERTY:institutionalName%% | Institution |
%%PROPERTY:institutionalUserIdentifier%% | Matriculation number (system-dependent metadata) |
%%PROPERTY:lastName%% | Last name |
%%PROPERTY:orgUnit%% | Organisation unit |
%%SALUTATION:LANG=de%% | Salutation (German) |
%%SALUTATION:LANG=en%% | Salutation (English) |
%%SCORE%% | Score for the entire course |
%%SCORE:###%% | Score for the course element with the ID ### (the course must be assessable) |
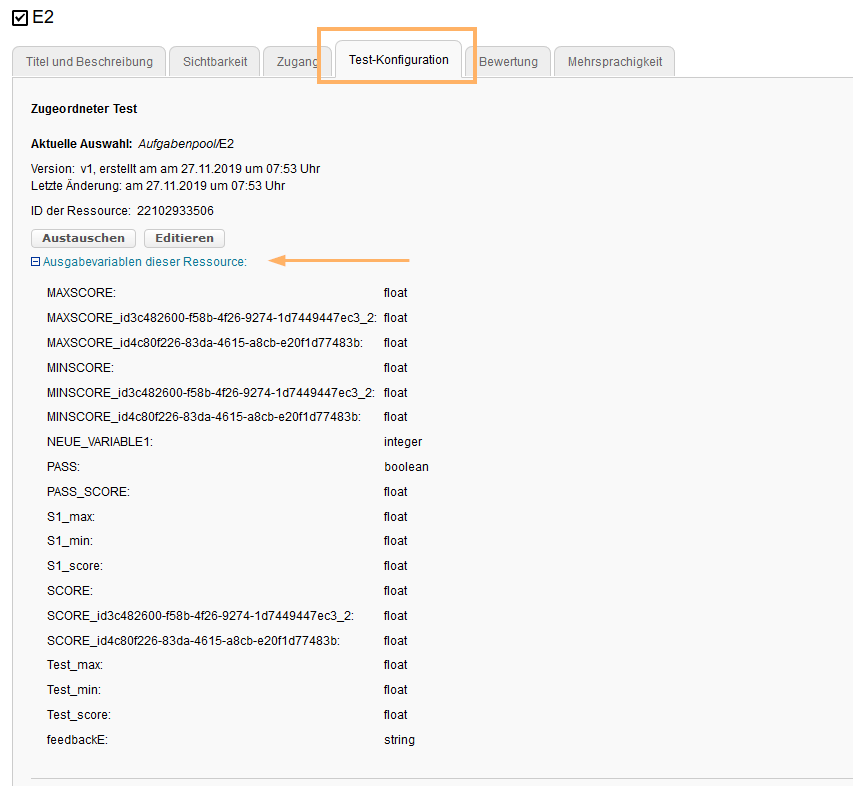
%%OUTCOME:[variable name]:###%% | Output value of an ONYX test Learn more about how to use this placeholder ...This placeholder can be used for all variables displayed in a test course element on the Test configuration tab>"Output variables of this resource" such as MAXSCORE, PASS_SCORE, SCORE, PASS, as well as for individual test and section variables of the type text or numerical.
If the certificate should contain output values from another course element, the course element ID must be specified in the placeholder. For example, this is the case if the certificate is created for a structure course element and output values are to be retrieved from a test course element. If the certificate is created directly for the test course element for which the user values should be displayed, %%OUTCOME:[variable name]%% will be sufficient as specification. |
%%SEMESTER%% | Semester |
%%USERNAME%% | First and last name of the person receiving the certificate for their performance results. |