Security groups
Open rights management
To open the rights management, proceed as follows:
1 | Open the course. |
|
2 | Use the upper function menu to switch to the rights management of the course. |
Create new security group
To create a security group, proceed as follows:
1 | Open the course and use the upper function menu to switch to the rights management of the course. |
|
2 | Select the New security group function from the rights management toolbox. |
|
3 | Assign a name for the new security group. You can choose any name. All special characters and numbers are allowed. The group's name will appear in the overview of the security group and the security group area in the course navigation. |
|
4 | Optionally, you can also enter a detailed description for the security group. This description will be displayed on the summary page when you have opened the security group. | |
5 | Save your entries with Finish. |
Manage the members of a security group
Add or remove users to/from a security group as follows:
1 | Open the course and select the rights management entry from the navigation. Click here directly on the name of the security group you wish to edit. |
|
2 | Then switch to the Members tab. |
|
3 | Here you can determine whether the security group members should be able to see all or no other members. | |
4 | You can use the Import user list or Add participant button to add more members to the security group. Security group members do not have the right to administer this security group. If the Get consent for membership from users option has been activated for this group, added users will directly be assigned to the Invited list. As soon as they accept the invitation to join the group, they will automatically be moved to the Member list. |
Manage the rights of a security group
1 | Open the course and select the rights management entry from the navigation. Click here directly on the name of the security group you wish to edit. |
|
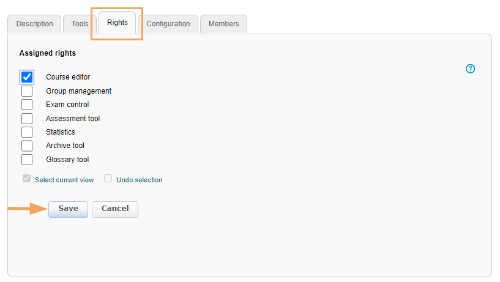
2 | Switch to the Rights tab. Here you can assign the right to access and use the following course tools:
|
|
Configure group tools
The following group tools are available for security groups:
Tool types
The following tools are available for groups:
| Information | In this area, content created by the tutor is displayed. |
| The calendar can be used to jointly schedule appointments. If the Visible to everyone in the course option is activated, group appointments can also be displayed in the course calendar. | |
| Depending on the settings configured by the tutor, learners can download, upload, and create files in this group tool. | |
| Via the email form, group participants can communicate with other participants as well as with their tutors. When communicating with several recipients, you can use the placeholders $firstname and $lastname in the subject or message to address an individual user. The possible total size of the attachment and the remaining storage space are also displayed in the form. | |
| In the forum, participants can exchange information, discuss important matters, and address questions to the tutors. | |
| With a wiki, articles and content can be easily created and collaboratively edited with other users. | |
| A blog is an electronic diary whose individual entries are displayed in chronological order, starting with the most current one. Entries may contain information, images and videos. Using the blog group tool, you can integrate a shared blog into a group. Depending on the tutor's settings, learners will have the right to read, write or moderate in the group blog. | |
| You can add your own posts (artefacts) to the collaborative folder. |
Add or remove group tools
To add tools to your group or to remove them, proceed as follows:
1 | Open the group in the editing mode. |
|
2 | In the section Group-Tools, you can see all available tool types. |
|
3 | To add a new tool, select the checkbox in front of the desired tool. Configure additional settings for individual tools. | |
4 | To remove an existing tool, click on an already selected checkbox. The checkmark will then be removed. | |
5 | Confirm your settings with Save at the bottom of the page. |
Edit security group
1 | Open the course and select the rights management entry from the navigation. Click here directly on the name of the security group you wish to edit. |
|
2 | The group overview of this group will open in the middle of the page. Click on Edit to switch to the edit view of this group. | |
3 | Make the desired changes in each area. What you can do in the individual tabs:
|
|
Notes on available functions per course tool
Course tool | Notes |
|---|---|
Course editor | The right to access the course editor includes all functions within the editor, but not the option to copy the course or configure further course settings. |


