Blog

Last modified by Carina Enke on 15.02.2024


KB_Blog.png  A Blog is an electronic diary, whose individual entries are displayed in chronological order, with the newest entry at the top. Entries may include information, images, and videos. New entries or changes to the blog can usually be subscribed to via RSS feed.

The course element Blog allows the integration of a learning resource Blog or external blog content into a course.


Usage: Learners' View

Overview

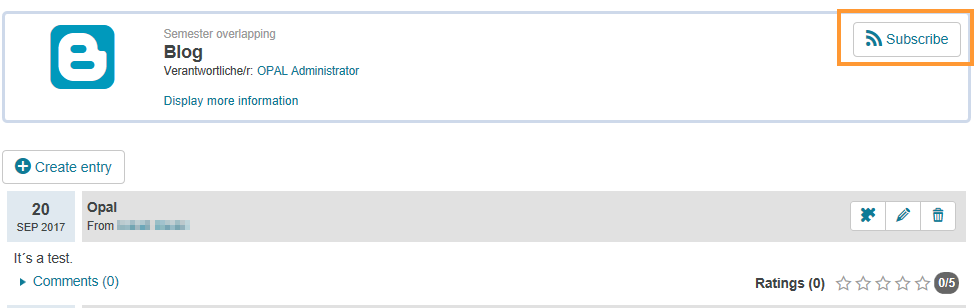
When you open a blog, you will see chronologically sorted individual text entries, and you can also display older entries if necessary.

Kursrun-Übersicht Blogbeispiel_de.png

Functions for users

As a user, you can use the following functions in a course element of the type Blog:

Icon_RSS abonnieren_en.png

Subscribe to blog

Users with access to the blog can copy an RSS link to the blog and paste it into their RSS reader.

How to do that?

To copy the RSS link, proceed as follows:
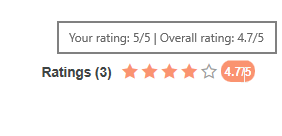
  1. Open the relevant course and then the course element Blog.
  2. Click on Subscribe in the upper right corner. The link will now automatically be copied to your clipboard and can be pasted into a feed reader by pressing Ctrl+V. Further general information can be found here: RSS feed.

Kursbaustein Blog-Blog abonnieren_en.png


Rate and comment on posts

In the course element Blog, you can view various posts, with the newest posts at the top. Individual blog posts can be rated and commented on.

How to do that?

Rate post 

Rate posts via the stars at the right edge of each post.

To perform a rating, click on the number of stars you want to assign. You can change your rating at any time by repeating it.

Beitrag bewerten_en.png

The current status of the rating is represented by both the coloured stars and the numbers in the circle.

In addition, you will be shown a note indicating whether you have already given a rating for this post before.

The status of the rating is colour-coded:

  • If you have not yet submitted a rating, the circle around the number of ratings is grey.
  • When a rating is submitted, the colour of the circle changes to orange.

If you hover the mouse pointer over the number, your personal rating and the overall rating will be displayed.

You can only rate the posts of other users, not your own. The rating is anonymous.

Beitrag noch nicht bewertet_en.png

Beitrag bewertet_en.png

Comment on post

You can also leave comments on each post. The comment function and the number of previously written comments can be found below each blog post.

  • You can write comments or reply to other users' comments.
  • You can edit or delete your own comments at any time.
  • The course supervisor can edit or delete all users' comments.

Beitrag kommentieren.png

You can be assigned extended rights by a course supervisor. These rights will make additional functions, such as creating and editing posts, available to you. For more information about these functions, refer to the section Functions in the course view.

Configuration: Authors' View

Functions in the course editor

The following functions are available in the course editor:

Add a course element blog

Click to open instructions on how to insert a course element ...

To integrate a course element into your course, proceed as follows:

1

Open the course you want to edit.

Use the pencil icon at the top of the page to open the editing mode.

Kurs-zum Editor wechseln_en.png

2

Select a course element from the menu on the right.

Kurseditor-KB auswählen_en.png

3

In the new window, you can define the position of the new course element within your course structure (left navigation pane). The available positions are marked with an insert icon.

To insert the new course element into an existing substructure, you need to open the substructure by clicking on the small triangle symbol next to its title. The area will open and you will again see insert icons at the positions which are available.

Click on the insert icon at the desired position within the structure. The selected area will be highlighted.

Confirm your choice with Insert course element.

Kurseditor-KB in tree einfügen_en.png

4

The element will be inserted into the course structure at the selected position.

Depending on the course element, you have to make additional configurations or add content in order to complete the configuration.

For these changes to take effect, you must publish the course. The course element will then also become available in the course view.

Kurseditor-KB konfigurieren_en.png


You already have an RSS feed of an external blog (from another website) that you wish to make available in the learning platform? For more information on how to do that, refer to the section Add external blog.

General configuration settings

In the course editor, you can find the following configuration tabs:
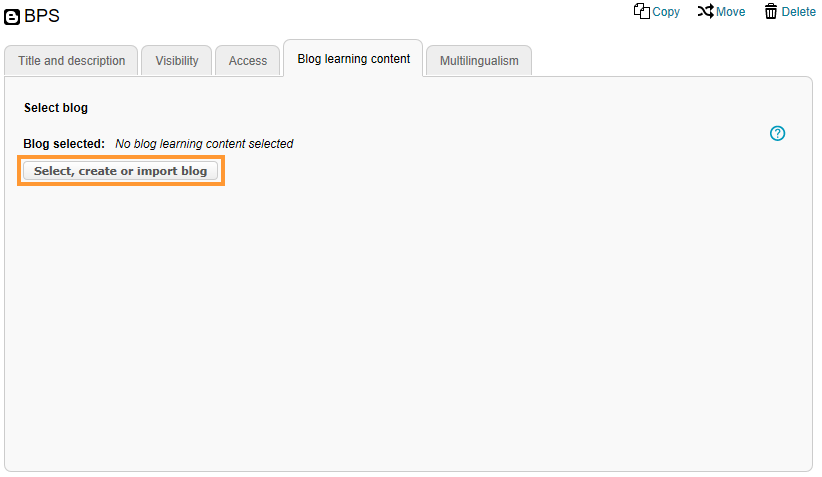
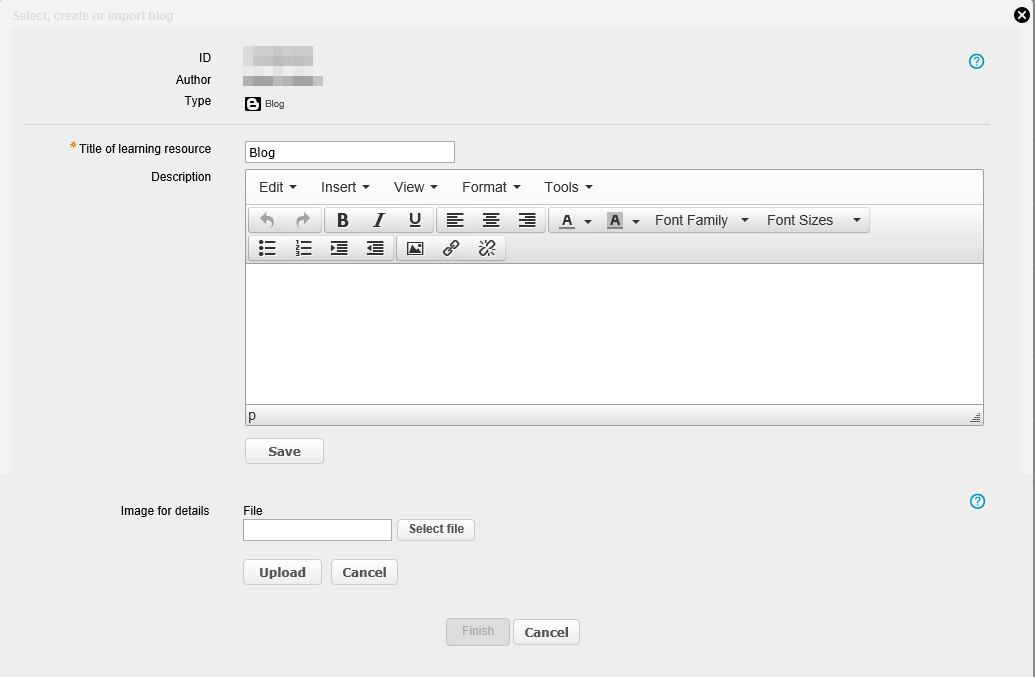
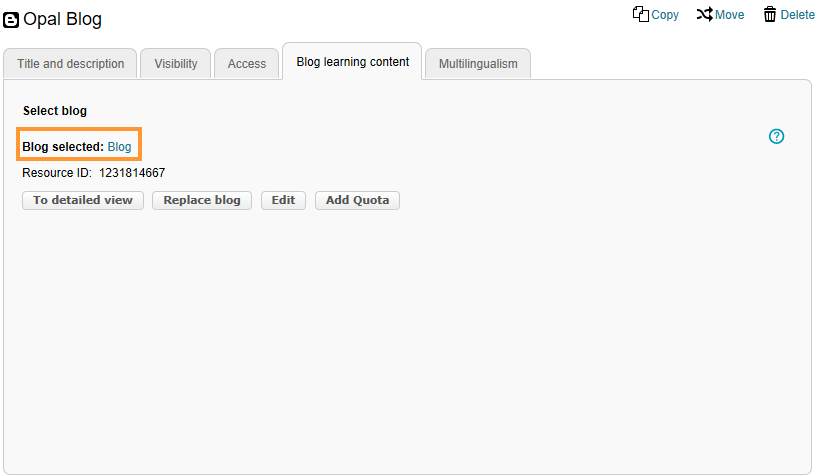
Title and description

Configuration options in the tab title and description ...

Kurseditor - Tab Titel und Beschreibung_en.png

Elements

Description

Title

You need to enter a title for the course element. The title can comprise a maximum of 100 characters. All special characters and numbers are permitted. The title will appear in the navigation menu of the course and also as a heading in the content area.

Changes to the title of the first course element, the so-called main course node ...
 If you change the title of the first course element, the new content will only be applied to the main course node and then displayed in the opened course. If you wish to edit the course title or description, you can do so using the more settings menu of the course.

Subtitle

You can enter a subtitle for the course element with a maximum of 255 characters. All special characters and numbers are permitted. The title will appear as a tooltip in the navigation menu and - if selected and configured accordingly - as a subtitle in the content area.

Description

Here you can describe the course element. The description will appear in the content area below the title.

Depending on the settings configured in the element Display, this additional text is displayed to the user when opening the course element. The user can expand or collapse the view of the text.


Display

Define which information about the course element should be displayed in the course view. In addition to the content, you can optionally display the title and description. All course elements are provided with a reasonable presetting, which mostly includes the setting Title, description and content. You can adjust this setting in accordance with the options available for each course element.

Set link for this course element

Each course element can be accessed via fixed link addresses. Therefore, an internal and an external URL is assigned to each course element. These direct links to concrete elements can be used within courses or provided to learners. The URLs are located below the title and description of the element and will appear upon selecting Set link for this course element.  

  • External link: To refer to this course element from outside of the course or learning platform, you can use the external link and insert it, for example as a href attribute, into the desired HTML page.
  • Internal link: To set a link to another course element within the same course, you can insert the internal link as a href attribute into the desired HTML page.

ID

You will need the ID number of the course element (on the bottom right), for example, if you wish to use the expert mode in the visibility or access tab.

VisibilityIf necessary, restrict the visibility of the course element here. For more information, see the Visibility help page.
Access If necessary, restrict the visibility of the course element here. For more information, see the Access help page.

Blog learning content

In this tab, you can select, create, and import resources. Detailed instructions are given in the following section Special configuration settings.

Multilingualism

In this tab, different translations can be added to individual course element areas.

Special configuration settings

In the tab Blog learning content, you can assign a blog resource to your course element. Choose one of the three options:

  • use an existing learning resource Blog (option 1),

  • create and use a new learning resource Blog (option 2), or
  • import a new learning resource Blog (option 3).

    Start the configuration for all three variants as follows ...

    1.

    Switch to the tab Blog learning content in the course editor and click on Select, create or import blog.

    Kursbaustein Blog-Blog hinzufügen_en.png

    2.

    A page with functions to create or import new blog resources and a list of your blog resources that are already stored in the system will open. Decide on one of the following options:

    Kursbaustein Blog- drei Hinzufügen Varianten_en.png

    3a.

    (Option 1:) To use an existing learning resource Blog, select the desired resource by clicking on the Icon_Hinzufügen schwarz.pngplus icon.

    Kurseditor-Blog Ressource-einbinden_en.png

    3b.

    (Option 2:) To create and use a new learning resource Blog, click on Create. A page for creating a new learning resource opens.

    Expand further steps ...
    • Enter a title for the new resource and add a description if necessary.
    • Click on Save.
    • As a next step, you can add an image to the resource using Upload.
    • Click on Finish to complete the creation process.

    The newly created resource will now automatically be used as a resource for the blog course element and displayed under Blog selected.

    Kurseditor-Blog Ressource erstellen_en.png

    3c.

    (Option 3:) To import a new learning resource Blog, click on Import. The default upload page of the system opens.

    Expand further steps ...

    Select a location for the file you wish to import and upload the file.

    • The page for creating a new learning resource opens.
    • Enter a title for the imported resource and add a description if necessary.
    • Click on Save.
    • As a next step, you can add an image to the resource using Upload.
    • Click on Finish to complete the creation process.

    The newly imported resource will now automatically be used as a resource for the blog course element and displayed under Blog selected.

    Kurseditor-Blog Ressource importieren_en.png

    4.

    The selected resource will now automatically be used as a resource for the blog course element and displayed under Blog selected.

    Kursbaustein Blog_gewählter Blog_en.png

    5.

    Publish your course to complete the configuration and to make the resource available to participants.


You can replace the blog resource at any time.

Functions after adding a blog resource

Once a blog resource has been added, you have the following options ...

To detailed view

Use this button to switch to the detailed view of the added blog resource. Among other things, you will find information on the supervisors and access rights in this area. For further information, please refer to the section Functions of the detailed .

Kursbaustein Blog-Optionen nach hinzufügen_en.png

Replace blog

Click the button to replace the added blog resource with another blog resource. The settings window for the blog will appear. Switch again to the tab Blog learning content. Choose one of the three options to add a new blog resource.

Edit

Click this button to get an overview of all existing blog entries. You can then create new entries, edit existing entries, and delete entries.  

If you click the Edit button, the edit view will still open in the old interface.

All of these functions can also be used in the course view of the course element or in the individual resource view of the blog resource.

Add quota

This function is only visible to users with extended rights. It can be used to change the storage space size of the blog resource.

Add external blog

If you already have an RSS feed of an external blog (from another website) that you wish to make available in the learning platform, proceed as follows:  

Expand for more information ...

A URL to a blog outside of the system (external blog) can only be added to a blog resource that does not yet contain any entries.

  1. Select the Edit button in the tab Blog learning content.

  2. In the editing mode of the blog, click on Include an external blog already existing.

  3. Enter a titledescription, and URL in the appropriate fields.
  4. Confirm your settings with Save.


A learning resource of the type Blog is not an independent learning resource, i.e. it must be integrated into a course element blog. Further information on independent learning resources as well as tutorials on their creation and management are provided in the section Learning resources.

Functions in the course view

In the course view of a blog, you have access to all functions available to users, as well as to the following editing options:
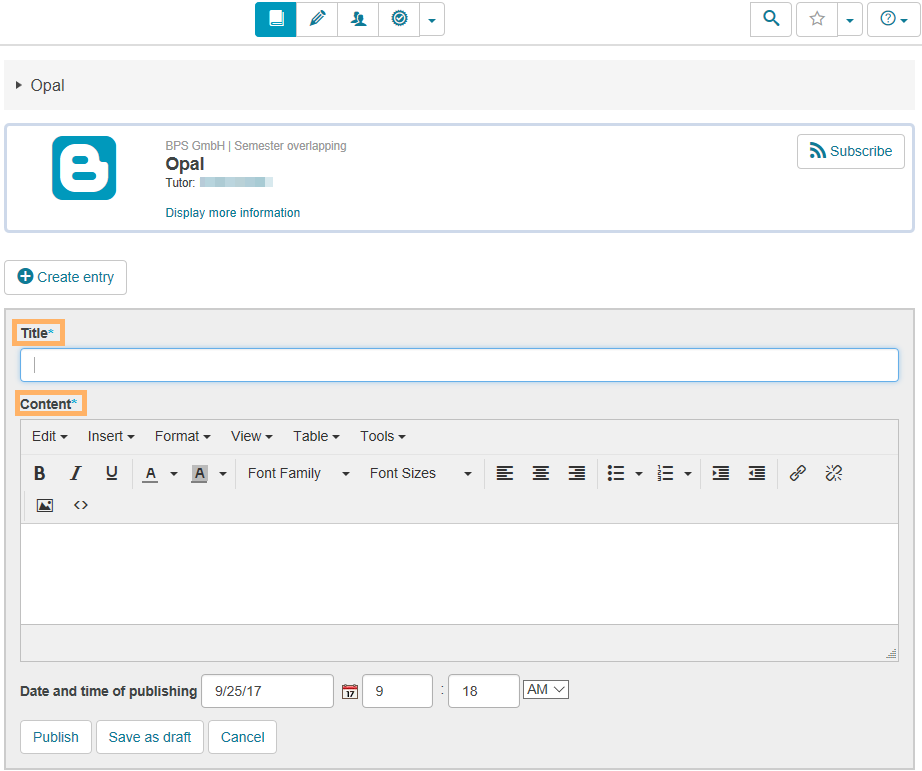
Icon_Eintrag erstellen_en.png

Create blog entry


To create a blog entry, proceed as follows ...

1

Open the course element Blog.

Click on the button Create entry.

The function to subscribe to a blog is only available in the course context.

Kurseditor Blog Ansicht Eintrag erstellen_en.png

2

Enter a title for the entry and add the desired content. You can also use the formatting options in the editor.

Kurseditor Blog Ansicht Eintrag erstellen2_en.png

3

To finish off your content, you have several options:

Save as draft: Select this button if the post is not yet finished. A post saved as a draft is only visible to the creator. In the post overview, it is greyed out. You can edit, publish, or delete your post at any time.

Publish: Once your post is finished, it can be published. You can flexibly control the time at which the post will be visible to users. 

  • Publish immediately: Select the button Publish. The post is automatically published, and you do not need to make any changes to the date field.
  • Publish later: Select Date and time of publishing and adjust both fields accordingly. Then click on Publish.

Kurseditor Blog Entwurf oder Veröffentlichen_en.png

4

You can recognise the status of an entry by various icons and notes.

  • Grey: Draft, text note above the content
  • Blue: Published post, visible to all users who can open the blog
  • Green: Publication planned, text note and time above the post content

Kurseditor Blog Farben_en.png


View of the old user interface

If you have created a blog entry with a picture in the new user interface and then open it in the old user interface, the post appears empty and the picture is not visible. However, the content of the post will become visible when clicking on the link "Read More".

Why is this? ...
In the old user interface, there were two different text fields, i.e. Description and Contentwhen creating a new blog entry. In the new user interface, in contrast, there is only the content field. This field is equivalent to the content field of the old user interface. If you create a post in the new user interface, both text and picture are thus referenced in the content field. This field, however, will only become visible in the old user interface if you click the button "Read More".


Icon_Bearbeiten.png

Edit blog entry


To edit a blog entry, proceed as follows ...
  1. Open the course element Blog.
  2. Select the post you want to edit and click the pencil icon.
  3. The editing mode opens.
  4. Make your desired changes. You can also use the formatting options in the editor.
  5. Confirm with Publish or Save as draft.

Save as draft: Select this button if the post is not yet finished. A post saved as a draft is only visible to the creator. In the post overview, it is greyed out. You can edit, publish, or delete your post at any time.

Publish: Once your post is finished, it can be published. You can flexibly control the time at which the post will be visible to users.

  • Publish immediately: Select the button Publish. The post is automatically published, and you do not need to make any changes to the date field.
  • Publish later: Select Date and time of publishing and adjust both fields accordingly. Then click on Publish.

Kurseditor Blog Eintrag bearbeiten_en.png


Icon_Löschen.png

Delete blog entry


To delete a blog entry, proceed as follows ...
  1. Open the course element Blog.
  2. Select the entry you want to delete and click the Delete icon.
  3. Confirm the dialogue box with OK.

Kurseditor-Blog Eintrag löschen_en.png


Add external blog

If you already have an RSS feed of a blog (from another website), you can reference this feed in the system. Open the course view of a new blog which does not contain any entries. Select the button Add blog. Enter the URL of the feed in the field Feed URL and confirm your settings with Save. The external blog will then be available in the system.


As a course supervisor, you can assign extended rights for a course element's additional editing functions to individual or even all course users. These rights can be configured in the tab Access. Further information can be found in the section General configuration settings on this page.