|
Click to open instructions on how to add a course element ...
To integrate a course element into your course, proceed as follows: | Open the course you want to edit. Use the pencil icon at the top of the page to open the editing mode. | | | Select the course element you require by clicking on it from the list of available course elements in the menu on the right-hand side. | | | In the dialog box, you can define the position of the new course element within your course structure (left navigation pane). The available positions are marked with an insert icon. To insert the new course element into an existing sub-structure, you must first open it by clicking on the small triangle icon next to the structure's title. The area will open, and you will again see insert icons at the available positions. Click on the insert icon at the desired position within the structure. The selected area will be highlighted. Confirm your choice with Insert course element. | | | The element will be inserted into the course structure at the selected position. Depending on the course element, you have to make additional configurations or add content in order to complete the configuration. For these changes to take effect, you must publish the course. The course element will then also become available in the course view. | |
|
|---|
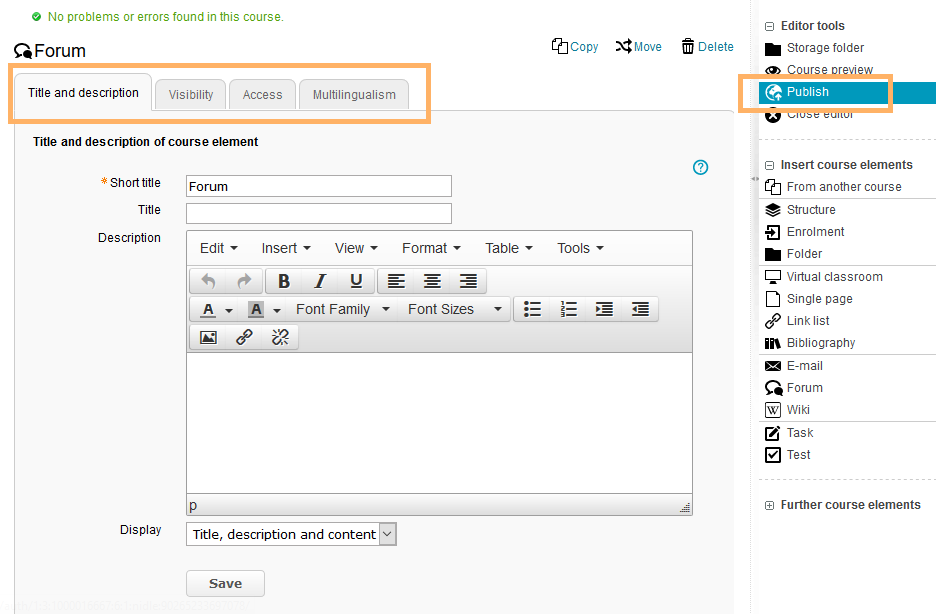
| In the course editor, you will find the following configuration tabs: |
Configuration options in the tab title and description ...
| |
|---|
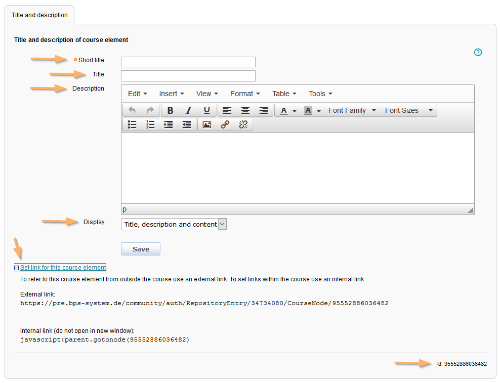
| You need to enter a title for the course element. The title can comprise a maximum of 100 characters. All special characters and numbers are permitted. The title will appear in the navigation menu of the course and also as a heading in the content area.
Changes to the title of the first course element, the so-called main course node ...
If you change the title of the first course element, the new content will only be applied to the main course node and then displayed in the opened course. If you wish to edit the course title or description, you can do so using the more settings menu of the course. | | You can enter a subtitle for the course element with a maximum of 255 characters. All special characters and numbers are permitted. The title will appear as a tooltip in the navigation menu and - if selected and configured accordingly - as a subtitle in the content area. | | Here you can describe the course element. The description will appear in the content area below the title. InformationDepending on the settings configured in the element Display, this additional text is displayed to the user when opening the course element. The user can expand or collapse the view of the text. | | Define which information about the course element should be displayed in the course view. In addition to the content, you can optionally display the title and description. All course elements are provided with a reasonable presetting, which mostly includes the setting Title, description and content. You can adjust this setting in accordance with the options available for each course element. | Set link for this course element | Each course element can be accessed via fixed links. Therefore, an internal and an external URL is assigned to each course element. You can use these direct links to specific elements within courses or, share them with learners. These direct links to concrete elements can be used within courses or provided to learners. The URLs are located below the title and description of the element and will appear upon selecting Set link for this course element. - External link: To refer to this course element from outside of the course or learning platform, you can use the external link and insert it, for example as a href attribute, into the desired HTML page.
- Internal link: To set a link to another course element within the same course, you can insert the internal link as a href attribute into the desired HTML page.
| | You will need the ID number of the course element (on the bottom right), for example, if you wish to use the expert mode in the visibility or access tab. |
|
|---|
| Visibility | If necessary, restrict the visibility of the course element here. For more information, see the Visibility help page. |
|---|
| Access | If necessary, restrict the visibility of the course element here. For more information, see the Access help page. |
|---|
| In this tab, you have the opportunity to decide on the presentation of the course element. Detailed instructions are given in the following section Configuration. |
|---|
| The structure element is an assessable course element. Scores, marks, and passed statuses from other course elements can be collected and displayed in an assessment summary. Detailed information can be found in the section Assessment |
|---|
| In this tab, different translations can be added to individual course element areas. |
|---|
|
|---|
| Open the course editor and go to the tab Configuration of a structure element. Now you can configure the following presentation settings: | If you prefer an automatic summary of the selected elements, you have the following options: - Automatic overview: The first ten child elements are displayed, including their title, subtitle, and description (if present).
- Automatic overview and preview: Up to ten child course elements are displayed, including their title, subtitle, and description (if present), as well as a preview of the content. This setting option also allows you to choose from a list of available elements. All you need to do is enable the checkboxes in front of the desired elements.
InformationBoth settings ignore the display configuration in the tab Title and description of the course element. This setting is applied only when opening a single element. - Display in two columns: In the case of more than five elements, we recommend a two column overview. Just activate the corresponding checkbox.
Confirm your entries with Save. | |
| | You have the following options to embed an HTML page as a summary page in the course element. - Create HTML page (option 1)
- Select HTML page (option 2)
- Upload HTML page (option 3)
Start the configuration for all three variants as follows:
- Activate the checkbox Your HTML page and click on Save.
| | 2. Then click on Select or create page. | | 3. A window with functions for creating, selecting, or uploading an HTML page opens. Decide on one of the following options: | | Create HTML page (option 1) - Enter the name of the new file in the appropriate text field and optionally select a different character set.
- The editor window for creating a new HTML page opens. For further information about formatting options, click here.
- Click on Save to complete the creation process.
| | Select HTML page (option 2) - Click on the button Select page.
- Select the desired file by clicking on its name.
- Confirm your selection with Select.
| | Upload HTML page (option 3) - Click on the button Select file.
- Select a file from your computer.
- Then click on Upload.
| | The HTML page will now be displayed in the tab Configuration under Selected Page.
| |
After adding an HTML page, you have the following options:
Open or replace page in the editor ...
Open page in editor: - Click on this button to make changes to your HTML page.
Replace page: - Click on this button to create, select, or upload a new HTML page. Follow the steps outlined above.
| |
Additional settings for the selected page ...
Display settings: Determine the height of the HTML page's visible area. If you would like the height of the visible area to be determined automatically, then select the first option. Otherwise, select the second option Define height manually and enter the desired height in pixels (min. 300 pixels). Click on Save to confirm your entries and publish the course. If the page is longer than the configured visible area, scroll bars will appear in the right margin of the page. | |
| | This option allows you to embed an external HTML page as a summary page in the course element Structure.
How to do that?
- Activate the checkbox External HTML page and click on Save.
| | 2. Now enter the URL in the appropriate text field. 3. If the page is password protected, you also have the option to enter the password and user name. Your information will not be displayed to the user in the learning platform. However, it will be automatically transmitted when the external page is accessed. 4. If necessary, configure the height of the external page's visible area under Display settings. If you would like the height of the visible area to be determined automatically, then select the first option. Otherwise, select the second option Define height manually and enter the desired height in pixels (min. 300 pixels). If the page is longer than the configured visible area, scroll bars will appear in the right margin of the page. 5. Confirm your entries with Save. | |
|
|
|---|
| In the course element Structure, as in the main course node, you can collect assessment information of other course elements, resulting in an overall assessment. Select the desired assessment category (score, mark, passing score) in the tab Assessment as well as the course elements that are to be included in the overall assessment of the structure element. Further information is provided in the chapter Teaching>Assessment. | |
|
|---|


 The course element Structure facilitates a clear course design through the thematic grouping of content.