Virtual Classroom

Last modified by Carina Enke on 17.01.2024

KB_Virtuelles Klassenzimmer.png  The course element Virtual Classroom allows the author to conduct online conferences and webinars in the course. Using such a classroom, authors can communicate online with the participants of their courses. They can, for example, share documents and their screen with them. Online meetings can also be recorded and made available to the participants.

There are various systems that can be integrated in a virtual classroom (e. g. Adobe Connect).


Usage: Learners' View

Overview

The course elemen Virtual Classroom gives you the opportunity to attend online conferences and webinars. Depending on the settings of the course author, you will also be able to access older online meetings.

Kursrun - Überblick_en.png

Functions for users

As a user, you can enter a virtual classroom to take part in a meeting. Depending on the configuration, different conference systems will be available.

Enter virtual classroom

The classroom can be entered as soon as it has been opened in the course element Virtual Classroom.

How to do that?
  1. Open the course element Virtual Classroom.
  2. Click on Enter virtual classroom.

    The classroom will open in a new tab. Please make sure that your browser allows pop-ups.

Kursrun - Schaltfläche Raum betreten_en.png

Functions in Adobe Connect

Please find below a brief overview of the most important buttons/functions in Adobe Connect.

Click to expand for more information about Adobe Connect ...
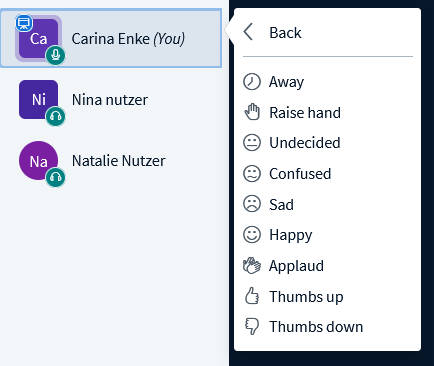
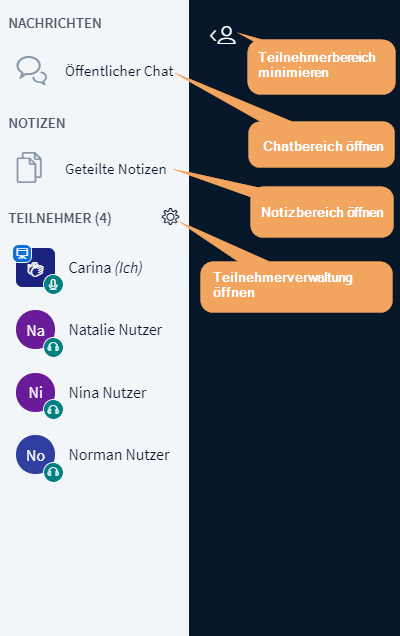
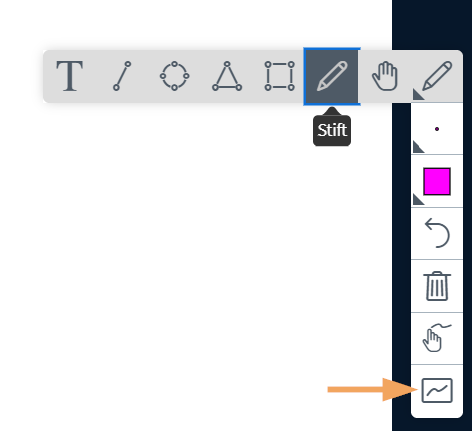
icon_Meeting_Adobe_de.png

Meeting

Click on this button to configure general settings for the current meeting. For example, you can manage access and admission, record the meeting, or end the meeting.

icon_Layout_Adobe_de.png

Layouts

Here you can specify various layout settings. Click on this button if you, for example, wish to create a new layout or manage or reset existing layouts.

icon_Pods_Adobe_de.png

Pods

This button allows you to manage existing pods and, if necessary, place them on the screen. Click on it to get an overview of all existing pods.

icon_Audioeinstellungen_Adobe_de.png

Audio settings

Click on this button to configure general audio settings. For example, you can decide about the microphone permissions of the participants or  enable the single speaker mode.

icon_Lautsprecher_Adobe_de.png

Speakers

Click on the speaker icon to  unmute the speakers . If successful, the icon turns green. Using the expand icon, you can also  adjust the speaker volume.

icon_Audio_Adobe_de.png

Audio

Click on the audio icon to connect your audio. If successful, the icon turns green. You can also use the expand icon to select a microphone.

icon_Webcam_Adobe_de.png

Webcam

Click on the webcam icon to enable your private webcam. If successful, the icon turns green. The expand icon takes you to further webcam settings.

icon_Status_Adobe_de.png

Set status

Here you have the option to  set a status. To do this, click on the expand icon and choose between statuses such as agree, disagree, and speak out. The status can be changed or deleted at any time.

icon_Bildschirm freigeben_Adobe_de.png

Share screen

This button allows you to share your screen with the other participants. You can also use the expand icon to choose between other options such as share document or share whiteboard.

Functions in BigBlueButton

Here you will find an overview of the most important buttons/functions in the BigBlueButton conference system.

Click to expand for more information about BigBlueButton ...

After the virtual classroom has been opened, BigBlueButton provides the following functions:

1

In the middle of the page is the presentation interface. On all sides of this interface, you will find all available functions and setting options (2-5).

BBB - Überblick zum Arbeitsbereich_en.png

2

At the top right, you can change basic settings or log out at the end of the session.

BBB - Optionen geöffnet_en.png

3

On the left, you will find the list of participants as well as access to chat options (public chat with all participants, private chat with individual participants). The list of participants can be extended or minimised using the appropriate icon Icon_BBB Teilnehmerliste.png.

Moderators can give participants additional rights.

BBB - Verfügbare Teilnehmerberechtigungen_en.png

Participants can show their current status and change it as they wish. The selected status will be displayed in the list of participants.

BBB - eigenen Status setzen_en.png

BBB - Übersicht Chatfunktionen_de.png

4

At the bottom of the page, you can start or stop audio and video functions, as well as upload and share files for presentation if you have presentation rights. To share your screen, use the last iconIcon_BBB - Bildschirm freigeben.png.

BBB - Aktionen_de.png

5

On the right, the presenter sees tools they may use to accompany their lecture. Depending on the tool you choose, further selections change accordingly. The last icon in the toolbar is for starting the multi-user mode. This mode allows participants to actively participate in the presentation and to add notes or markings themselves.

BBB - Werkzeugleiste.png

If you have moderation rights, additional functions will be available to you. For more information, refer to the last section on this page

Configuration: Authors' View

In the course editor

The following functions are available to you in the course editor:

Add a course element virtual classroom

Click to open instructions on how to add a course element ...

To integrate a course element into your course, proceed as follows:

1

Open the course you want to edit.

Use the pencil icon at the top of the page to open the editing mode.

Kurs-zum Editor wechseln_en.png

2

Select a course element from the menu on the right.

Kurseditor-KB auswählen_en.png

3

In the new window, you can define the position of the new course element within your course structure (left navigation pane). The available positions are marked with an insert icon.

To insert the new course element into an existing substructure, you need to open the substructure by clicking on the small triangle symbol next to its title. The area will open and you will again see insert icons at the positions which are available.

Click on the insert icon at the desired position within the structure. The selected area will be highlighted.

Confirm your choice with Insert course element.

Kurseditor-KB in tree einfügen_en.png

4

The element will be inserted into the course structure at the selected position.

Depending on the course element, you have to make additional configurations or add content in order to complete the configuration.

For these changes to take effect, you must publish the course. The course element will then also become available in the course view.

Kurseditor-KB konfigurieren_en.png


General configuration settings

In the course editor, you will find the following configuration tabs:

Title and description

Configuration options in the tab title and description ...

Kurseditor - Tab Titel und Beschreibung_en.png

Elements

Description

Title

You need to enter a title for the course element. The title can comprise a maximum of 100 characters. All special characters and numbers are permitted. The title will appear in the navigation menu of the course and also as a heading in the content area.

Changes to the title of the first course element, the so-called main course node ...
 If you change the title of the first course element, the new content will only be applied to the main course node and then displayed in the opened course. If you wish to edit the course title or description, you can do so using the more settings menu of the course.

Subtitle

You can enter a subtitle for the course element with a maximum of 255 characters. All special characters and numbers are permitted. The title will appear as a tooltip in the navigation menu and - if selected and configured accordingly - as a subtitle in the content area.

Description

Here you can describe the course element. The description will appear in the content area below the title.

Depending on the settings configured in the element Display, this additional text is displayed to the user when opening the course element. The user can expand or collapse the view of the text.


Display

Define which information about the course element should be displayed in the course view. In addition to the content, you can optionally display the title and description. All course elements are provided with a reasonable presetting, which mostly includes the setting Title, description and content. You can adjust this setting in accordance with the options available for each course element.

Set link for this course element

Each course element can be accessed via fixed link addresses. Therefore, an internal and an external URL is assigned to each course element. These direct links to concrete elements can be used within courses or provided to learners. The URLs are located below the title and description of the element and will appear upon selecting Set link for this course element.  

  • External link: To refer to this course element from outside of the course or learning platform, you can use the external link and insert it, for example as a href attribute, into the desired HTML page.
  • Internal link: To set a link to another course element within the same course, you can insert the internal link as a href attribute into the desired HTML page.

ID

You will need the ID number of the course element (on the bottom right), for example, if you wish to use the expert mode in the visibility or access tab.

VisibilityIf necessary, restrict the visibility of the course element here. For more information, see the Visibility help page.
Access If necessary, restrict the visibility of the course element here. For more information, see the Access help page.

Configuration

In this tab, you have the possibility to configure settings for access permissions and moderators of the course element.
Detailed instructions are given in the following section Special configuration settings.

Multilingualism

In this tab, different translations can be added to individual course element areas.

Special configuration settings

In the Configuration  tab of the course element Virtual Classroom, you have the following options:

Conference system Adobe Connect ...
Access permissions

Virtual classroom shall only be available at defined dates: Enable this checkbox to restrict access to the virtual classroom to defined dates. Enter a title and description as well as the start and duration of the meeting in the appropriate text fields. Using the plus symbol, you can add as many dates as you like. Confirm your entries with Save when you are done.

Kurseditor - Zutrittsberechtigungen_en.png

Settings for moderators
  • Add moderator:
    Click on this button to search the system for a specific user and add them as a moderator. Enter the last name, first name, and email address in the appropriate text fields and click on Search.
  • Import moderators:
    Click on this button to add multiple users to the group. A wizard opens to guide you through the process.
  • Moderator must be in classroom to grant access to users:
    If this option is enabled, participants can enter the classroom only if a moderator is already present. If the opposite is the case, users can enter the classroom at any time.
  • Only moderators are allowed to open this virtual classroom :
    This option determines whether the virtual classroom can only be opened by a moderator. If it is enabled, a closed classroom cannot be entered by a participant. Otherwise, the virtual classroom will be opened as soon as a participant enters it.

Kurseditor - Moderatoren_en.png

Conference system BigBlueButton ...
Template for virtual classroom

Choose between the templates: consultation, meeting and lecture. Depending on the selected template, a meaningful pre-assignment of the following advanced configuration settings is automatically made when you click Save.

Editor - Konfiguration BBB_en.png

Add moderator

Specify those users who should receive moderation rights in the classroom. Moderators can grant presentation rights to others within the classroom.

In the course view

The following options are available to you in the course view:
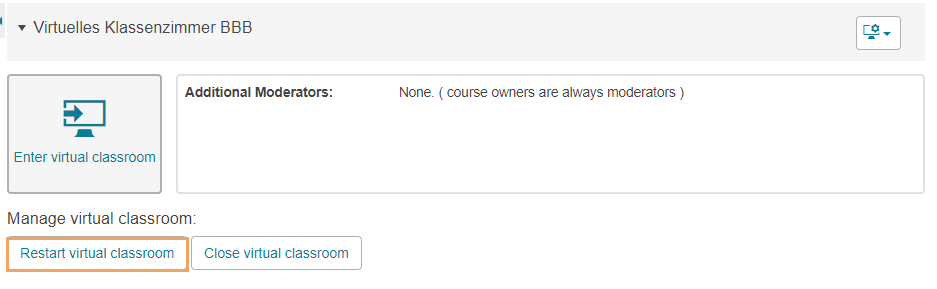
Open and enter the virtual classroom

This option allows you to open and enter a classroom to create an online meeting.

How to do that?
  1. Open the course element Virtual Classroom.
  2. Click on Open and enter the virtual classroom.

Kursrun - Schaltfläche Raum eröffnen und beitreten_en.png

Restart virtual classroom

This option allows you to restart the virtual classroom.

How to do that?
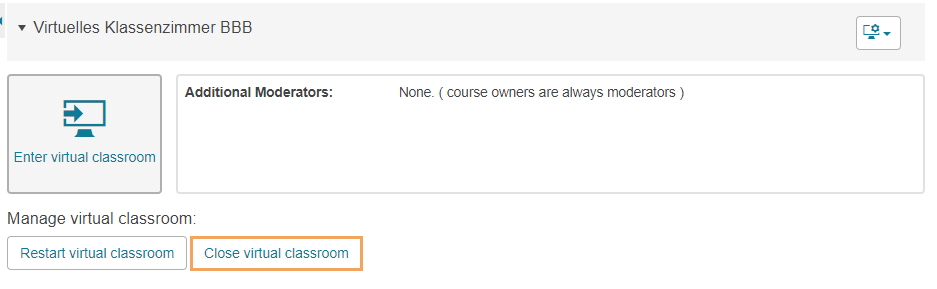
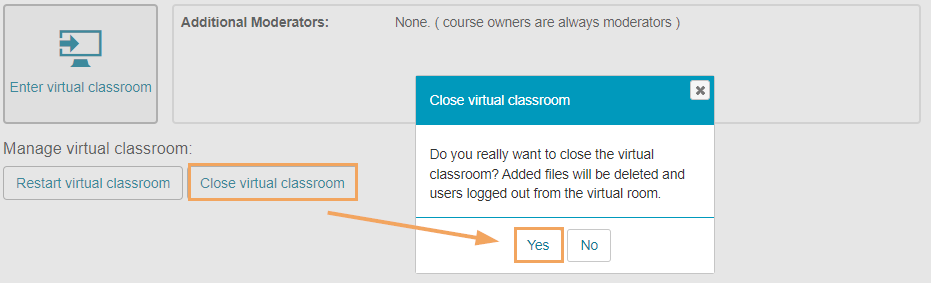
  1. Open the course element Virtual Classroom.
  2. Click on Restart virtual classroom.

Kursrun - Schaltfläche Raum neu starten_en.png

3. Confirm the restart with Yes.

Note that closing the virtual classroom will delete all added files, and users will be logged out automatically.

Kursrun - Neustart bestätigen_en.png

Close virtual classroom

Click on this button to close an open virtual classroom.

How to do that?
  1. Open the course element Virtual Classroom.
  2. Click on Close virtual classroom.

Kursrun - Schaltfläche Raum schließen_en.png

3. Confirm the process with Yes.

Note that closing the virtual classroom will delete all added files, and users will be logged out automatically.

Kursrun - Beenden bestätigen_en.png