Certificates
 In addition to the Performance results, certificate files can be generated for a course or individual course elements. The user can download these files as a PDF via a link in the performance results section of the course and print them out.
You can use various configuration options to influence the design of the certificate and limit the view or print.
Offer certificates
To generate a certificate automatically and display it to the learner, proceed as follows:
- Open the course editor and navigate to the desired course element. To receive a certificate for the entire course, go to the top course node.
- In the selected element, switch to the Assessment tab.
- Activate the Use certificates option.

- Choose the desired certificate template from the Template for certificates selection list. Apart from the example template, you can also use individually created templates. The latter will appear at the top of the selection list.
- If you activate the Display certificates only for tutors option, the PDF files of the certificates will only be accessible by tutors via the assessment tool. A simple user does not have access to this area and can thus not view, print, or download their certificate.
Use individual certificate templates
Individual course templates must be saved to the storage folder of the course and linked to the relevant course element. First open the course and switch to the course editor. Then select the Storage folder entry from the Editor tools menu. Choose one of the following options according to your certificate template:
- One or more certificate files with any name:
- First create a new folder with the exact title certificate_templates in the course storage folder.
- Copy all HTML templates as well as all images and CSS files referenced in these templates to the certificate_templates folder.
Close the storage folder.
- A single template with the mandatory file name certificatetemplate.html (all letters in lowercase):
- Upload the HTML file with this specific file name to the course storage folder or the assigned resource folder of the course.
- All images and CSS files referenced in the template must also be copied to the course storage folder / resource folder.
- Close the storage folder.
When configuring the course element in the Assessment tab, select exactly this template from the Template for certificates list.
Placeholder
When creating the certificate template, you can use different placeholders in the HTML file, depending on the configuration of the learning platform. These are then filled in the certificate of the respective user with the corresponding data of the course or user.
You can create and design such a certificate template with the integrated HTML editor e. g. directly in the course storage folder. If you create and upload a certificate template with an external editor, the system will warn you of possible information loss when trying to edit the template with the integrated editor.
Placeholder | Value | ||||||||||||||||||||||||||||||
|---|---|---|---|---|---|---|---|---|---|---|---|---|---|---|---|---|---|---|---|---|---|---|---|---|---|---|---|---|---|---|---|
%%COURSE_TITLE%% | Title of the course for which the certificate is issued. | ||||||||||||||||||||||||||||||
%%COURSENODE_TITLE%% | Title of the course element for which the certificate is issued. | ||||||||||||||||||||||||||||||
%%CERTIFICATE_DATE%%
| The date on which the performance results were achieved. The formatting of the placeholder depends on the language selected by the user. It can be adjusted with the following options:
| ||||||||||||||||||||||||||||||
%%GRADE%% | Display of grades as text | ||||||||||||||||||||||||||||||
%%GRADE:###:LANG=de%% | Display of the German grade for the specified course element | ||||||||||||||||||||||||||||||
%%GRADE:###:LANG=en%% | Display of the English grade for the specified course element | ||||||||||||||||||||||||||||||
%%MARK%% | Mark for the entire course | ||||||||||||||||||||||||||||||
%%MARK:###%% | Mark for the course element with the ID ### (the course element must be assessable) | ||||||||||||||||||||||||||||||
%%ROOT_NODE_SHORT_TITLE%% | Short title from the course root node | ||||||||||||||||||||||||||||||
%%ROOT_NODE_TITLE%% | Title from the course root node | ||||||||||||||||||||||||||||||
| %%METADATA:coursetype%% | Course metadata: Coursetype | ||||||||||||||||||||||||||||||
%%METADATA:moduleduration%% | Course metadata: Duration of the module | ||||||||||||||||||||||||||||||
%%METADATA:moduleects%% | Course metadata: ECTS | ||||||||||||||||||||||||||||||
%%METADATA:moduleexam%% | Course metadata: Exams | ||||||||||||||||||||||||||||||
%%METADATA:modulelevel%% | Course metadata: Level | ||||||||||||||||||||||||||||||
%%METADATA:modulelink%% | Course metadata: Link to the module | ||||||||||||||||||||||||||||||
%%METADATA:modulemethods%% | Course metadata: Teaching and learning methods | ||||||||||||||||||||||||||||||
%%METADATA:modulename%% | Course metadata: Name of the module | ||||||||||||||||||||||||||||||
%%METADATA:modulenumber%% | Course metadata: Module number | ||||||||||||||||||||||||||||||
%%METADATA:moduleresponsible%% | Course metadata: Person responsible for further education | ||||||||||||||||||||||||||||||
%%METADATA:moduleversion%% | Course metadata: Version | ||||||||||||||||||||||||||||||
%%METADATA:moduleworkloadpresence%% | Course metadata: Attendance time | ||||||||||||||||||||||||||||||
%%METADATA:moduleworkloadprivate%% | Course metadata: Private study time | ||||||||||||||||||||||||||||||
%%METADATA:moduleworkloadtotal%% | Course metadata: Total workload | ||||||||||||||||||||||||||||||
%%PASSED%% | Displays "Passed" in the certificate, depending on the configured user language at the time of passing. | ||||||||||||||||||||||||||||||
%%PROPERTY:birthDay%% | Date of birth with the following options:
| ||||||||||||||||||||||||||||||
%%PROPERTY:email%% | Email address | ||||||||||||||||||||||||||||||
%%PROPERTY:firstName%% | First name | ||||||||||||||||||||||||||||||
%%PROPERTY:institutionalName%% | Institution | ||||||||||||||||||||||||||||||
%%PROPERTY:institutionalUserIdentifier%% | Matriculation number (system-dependent metadata) | ||||||||||||||||||||||||||||||
%%PROPERTY:lastName%% | Last name | ||||||||||||||||||||||||||||||
%%PROPERTY:orgUnit%% | Organisation unit | ||||||||||||||||||||||||||||||
| %%PROPERTY:personalTitle%%% | Title (in the sense of academic degree) | ||||||||||||||||||||||||||||||
| %%PROPERTY:employeeType%% | User type | ||||||||||||||||||||||||||||||
%%SALUTATION:LANG=de%% | Salutation (German) | ||||||||||||||||||||||||||||||
%%SALUTATION:LANG=en%% | Salutation (English) | ||||||||||||||||||||||||||||||
%%SCORE%% | Score for the entire course | ||||||||||||||||||||||||||||||
%%SCORE:###%% | Score for the course element with the ID ### (the course must be assessable) | ||||||||||||||||||||||||||||||
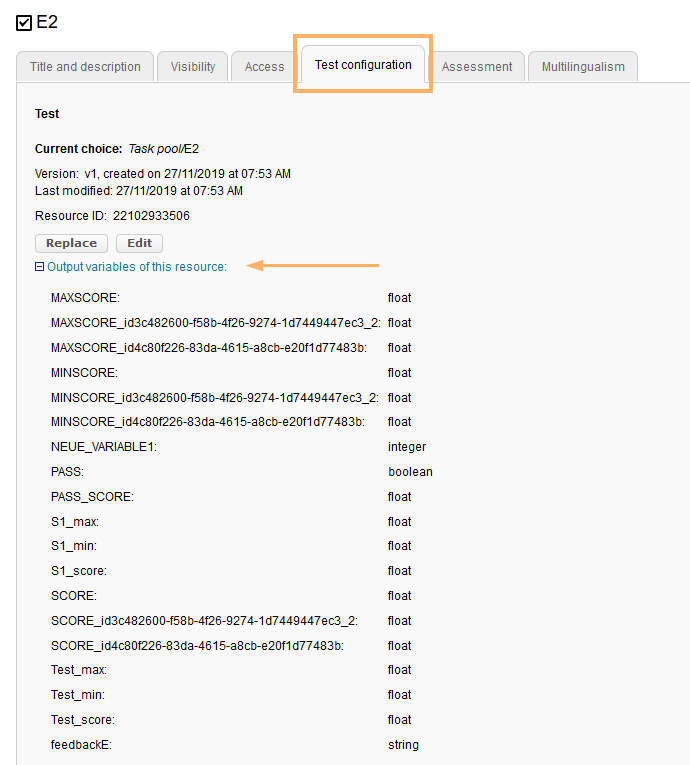
%%OUTCOME:[variable name]:###%% | Output value of an ONYX test Learn more about how to use this placeholder ...This placeholder can be used for all variables displayed in a test course element on the Test configuration tab>"Output variables of this resource" such as MAXSCORE, PASS_SCORE, SCORE, PASS, as well as for individual test and section variables of the type text or numerical.
If the certificate should contain output values from another course element, the course element ID must be specified in the placeholder. For example, this is the case if the certificate is created for a structure course element and output values are to be retrieved from a test course element. If the certificate is created directly for the test course element for which the user values should be displayed, %%OUTCOME:[variable name]%% will be sufficient as specification. | ||||||||||||||||||||||||||||||
%%SEMESTER%% | Semester | ||||||||||||||||||||||||||||||
%%USERNAME%% | First and last name of the person receiving the certificate for their performance results. |