Aus eigenen Kursen
![]() Die Anpassung und Konfiguration von Kursbausteinen können sehr individuell erfolgen. Haben Sie als Kursautor einen solchen Kursbaustein erstellt, können Sie ihn mit der Funktion Aus eigenen Kursen in einen anderen eigenen Kurs kopieren.
Die Anpassung und Konfiguration von Kursbausteinen können sehr individuell erfolgen. Haben Sie als Kursautor einen solchen Kursbaustein erstellt, können Sie ihn mit der Funktion Aus eigenen Kursen in einen anderen eigenen Kurs kopieren.
Inhalt
Verwandte Themen
Funktion "Aus eigenen Kursen" verwenden
Starten Sie die Funktion wie folgt:
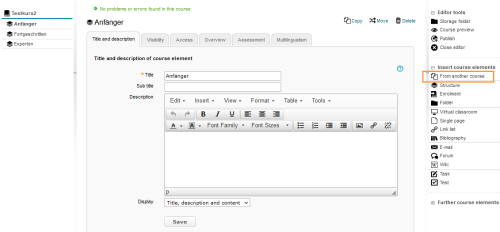
Starten Sie den Ziel-Kurs, in den Sie einen Kursbaustein eines anderen Kurses kopieren wollen, und öffnen Sie den Kurseditor.
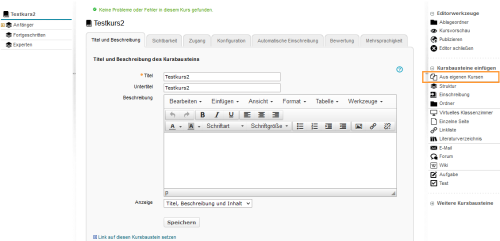
Klicken Sie auf den Eintrag Aus eigenen Kursen in der Kursbausteinliste.
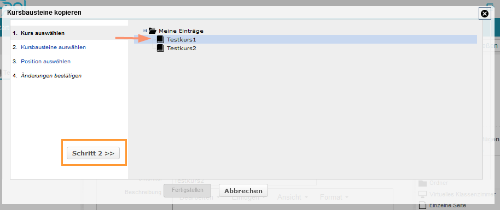
Die Funktion startet in einem eigenen Dialog. Wählen Sie hier zunächst durch Anklicken den Kurs, aus dem Sie Kurselemente kopieren möchten. Dieser wird nachfolgend als "Stamm-Kurs" bezeichnet. Klicken Sie nach der Auswahl auf den Button Schritt 2.
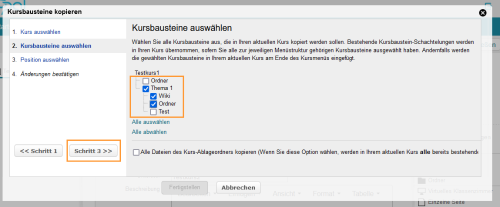
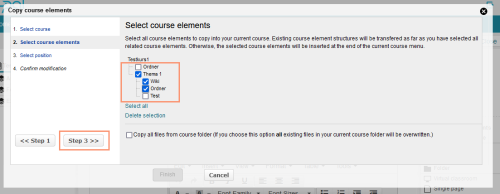
Wählen Sie nun alle Kursbausteine dieses Stamm-Kurses, die Sie in Ihren aktuellen Ziel-Kurs kopieren wollen.
Bestehende Kursbaustein-Strukturen des Stamm-Kurses werden übernommen, sofern Sie alle zur jeweiligen Struktur gehörenden Kurselemente ausgewählt haben. Andernfalls werden die gewählten Kursbausteine am Ende des Kursmenüs des Ziel-Kurses eingefügt. Klicken Sie anschließend auf den Button Schritt 3.
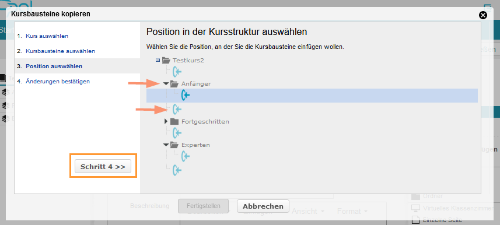
Markieren Sie im nächsten Schritt die Zielposition.
Um die gewählen Bausteine in eine bereits angelegte Struktur einzufügen, öffnen Sie die Struktur durch Klick auf das kleine Dreieck. Alle verfügbaren Zielpositionen werden duch ein entsprechendes Icon angezeigt.
Wenn Sie keine Auswahl treffen, werden die Bausteine an der letzten Stelle der Kursstruktur eingefügt.
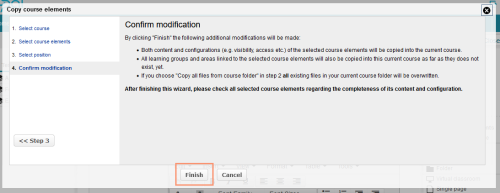
Klicken Sie anschließend auf den Button Schritt 4.
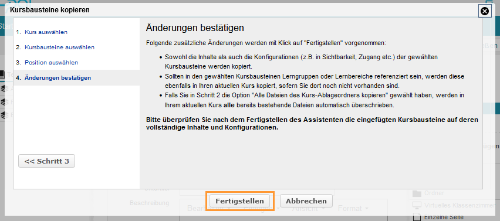
Hier sehen Sie eine Zusammenfassung der Änderungen, die an Ihrem Kurs vorgenommen werden. Mit Klick auf Fertigstellen wird die Funktion abgeschlossen und die gewählten Elemente erscheinen in Ihrem Kurs.
![]() The modification and configuration of course elements can be done very individually. If you (the course author) have created such a course element, you can copy it to another of your courses using the function From another course.
The modification and configuration of course elements can be done very individually. If you (the course author) have created such a course element, you can copy it to another of your courses using the function From another course.
Content
Related topics
How to use the "From another course" function
Run the function as follows:
Start the target course to which you wish to copy a course element of another course and open the course editor.
Select the entry From another course from the list of course elements.
The function will start in a separate dialogue. First select the course from which you wish to copy course elements by clicking on it. In the following, this course will be referred to as the “master course”. Then click on Step 2.

Now select all course elements from this master course that you wish to copy to your current target course.
Existing course element structures of the master course will be adopted, provided that you have picked all course elements from the respective structure. Otherwise, the selected course elements will be inserted at the end of the course menu of the target course. Click on Step 3 to continue.
If you mark this checkbox, this will have the following impact on the course folder of the current target course:
- files with the same file title will be overwritten,
- files with different file titles will be added,
- existing folders with the same name will be supplemented by the content of the new folder (within content, this procedure will also depend on the file title)
Folder of the selected master course contains: | Target course to which files will be copied contains: | After finishing the wizard and with an enabled checkbox, the folder of the target course will contain: |
|---|---|---|
Story1.doc |
| Story1.doc |
Story1.doc | Story1.doc | File will be overwritten, there will be only one Story1.doc file |
Story1.doc | Story2.doc | File will be added, there will be a Story1.doc and Story2.doc file |
Folder Images with the files Pyramid1.png and NileDelta1.jpg |
| Folder Images with the files Pyramid1.png and NileDelta1.jpg |
Folder Images with the files Pyramid1.png and NileDelta1.jpg | Folder Images with the file Pyramid1.png | The file Pyramid1.png will be overwritten, and the file NileDelta1.jpg will be added to the folder |
In the next step, mark the target position.
To insert the selected course elements into an already created structure, open the latter by clicking on the small triangle. All available target positions are indicated by a corresponding icon.
If you do not make a selection, the elements are inserted at the last position in the course structure.
Now click on the Step 4 button.

Here is a summary of the modifications that will be made to your course. Click on Finish to close the wizard. The selected elements will then appear in your course.