Email

Last modified by Carina Enke on 17.01.2024

kb_envelop-filled.png The email course element allows the integration of an email form into a course or group. By using this form, course participants can directly communicate with the author or recipients defined by the author. The subject and message can either be predefined or freely defined by the sender.

Usage: Learners' View

Overview

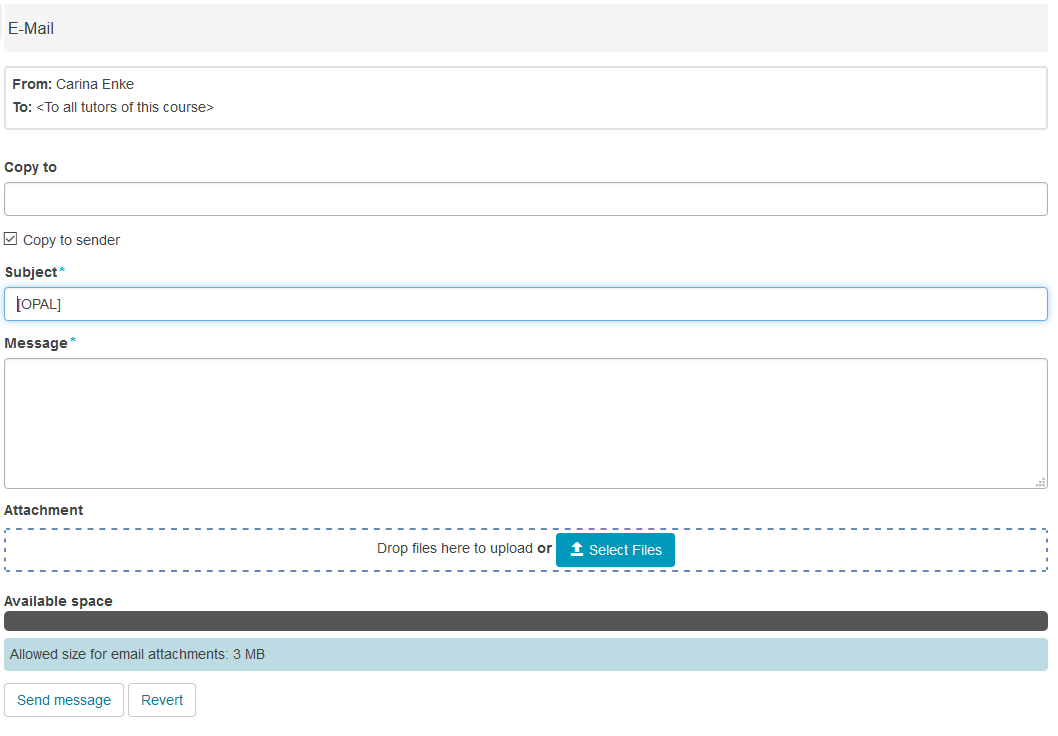
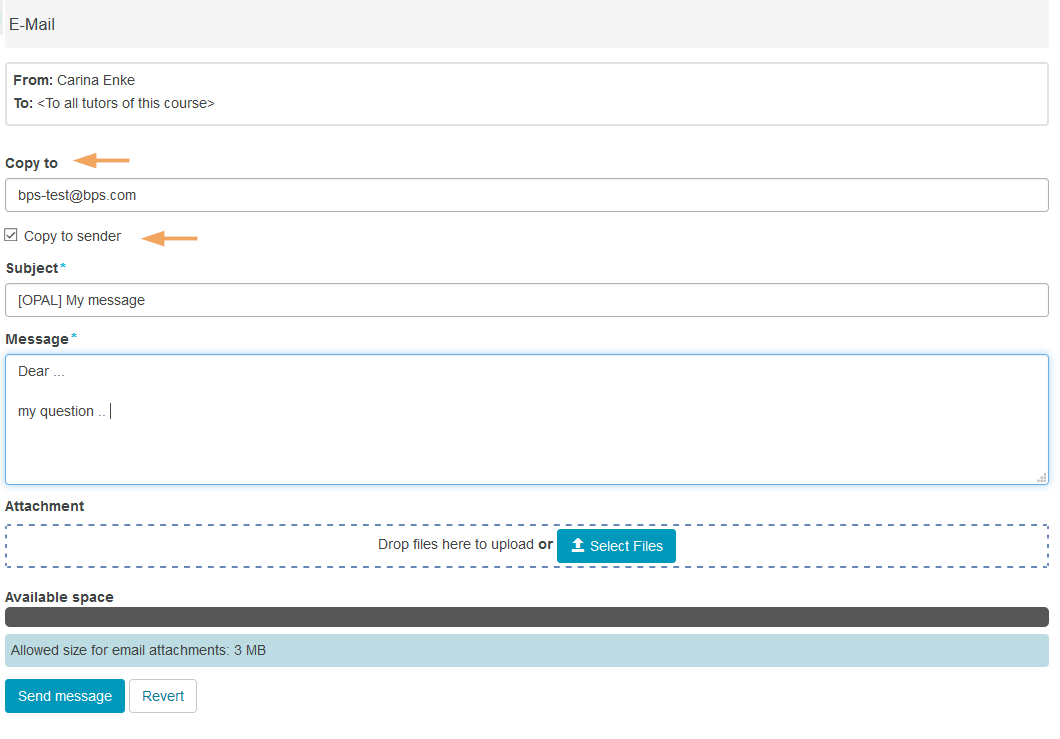
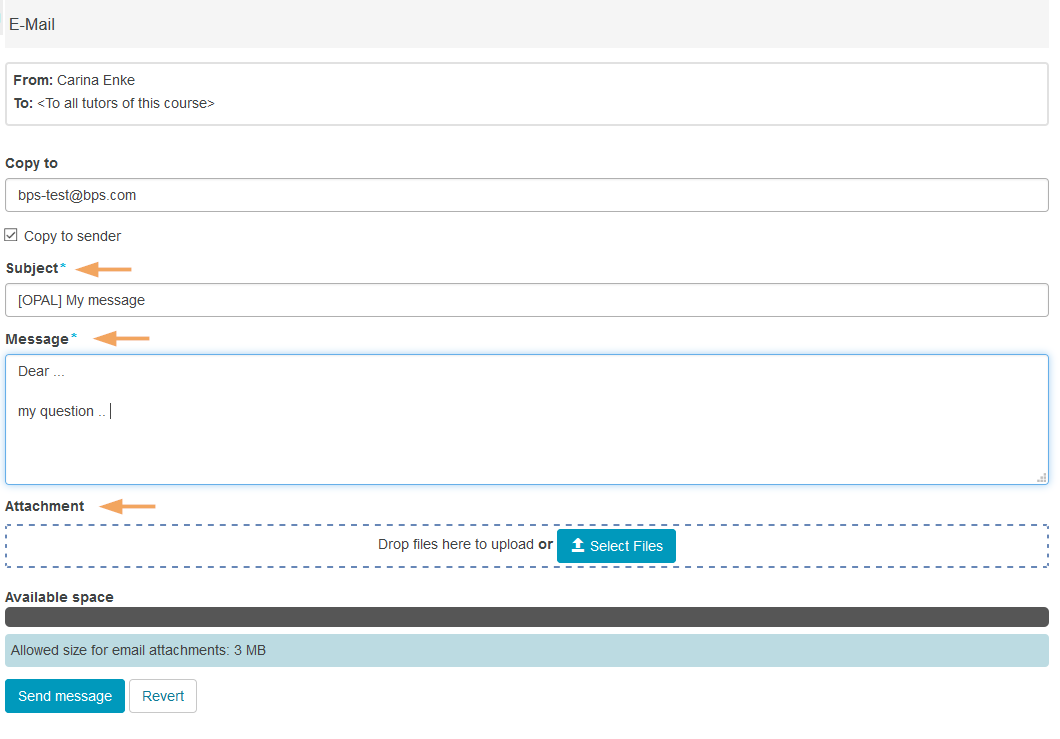
In the email course element, there is a ready-made form for sending emails. This means that the course author can preconfigure the recipients, subject, and message. The email author will then find this prefilled form in the course view of the course element. They can still change the subject and message, specify recipients for copies, and add attachments. However, the preconfigured recipients cannot be changed.

Kursrun - Leeres E-Mailformular_en.png


Functions for users

As a user, you can use the following functions in an email course element:

Send email

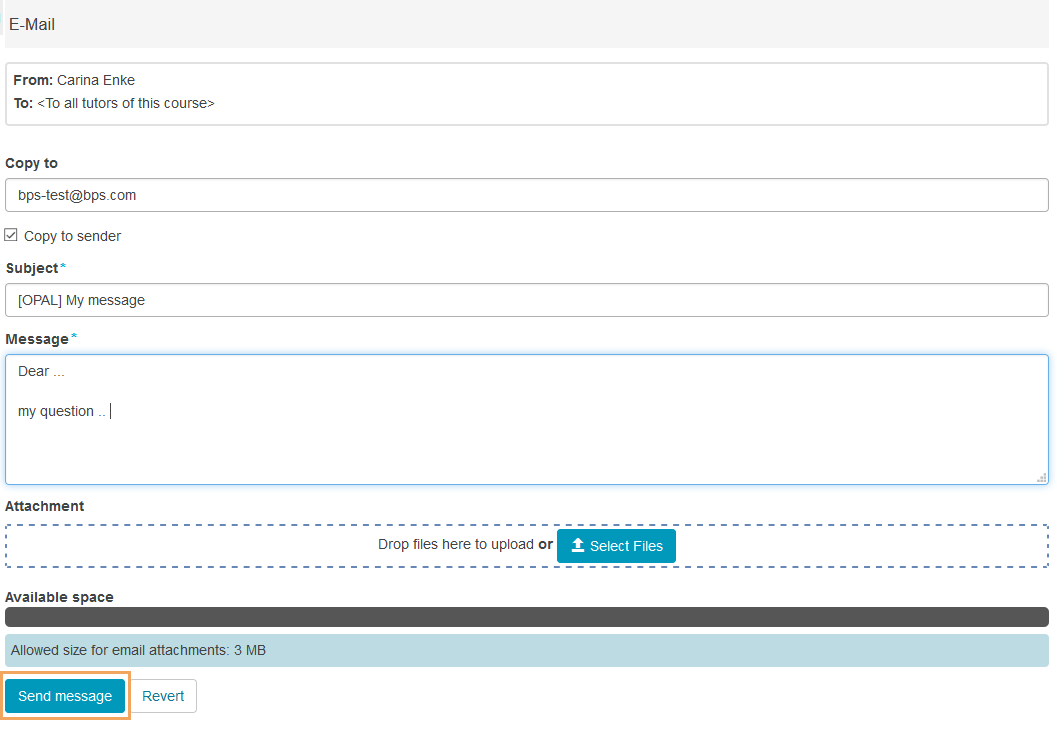
Send an email to a preconfigured group of recipients using the form provided.

How to use the form?
  1. Open the email course element.
  2. In the upper section, you can see information about the sender and preconfigured recipientof the email.

    The recipients are determined by the course author and cannot be changed in the form.

Kursrun - E-Mail Absender und Empfänger_en.png

3. Optionally enter another email address in the Copy to text field. To send a copy to yourself, select the Copy to sender option.

Kursrun - E-Mail Kopie an_en.png

4. In the Subject and Message fields, a sample text is displayed if previously configured by the course author. This text is for orientation and can be changed. Just enter the desired changes or additions in the fields.If the course author has not added any sample text here, enter a meaningful subject and your desired message in the fields.

If you wish to address users personally when communicating with several recipients, you can use so-called placeholders. For example, use $firstname and $lastname in the subject and message to address the recipient of the email directly by their name.

5. Optionally add documents or images with the Select Files button in the Attachment area. The possible total size of the attachment and the remaining storage space are also displayed in the form.

Kursrun - E-Mail Betreff und Nachricht_en.png

6. At the bottom of the form, click on Send message to start the distribution.

Kursrin - E-Mail - Nachricht senden_en.png

Configuration: Authors' View

In the course editor

The following functions are available to course authors in the course editor:

Add an email course element

Click to open instructions on how to add a course element ...

To integrate a course element into your course, proceed as follows:

1

Open the course you want to edit.

Use the pencil icon at the top of the page to open the editing mode.

Kurs-zum Editor wechseln_en.png

2

Select a course element from the menu on the right.

Kurseditor-KB auswählen_en.png

3

In the new window, you can define the position of the new course element within your course structure (left navigation pane). The available positions are marked with an insert icon.

To insert the new course element into an existing substructure, you need to open the substructure by clicking on the small triangle symbol next to its title. The area will open and you will again see insert icons at the positions which are available.

Click on the insert icon at the desired position within the structure. The selected area will be highlighted.

Confirm your choice with Insert course element.

Kurseditor-KB in tree einfügen_en.png

4

The element will be inserted into the course structure at the selected position.

Depending on the course element, you have to make additional configurations or add content in order to complete the configuration.

For these changes to take effect, you must publish the course. The course element will then also become available in the course view.

Kurseditor-KB konfigurieren_en.png


General configuration settings

In the course editor, you will find the following configuration tabs:
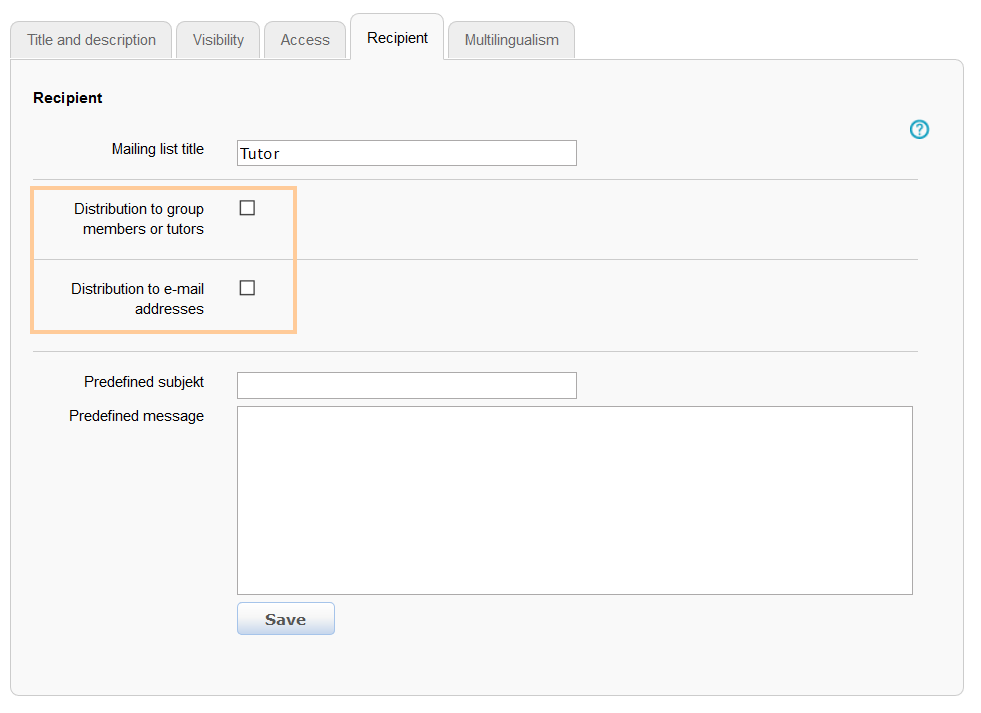
Title and description

Configuration options in the tab title and description ...

Kurseditor - Tab Titel und Beschreibung_en.png

Elements

Description

Title

You need to enter a title for the course element. The title can comprise a maximum of 100 characters. All special characters and numbers are permitted. The title will appear in the navigation menu of the course and also as a heading in the content area.

Changes to the title of the first course element, the so-called main course node ...
 If you change the title of the first course element, the new content will only be applied to the main course node and then displayed in the opened course. If you wish to edit the course title or description, you can do so using the more settings menu of the course.

Subtitle

You can enter a subtitle for the course element with a maximum of 255 characters. All special characters and numbers are permitted. The title will appear as a tooltip in the navigation menu and - if selected and configured accordingly - as a subtitle in the content area.

Description

Here you can describe the course element. The description will appear in the content area below the title.

Depending on the settings configured in the element Display, this additional text is displayed to the user when opening the course element. The user can expand or collapse the view of the text.


Display

Define which information about the course element should be displayed in the course view. In addition to the content, you can optionally display the title and description. All course elements are provided with a reasonable presetting, which mostly includes the setting Title, description and content. You can adjust this setting in accordance with the options available for each course element.

Set link for this course element

Each course element can be accessed via fixed link addresses. Therefore, an internal and an external URL is assigned to each course element. These direct links to concrete elements can be used within courses or provided to learners. The URLs are located below the title and description of the element and will appear upon selecting Set link for this course element.  

  • External link: To refer to this course element from outside of the course or learning platform, you can use the external link and insert it, for example as a href attribute, into the desired HTML page.
  • Internal link: To set a link to another course element within the same course, you can insert the internal link as a href attribute into the desired HTML page.

ID

You will need the ID number of the course element (on the bottom right), for example, if you wish to use the expert mode in the visibility or access tab.

VisibilityIf necessary, restrict the visibility of the course element here. For more information, see the Visibility help page.
Access If necessary, restrict the visibility of the course element here. For more information, see the Access help page.

Recipient

In this tab, you can decide who will be added as recipients of the emails. You also have the option to create text templates. Detailed instructions are given in the following section Special configuration settings.

Multilingualism

In this tab, different translations can be added to individual course element areas.

Special configuration settings

In the course view of the email course element, users can use a preconfigured email form. All relevant settings and specifications for this form can be defined in the Recipient tab:

Specify a mailing list title

With the mailing list title, you can specify which title or name will appear as recipient in the email form.

How to do that?
  1. Open the course editor of the email course element and switch to the Recipient tab.
  2. Enter your desired title in the Mailing list title text field.
  3. Click on Save.
  4. The title will now be displayed to the users as the recipient.

Kurseditor - E-Mail Beispielempfänger Projektbetreuer_en.png

Specify recipients

Select one or both options:  

  • Distribution to group members or tutors: By activating this option, you can define a course-specific group of recipients to which the emails will be sent in the course view. When activated, you can then specify this group in more detail.  
  • Distribution to e-mail addresses: Activating this option allows you to set individual users as recipients. Use this option if you wish to use email addresses that are not linked to any group member or tutor.

Kurseditor -E-Mail Empfängeroptionen_en.png

Distribution to group members or tutors

By activating the Distribution to group members or tutors option, you can define a course-specific group of recipients to which the emails will be sent in the course view.

Then choose from the following options:

  • To all tutors of this course
  • To all participants of this course
  • To selected learning groups
  • To selected learning areas
How to do that?
  1. Open the course editor of the email course element and switch to the Recipient tab.
  2. Select the checkbox next to Distribution to group members or tutors.
  3. Now select the recipients from the other options.
  4. In the case of the learning group and learning area options, you can enter the names directly separated by commas or by using the grey square button with the three dots.

Kurseditor - E-Mail erweiterte Versandoptionen_en.png

Distribution to e-mail addresses

The Distribution to e-mail addresses option allows you to define specific participants or tutors as recipients. You can also use email addresses that are not linked to any group member or tutor.

How to do that?
  1. Open the course editor of the email course element and switch to the Recipient tab.
  2. Select the checkbox next to Distribution to e-mail addresses.
  3. Now enter the desired email addresses in the text field.

Kurseditor - E-Mailversand an E-Mailadressen mit Beispiel_en.png

Create text templates

The Create templates function allows you to suggest a subject and/or message to the user. These suggestions are for orientation and can be changed by the user at any time. 

How to do that?
  1. Open the course editor of the email course element and switch to the Recipient tab.
  2. Enter a suggestion for the subject and/or message in the appropriate text fields.
  3. Click on Save. The suggestions will now be displayed to the users in the respective fields.

If you wish to address users personally when communicating with several recipients, you can use so-called placeholders. For example, use $firstname and $lastname in the subject and message to address the recipient of the email directly by their name.

Kurseditor- Beispielvorlage E-Maillinhalt_en.png


In the course view

In the course view, you can use the email form just like the course participants. Detailed instructions can be found in the Functions for users section.