Enrolment

Last modified by Carina Enke on 17.01.2024

KB_Einschreibung.pngThe enrolment course element allows learners to enrol in learning groups, which is a prerequisite to participate in courses, access course or group content and be assessed.


Usage: Learners' View

Overview

The enrolment course element gives you an overview of all learning groups of a course you can enrol in. Next to the learning group names, you can find information on the number of available places.

The colour code symbolises whether a regular enrolment is still possible. If there are still places available and the enrolment deadline has not yet been exceeded, the number of places will be highlighted in green. If the learning group is already full or the enrolment deadline is in the past or in the future, the number of places will be highlighted in red.

The example groups can be interpreted as follows:

  • In the first group (L1), all three places are still available. Thus, three more users can enrol in this learning group. However, enrolment in this case is only possible up to a certain date (see Enrol column).
  • In the case of the second group (L2), there is already one enrolled user. Since the number of places in this group is not limited, the group is open for an infinite number of users.
  • In the case of the third group (L3), there are already three enrolled users. Since the total number of places was limited to three, this means that this learning group is already full and direct enrolment is no longer possible. However, a waiting list has been configured for which it is still possible to register. In the event that an already enrolled user decides to leave the group, users on the waiting list have the chance of moving up. Depending on the configuration, this process either happens automatically or is manually controlled by the group supervisor.
  • In the case of the fourth group (L4), you are already enrolled. However, the course supervisor has configured the learning group in such a way that you can leave the group at any time, as you can see the Withdraw button. You can also still enrol in other groups, since their Enrol buttons are still active.

Kursrun-Tabellenansicht Einschreibung_en.png

Functions for users

As a user, you have access to the following functions in an enrolment course element:

Icon_Ich stimme zu_en.png

Agree to conditions

The course author may assign conditions to the enrolment. If this is the case, these conditions will be displayed when you first open the enrolment element. Only if you agree to them, you can proceed to enrol in one or more groups of this course.

How to do that?
  1. Open the enrolment course element.
  2. Carefully read the conditions and then click on I agree.
  3. The conditions you agreed to are permanently displayed above the table with all available groups. You can hide and show them at any time by clicking on the small triangle symbol in front of the text.

Kursrun - Bedingung zur Einschreibung zugestimmt_en.png

Kursrun - Bedingung zur Einschreibung zustimmen_en.png

Icon_Einschreiben_en.png

Enrol

You will only see this button if you can enrol in this group.

Proceed as follows:

  1. Click on Enrol.
  2. The button disappears, a checkmark icon appears in the Status column, and the Number of places increases.

The author can configure further enrolment and learning group settings. For example, they can define the number of places or an enrolment period.

All settings can possibly affect the functions and resulting views available to you.

Kursrun - Einschreibung Schaltflächen_en.png
 

Icon_Einschreiben Warteliste_en.png

Enrol (waiting list)

You will see this button if the configured maximum number of group participants has been exceeded and the course supervisor has configured a waiting list for this case.

To enrol in this waiting list, click on Enrol (waiting list). The button will then disappear and a clock symbol with your place on the waiting list pops up in the Status column.

To offer users on the waiting list a place in the course, the author can activate the Enable automatic moving up function. If activated, the next eligible user on the waiting list will automatically be added to the group as soon as a vacancy becomes available (e. g. if a group member leaves the group or is excluded from it). If not activated, the course author or a group supervisor must make the change manually.

Icon_Austragen_en.png

Withdraw

You will only see this button if the course author has allowed sign off by members.

To withdraw from a group within a course via an enrolment course element, proceed as follows:

  1. Open the enrolment course element.
  2. Select the desired group in the overview.
  3. Click on Withdraw.
  4. Confirm the dialogue with Withdraw.

Whether or not you can withdraw from groups depends on the settings configured by the author.  

Alternative option

If you have the right to withdraw from a group, you can also do this under Teach & Learn>My Groups>participating.

How to do that?


To leave a group, proceed as follows:

  1. Open the area Teach & Learn and select My Groups - Participating. Your groups will be displayed in the middle of the page.

LuL-Meine Gruppen_verlassen_gesamt_en.png

2. In the list view, click on the exit icon in the column Actions.

LuL-Meine Gruppen_verlassen_en.png

3. If you are currently using the preview for the group entries in the table, you will find the exit button at the end of the group entry.

LuL-Meine Gruppen_verlassen_Vorschau_en.png

The icon for leaving a group is only displayed if this action is possible.

Authors can also limit the possibility of withdrawing to a certain period of time or prohibit members from leaving a learning group entirely. For more information on configuration options for groups, please refer to the help section Groups.

Icon_Austragen Warteliste_en.png

Withdraw (waiting list)  

You will see this button if you are on a group's waiting list and the course author has allowed you to sign off from the waiting list.

To sign off from the waiting list, click on Withdraw (waiting list) and confirm the dialogue with Withdraw.


Course progress

Automatic progress

If the course progress indicator is activated for a course, the course element will automatically be marked as completed upon the first finished attempt of the user. This process is independent of any possible assessment.


Configuration: Authors' View  

In the course editor

The following functions are available in the course editor:

Add course element

Click to open instructions on how to add a course element ...

To integrate a course element into your course, proceed as follows:

1

Open the course you want to edit.

Use the pencil icon at the top of the page to open the editing mode.

Kurs-zum Editor wechseln_en.png

2

Select a course element from the menu on the right.

Kurseditor-KB auswählen_en.png

3

In the new window, you can define the position of the new course element within your course structure (left navigation pane). The available positions are marked with an insert icon.

To insert the new course element into an existing substructure, you need to open the substructure by clicking on the small triangle symbol next to its title. The area will open and you will again see insert icons at the positions which are available.

Click on the insert icon at the desired position within the structure. The selected area will be highlighted.

Confirm your choice with Insert course element.

Kurseditor-KB in tree einfügen_en.png

4

The element will be inserted into the course structure at the selected position.

Depending on the course element, you have to make additional configurations or add content in order to complete the configuration.

For these changes to take effect, you must publish the course. The course element will then also become available in the course view.

Kurseditor-KB konfigurieren_en.png


Please use an enrolment course element if you want external users to participate in your course. For more information, see the External user role help page.

General configuration settings

In the course editor, you will see the following configuration tabs for an enrolment course element:
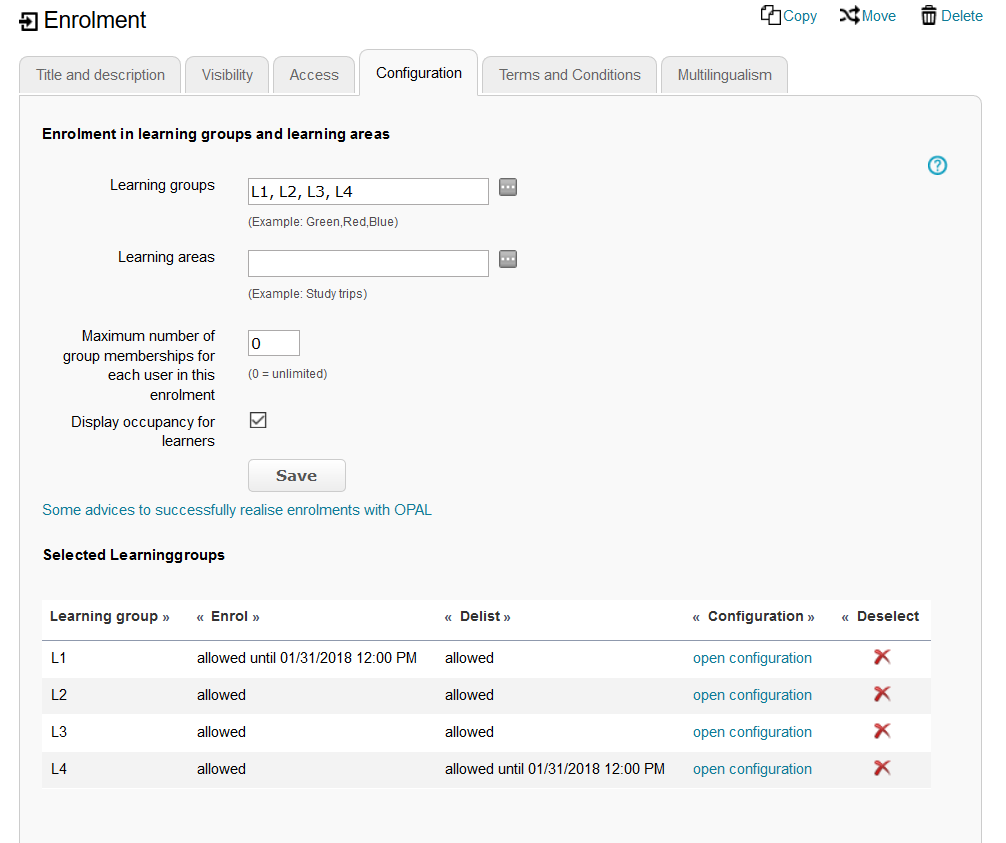
Title and description

Configuration options in the tab title and description ...

Kurseditor - Tab Titel und Beschreibung_en.png

Elements

Description

Title

You need to enter a title for the course element. The title can comprise a maximum of 100 characters. All special characters and numbers are permitted. The title will appear in the navigation menu of the course and also as a heading in the content area.

Changes to the title of the first course element, the so-called main course node ...
 If you change the title of the first course element, the new content will only be applied to the main course node and then displayed in the opened course. If you wish to edit the course title or description, you can do so using the more settings menu of the course.

Subtitle

You can enter a subtitle for the course element with a maximum of 255 characters. All special characters and numbers are permitted. The title will appear as a tooltip in the navigation menu and - if selected and configured accordingly - as a subtitle in the content area.

Description

Here you can describe the course element. The description will appear in the content area below the title.

Depending on the settings configured in the element Display, this additional text is displayed to the user when opening the course element. The user can expand or collapse the view of the text.


Display

Define which information about the course element should be displayed in the course view. In addition to the content, you can optionally display the title and description. All course elements are provided with a reasonable presetting, which mostly includes the setting Title, description and content. You can adjust this setting in accordance with the options available for each course element.

Set link for this course element

Each course element can be accessed via fixed link addresses. Therefore, an internal and an external URL is assigned to each course element. These direct links to concrete elements can be used within courses or provided to learners. The URLs are located below the title and description of the element and will appear upon selecting Set link for this course element.  

  • External link: To refer to this course element from outside of the course or learning platform, you can use the external link and insert it, for example as a href attribute, into the desired HTML page.
  • Internal link: To set a link to another course element within the same course, you can insert the internal link as a href attribute into the desired HTML page.

ID

You will need the ID number of the course element (on the bottom right), for example, if you wish to use the expert mode in the visibility or access tab.

VisibilityIf necessary, restrict the visibility of the course element here. For more information, see the Visibility help page.
Access If necessary, restrict the visibility of the course element here. For more information, see the Access help page.

Configuration

In this tab, you can select and manage learning groups or learning areas in which course participants can enrol. Detailed instructions are given in the following section: Special configuration settings.

Conditions

You can set enrolment conditions or conventions that course participants must agree to before they can enrol.

The agreed conditions are then displayed in the course view. Course participants cannot revoke these conditions. 

Use the following functions: 

Activate conditions:

  1. Select the checkbox to activate conditions.
  2. The Conditions text field opens. Enter the conditions and confirm your entries with Save.
  3. The user will now see the conditions and a button to agree to them in the course view Enrolment

Kurseditor - Bedingungen aktivieren_en.png

Note

If you make subsequent changes to the conditions, all course participants will see the revised conditions in the enrolment course element and must agree to them again. This confirmation only applies to the enrolment element. If the user is already enrolled in a learning group, they can use all functions of the learning group or the course elements available in connection with this learning group without having to agree to the conditions again.

Multilingualism

In this tab, different translations can be added to individual course element areas.

Special configuration settings

In the Configuration tab, you can configure all course element-specific settings. In the enrolment course element, these include:

Learning groups

Enter the names of the learning groups - separated by comma - in the text field or select the button with the three dots at the end of the text line.

If there is no learning group available in the course yet, a window to create a new learning group opens.

If there are already learning groups in the course, they will be displayed in a list from which they can be selected. You can also create new learning groups in this view with the Create button.

Kurseditor-Konfiguration zur Einschreibung_en.png

Learning areas

Enter the names of the learning areas - separated by comma - in the text field or select the button with the three dots at the end of the text line.

If there is no learning area available in the course yet, a window to create a new learning area opens.

If there are already learning areas in the course, they will be displayed in a list from which they can be selected. You can also create new learning areas in this view with the Create button.

For further information and an example on how to use learning areas, refer to the Create and manage learning areas help page.

Maximum number of group memberships for each user in this enrolment

Enter the maximum number of groups in which a participant can enrol.

Examples:

  • Enter "0" to allow an unlimited number of groups. Users can enrol in all offered groups.
  • Enter "2" to allow users to enrol in two of the groups available for enrolment.

Display occupancy for learners

If this option is enabled, the Number of places and Waiting list columns will be displayed in the course view. 

If this option is disabled, these two columns will be hidden from students and group tutors. For course owners, the columns will remain visible.

Selected learning groups

This section displays all learning groups used in the enrolment in a list and provides quick access to some of the configuration options for these groups.

Learning areas or learning groups which (only) belong to learning areas are not listed.

You have the option at any time to replace or increase the included groups or to adjust their configuration.

Publish the course for these changes to take effect in the course view.


In the course view

In the course view, you have access to all Functions available to users.

Users with the right to edit groups can also directly open the group user management area by clicking on the icon indicating the number of places (e. g. Icon_Anzahl Plätze.pngIcon_Anzahl Plätze leer.pngIcon_Anzahl Plätze voll.png).