Lücken auf einer Hintergrundgrafik platzieren (CSS)
Die Vorgehensweise zur Platzierung von Lücken auf einer Hintergrundgrafik wird am Beispiel einer Aufgabe zum Thema Sachsen erläutert. Als Hintergrundgrafik wird eine Karte des Freistaates Sachsen genutzt. Drei Lücken werden auf der Karte so platziert, dass die Namen der Städte direkt an der richtigen Stelle auf der Karte eingegeben werden können.

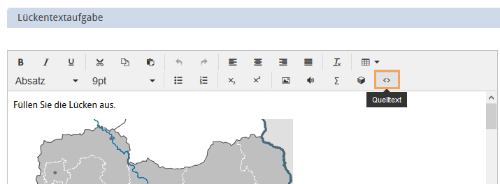
1. STEP: Erstellung einer neuen Aufgabe im Lückentext-Format
Der ONYX Editor unterstützt verschiedene Lückentext-Formate (u. a. Lückentext, Numerische Eingabe, Berechnung, Formelvergleich). Die Platzierung der Lücken auf einer Hintergrundgrafik funktioniert für alle Formate gleich. Im Folgenden wird die Platzierung für einen einfachen Lückentext erklärt. Um eine neue Aufgabe zu erstellen, klicken Sie auf den Button „Neue Aufgabe“. Wählen Sie den Aufgabentyp „Lückentextaufgabe“ und vergeben Sie einen Titel für Ihre Aufgabe.
2. STEP: Aufgabenbearbeitung und Hinzufügen der Inhalte
Der gesamte Aufgabeninhalt wird im Abschnitt Lückentext im HTML-Eingabefeld hinzugefügt. Tragen Sie zunächst Ihre Fragestellung ein, z. B. „Name the three independent cities of the state of Saxony“.
Fügen Sie nun die Hintergrundgrafik hinzu, auf der die Lücken später platziert werden sollen.
Anschließend fügen Sie direkt unterhalb der Grafik beliebig viele Lücken ein. Definieren Sie für jede Lücke die korrekte Lösung und die maximale Punktzahl. Zusätzlich können Sie weitere Einstellungen vornehmen.
3. STEP: Platzierung der Lücken auf der Grafik I (HTML)
Die Platzierung der Lücken auf der Hintergrundgrafik wird mittels einer CSS-Positionierung der Lücken erreicht. Voraussetzung ist die Definition von CSS-Klassen im HTML-Quellcode. Den HTML-Quellcode Ihrer Aufgabe können Sie über die Option „Quellcode“ des HTML-Editors einsehen und bearbeiten.
Hinweis: Damit Sie das HTML besser bearbeiten können, sollten Sie Zeilenumbrüche einfügen, sodass jedes Element (<p>, <span>, <img /> usw.) auf einer eigenen Zeile steht.
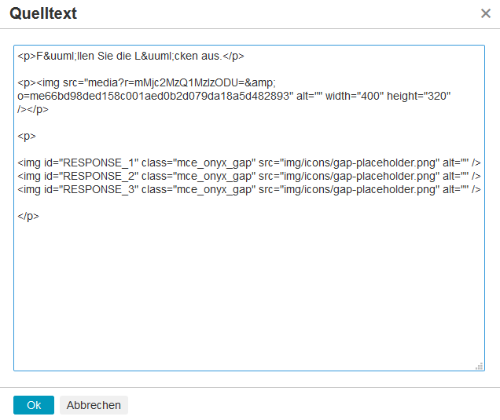
Ihre Grafik erkennen Sie an folgendem HTML-Code:
Die Lücken werden im HTML wie folgt ausgezeichnet:
Um die Grafik und Ihre Lücken müssen Sie einen Container (<div>) mit der Klasse „gap-container“ setzen.
[Grafik]
[Lücken]
</div>
Benötigen Sie die CSS-Platzierung auf der Hintergrundgrafik für mehrere Aufgaben im Test, ergänzen Sie bei der Klassenbezeichnung die Angabe [NAMEderAUFGABE]. Setzen Sie für "NAMEderAUFGABE" einen testweit eindeutigen Bezeichner ein.
[Grafik]
[Lücken]
</div>
Achten Sie bitte darauf, dass das <div> Ihre Grafik und alle Lücken umschließt. Vergessen Sie nach der letzten Lücke das schließende Tag (</div>) nicht.
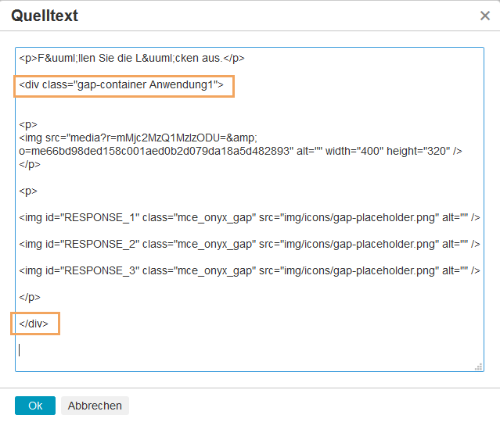
Nun fügen Sie um jede einzelne Lücke einen weiteren Container hinzu. Alle Container (<span>) bekommen die Klasse „gap“ zugewiesen. Zusätzlich vergeben Sie bitte eine weitere Klasse, die jede einzelne Lücke individuell auszeichnet. Am besten nummerieren Sie Ihre Lücken entsprechend der Reihenfolge und vergeben für die erste Lücke die Klasse „gap1“, für die zweite die Klasse „gap2“ usw.
<span class="gap gap2"> </span>

4. STEP: Platzierung der Lücken auf der Grafik II (CSS)
Um Ihre Lücken auf der Hintergrundgrafik zu platzieren, ist nun noch die genaue Positionsangabe erforderlich. Diese erfolgt in einer separaten CSS-Datei, welche Sie zu jeder Aufgabe hochladen können.
Als Vorlage können Sie folgende CSS-Anweisungen für eine einzelne Aufgabe im Test nutzen:
.gap {position: absolute;}
.[LückenID] {top: [x]px; left: [y]px;}
Wenn Sie zu mehreren Aufgaben im Test eine Platzierung per CSS vornehmen und somit im HTML der Aufgabe die Klassenbezeichnung "gap-container [NAMEderAUFGABE]" genutzt haben, dann verwenden Sie diese Vorlage:
Bei den Anweisungen für die einzelnen Lücken (.gap1, .gap2 usw.) setzen Sie nun Ihre Werte bei top und left für die Positionierung ein. Fügen Sie so viele Anweisungen hinzu, wie Sie Lücken in Ihrer Aufgabe definiert haben.
Speichern Sie Ihre Datei als CSS-Datei (.css) ab und fügen Sie diese im ONYX Editor Ihrer Aufgabe im Tab Optionen hinzu.
Nutzen Sie die Vorschau im ONYX Editor, um die korrekte Darstellung Ihrer Aufgabe zu überprüfen.
.gap {position: absolute;}
.[NAMEderAUFGABE] .[LückenID] {top: [x]px; left: [y]px;}
.gap {position: absolute;}
.Anwendung1 .gap1 {top: 100px; left: 255px;}
.Anwendung1 .gap2 {top: 50px; left: 75px;}
.Anwendung1 .gap3 {top: 180px; left: 90px;}
The procedure for placing gaps on a background graphic is explained using the example of a question about Saxony. A map of the Free State of Saxony serves as a background graphic. Three gaps are placed on the map so that the names of the cities can be entered directly in the correct place on the map.
STEP 1: Create new question in text entry format
The ONYX Editor supports various text entry formats (e. g. text entry, numerical input, calculation, formula comparison). Placing the gaps on a background graphic works the same for all formats. In the following, instructions on how to place gaps are provided for a simple text entry interaction. To create a new question, click on the "New question” button. Then select the "text entry interaction" question type and enter a title for your question.
STEP 2: Edit question and add content
All question content can be added via the HTML input field in the Text entry interaction section. Start by entering your question text, e. g. "Name the three independent cities of the state of Saxony".
Now add the background graphic on which the gaps should be placed later.
Then add any number of gaps directly below the graphic. Define the correct solution and the maximum score for each gap. You can also configure additional settings.
STEP 3: Place gaps on graphic I (HTML)
Placing the gaps on the background graphic is achieved by CSS positioning. The only prerequisite is the definition of CSS classes in the HTML source code. You can view and edit the HTML source code of your question using the "Source code” option of the HTML editor.
Note: To make it easier for you to edit the HTML code, you should insert line breaks so that each element (<p>, <span>, <img />, etc.) is on a separate line.
You can identify your graphic by the following HTML code:
The gaps are marked in the HTML as follows:
You need to set a container (<div>) with the class "gap-container" around the graphic and your gaps.
[graphic]
[gaps]
</div>
If you require CSS placement on the background graphic for several questions in the test, add [TITLEofQUESTION] to the class name. Insert an identifier for “TITLEofQUESTION” that is unique throughout the test.
[graphic]
[gaps]
</div>
Make sure that <div> encloses your graphic and all gaps. Do not forget the closing tag (</div>) following the last gap.
Now add another container around each individual gap. For all containers (<span>), the class "gap” should be assigned. Another class should be assigned to identify each gap individually. We recommend to number your gaps in order, starting with class "gap1” for the first gap, "gap2" for the second gap and so on.
<span class="gap gap2"> </span>
STEP 4: Place gaps on graphic II (CSS)
To place your gaps on the background graphic, you now need to specify the exact position. This is done in a separate CSS file that can be uploaded to each question.
You can use the following CSS statements as a template for individual questions in the test:
.gap {position: absolute;}
.[gapID] {top: [x]px; left: [y]px;}
If you place gaps for several questions in the test using CSS and have thus used the class name "gap-container [TITLEofQUESTION]" in the HTML of the question, then deploy this template:
Now insert your values for top and left in the statements related to the individual gaps (.gap1, .gap2, etc.) to determine their position. Add as many statements as there are gaps defined in your question.
Save your file to a CSS file (.css) and add it to your question on the Options tab in the ONYX Editor.
Use the preview in the ONYX Editor to verify whether the question is properly displayed.
.gap {position: absolute;}
.[TITLEofQUESTION] .[gapID] {top: [x]px; left: [y]px;}
.gap {position: absolute;}
.Application1 .gap1 {top: 100px; left: 255px;}
.Application1 .gap2 {top: 50px; left: 75px;}
.Application1 .gap3 {top: 180px; left: 90px;}