Test Options
Use various configurations in the Options tab to customise tests according to your needs.

Content
Test Settings
Time limit
Authors can set a time limit for the entire test or for individual test sections. While taking the test, participants can see the remaining processing time down to the second.

After the time limit is up, participants receive a notification indicating that they can no longer edit the sections and questions contained in the test. Once the time limit for the test is over, the test ends automatically.

Display of the processing time without time limit

Tools
You can provide additional functions to participants for taking the test. For example, you can share a calculator or additional documents that can be opened and used in the test.

Calculator
There is a simple and a scientific calculator available. Select the required range of functions under Display.
Simple calculator | Scientific calculator |
|---|---|
|
|


Additional files
Any additional files that are provided can be accessed during test execution.
Provide file(s)
Upload one or more PDF documents that can be accessed throughout the entire test.

Question tagging
If this option is activated, users can mark questions during the test that they would like to check again later. Simply select a question by clicking on the flag icon in the title. Once a question has been marked, it is displayed in the test navigation with a flag icon

Navigation and Display
Navigation
The author can choose between a linear and a non-linear navigation. A non-linear navigation allows participants to navigate between questions. In this way, solutions to previous questions can still be changed later on. In non-linear navigation, the displayed navigation tree can also be used for navigating.
In the case of a linear navigation, participants have to navigate from question to question by using the forward and back buttons. Free navigation via the navigation tree is not possible.
If the option linear with test path control is activated, navigation is also carried out by using the forward and back buttons. The navigation tree for the test execution is hidden. Only those tasks that fulfil the defined visibility rules are displayed. For more information on how to create these rules, see the page Setting the visibility.

Display
Authors can decide on how they want to show their questions to participants. It is possible to use a single question display or to show several questions per page (section-based).
For the display on mobile devices, we recommend showing only one question per page.

In combination with section settings, this can influence the navigation flow in the test. The page How visibility settings for sections affect test navigation shows some examples and effects.
Question settings
Comments allow the participant to leave feedback on a question for the test evaluator. Especially in the case of closed question forms with limited response options, the comment function offers a valuable support possibility for participants, e.g. if they do not understand the question, perceive it as inaccurate, or do not find their solution in the answers provided to them.

In the ONYX Editor, you can decide whether the comment settings are supposed to be applied to the entire test or only to selected sections or individual questions.
The tutor can view the comments in the participant's results view. Further information are provided in the help section Results view: View participant.
Comments
To enable the comment function, proceed as follows:
- Switch to the Options tab in your test settings.
- Activate the checkbox Allow on question level under Item settings. Your participants can now leave a comment for each question in the test.
Test attempts
You can allow learners to answer individual questions multiple times. During the test, your students will see the number of attempts available for each question. They can submit their answer and, if further attempts are possible, answer the same question again.

In the ONYX Editor, you can decide whether the settings for the number of available attempts should be applied to the entire test or only to selected sections or individual questions.
To do this, go to the Options tab to define your preferred settings:
| If you, for example, set the maximum number of attempts to find a solution to 2, the learner can answer each question in the test twice. |  |
If you wish to set the number of attempts individually for specific sections or questions, disable the option Apply the configuration of the superior element. Now, you can set the number of attempts individually for the section or question. The default is always one attempt. To allow an unlimited number of attempts, enter 0 in the input field. | 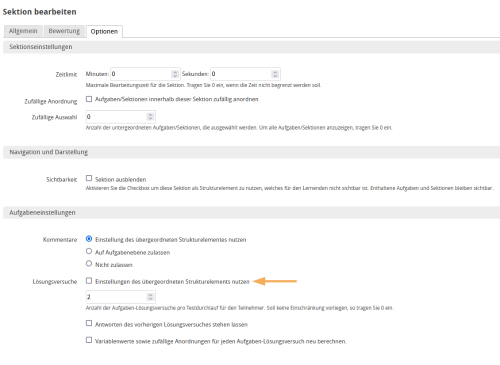 |
| Once a new attempt is started, the previous answer entry is cleared. If you want to give participants the option to modify their answer based on their latest response, activate the option Keep answers from previous attempts. |  |
| If your task has variables, you can use the option Recalculate variable values and random arrangements for each task attempt to specify whether a new attempt should be made based on new initial values. |
New random values
By default, the same variable values and the same order of elements will be used for each attempt to solve a question. If you select the New random values option, random parameters will be recalculated per attempt. This affects both the variables used and the random order.
- Recalculate variables: Questions can be changed for each test attempt by using variables. If the random values are recalculated, so are the variable values for each attempt at a question.
- Reshuffle random order: The Shuffle option is available for choice interactions, match interactions, matrix interactions and order interactions. If enabled, the predefined responses of these question types will be arranged differently for each test attempt. If random values are recalculated, the order will also be changed for each attempt at a question.
These settings can extend practise and self-test scenarios. Should a participant complete a question incorrectly, the question feedback can be used to provide hints on how to complete the task and find the solution. They can then retry the question in a new attempt. The use of random values such as variables and a new random order will allow the participant to work on a similar question but with new answers or values.

External File
You can enhance or customise your questions and tests with additional files.

Layout adjustments by using a style sheet file (CSS)
In order to use this function, you need to have a basic knowledge of HTML and CSS. Save your layout file as a CSS file (.css) and upload it to the Options tab of your question or test. Use the preview to verify whether it will be properly displayed. You can remove the layout file at any time or upload a new one.
When performing a test, the test title is displayed in the upper left pane. You may hide the test title using your own style sheet file (CSS).


To do this, use the following CSS statement:
Save the statement in a CSS file (.css). Then add the CSS file to the test content by uploading it as a style sheet file to the Layout settings section in the Options tab.
Further examples on how to use layout files can be found here: