Assessment

Last modified by Carina Enke on 16.01.2024

KB_Bewertung.png 
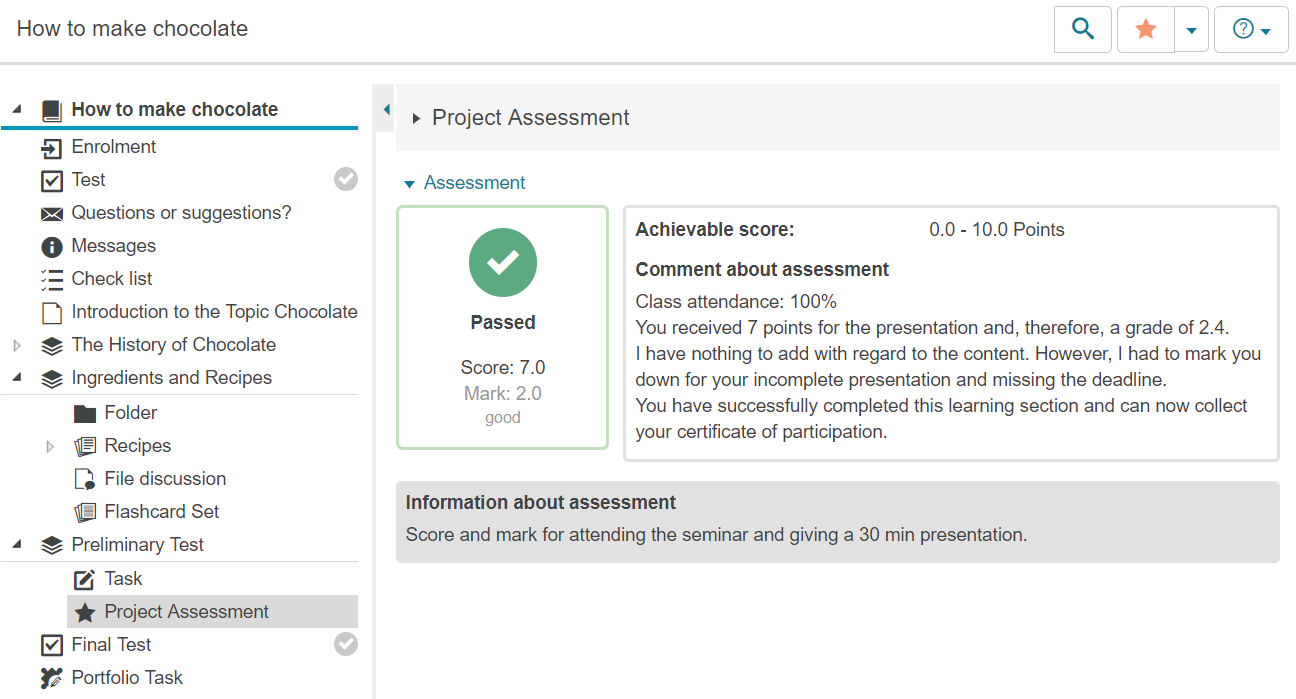
The course element Assessment can be used to assess participants manually. For example, learners' non-digital performances, such as oral presentations or attendance, can be assessed (using points scores) and graded (on a passed/failed basis) this way. Further, this element can be used for the assessment of course elements which are not automatically assessable.

Results of a course element Assessment can also be included in the final assessment of the entire course or a subsection of the course.


Usage: Learners' View

Overview

Depending on the configuration, the assessment data for each course element is displayed in the course view.

Possible assessment elements are:

  • Passed status: Passed / not passed
  • Score
  • Mark in numbers and words
  • Achievable score
  • Comment about assessment (by the assessor)
  • Information about assessment (to all users)

 Kursrun-Bewertungsbeispiel_en.png

Functions for users

As a user, you can view your assessment information in a course element Assessment . Further functions are currently not available for this element type.

Automatic progress

If the course progress indicator is activated for a course, the course element will automatically be marked as completed upon the first finished attempt of the user. This process is independent of any possible assessment.

Usage: Authors' View

In the course editor

The following functions are available in the course editor:

Add a course element assessment

Click to open instructions on how to add a course element ...

To integrate a course element into your course, proceed as follows:

1

Open the course you want to edit.

Use the pencil icon at the top of the page to open the editing mode.

Kurs-zum Editor wechseln_en.png

2

Select a course element from the menu on the right.

Kurseditor-KB auswählen_en.png

3

In the new window, you can define the position of the new course element within your course structure (left navigation pane). The available positions are marked with an insert icon.

To insert the new course element into an existing substructure, you need to open the substructure by clicking on the small triangle symbol next to its title. The area will open and you will again see insert icons at the positions which are available.

Click on the insert icon at the desired position within the structure. The selected area will be highlighted.

Confirm your choice with Insert course element.

Kurseditor-KB in tree einfügen_en.png

4

The element will be inserted into the course structure at the selected position.

Depending on the course element, you have to make additional configurations or add content in order to complete the configuration.

For these changes to take effect, you must publish the course. The course element will then also become available in the course view.

Kurseditor-KB konfigurieren_en.png


General configuration settings

In the course editor, you will see the following configuration tabs for a course element Assessment :

Title and description

Configuration options in the tab title and description ...

Kurseditor - Tab Titel und Beschreibung_en.png

Elements

Description

Title

You need to enter a title for the course element. The title can comprise a maximum of 100 characters. All special characters and numbers are permitted. The title will appear in the navigation menu of the course and also as a heading in the content area.

Changes to the title of the first course element, the so-called main course node ...
 If you change the title of the first course element, the new content will only be applied to the main course node and then displayed in the opened course. If you wish to edit the course title or description, you can do so using the more settings menu of the course.

Subtitle

You can enter a subtitle for the course element with a maximum of 255 characters. All special characters and numbers are permitted. The title will appear as a tooltip in the navigation menu and - if selected and configured accordingly - as a subtitle in the content area.

Description

Here you can describe the course element. The description will appear in the content area below the title.

Depending on the settings configured in the element Display, this additional text is displayed to the user when opening the course element. The user can expand or collapse the view of the text.


Display

Define which information about the course element should be displayed in the course view. In addition to the content, you can optionally display the title and description. All course elements are provided with a reasonable presetting, which mostly includes the setting Title, description and content. You can adjust this setting in accordance with the options available for each course element.

Set link for this course element

Each course element can be accessed via fixed link addresses. Therefore, an internal and an external URL is assigned to each course element. These direct links to concrete elements can be used within courses or provided to learners. The URLs are located below the title and description of the element and will appear upon selecting Set link for this course element.  

  • External link: To refer to this course element from outside of the course or learning platform, you can use the external link and insert it, for example as a href attribute, into the desired HTML page.
  • Internal link: To set a link to another course element within the same course, you can insert the internal link as a href attribute into the desired HTML page.

ID

You will need the ID number of the course element (on the bottom right), for example, if you wish to use the expert mode in the visibility or access tab.

VisibilityIf necessary, restrict the visibility of the course element here. For more information, see the Visibility help page.
Access If necessary, restrict the visibility of the course element here. For more information, see the Access help page.

Assessment

In this tab, you can make various basic configuration settings for the assessment. These settings have an effect on the assessment form and the assessment information displayed in the course view. All available options are described in detail in the following section Special configuration settings .

Multilingualism

In this tab, different translations can be added to individual course element areas.

Special configuration settings


The tab Assessment allows you to configure basic settings including the view of the assessment form in the assessment tool and the assessment information available for users in the course view.

Configuration view in the course editor

Resulting view of an assessment form in the assessment tool

Assessment from the user's perspective

Kurseditor-Beispiel Tab Bewertung_en.png

Bewertungswerkzeug-Beispiel Bewertungsformular_en.png

Kursrun-Nutzeransicht zum Bewertungsbeispiel_en.png

You can set the following options:

Score granted

If you select this checkbox, you can assign points to any assessable user in the assessment form. Set a range of points:

  • Minimum score: Enter the minimum number of points course participants can reach. You cannot make this entry if you have not selected the checkbox Score granted.
  • Maximum score: Enter the maximum number of points course participants can reach. You cannot make this entry if you have not selected the checkbox Score granted.

If you do not select the checkbox, this field will not be displayed in the assessment form.

Bewertungsformular_en.png

Mark assigned

Select the entry Yes from the list if you want to assign marks in the assessment form. If you select No, the assessment form cannot be used for grading.

Display passed/failed

If this checkbox is selected, it is possible to assign the status Passed or Failed in the assessment form.

Type of display

This choice is only available if you have selected the checkbox Display passed/failed.

Determine whether the status passed or failed will be automatically assigned when reaching a certain threshold score, or whether the tutor can manually assign points to each assessable user.

  • Automatic (using cut value): Enter a score as a cut value for passing in this field. As soon as an assessor assigns a score to a user equal to or higher than this value, the system will automatically mark the user's status as passed upon saving the assessment. If the assigned score is below the given threshold value, the system will automatically mark the status as failed.
  • Manually by tutor: If you select this option, the assessor can manually mark the status of each assessment as passed.

Individual comment

If you mark this checkbox, you can leave a comment or note on the assessment for each user. This text is displayed to the user in the right assessment box in the course view.

Notice for all users

Enter a text, which will be displayed to all users in the course view of the course element. This field is, for example, suitable for describing assessment criteria. 

The entered text will be displayed in a separate box with the title Information about assessment, regardless of whether or not an assessment already exists.

Notice for tutors

Enter a text, which will be displayed to the assessor when conducting the assessment of a course participant. This text will be displayed in a separate box with the title Information on assessment, which can be found directly above the assessment form in the assessment tool

Use certificates

Depending on the system and course configuration, it is possible to create a certificate for a course element Assessment, provided that the user has been assigned the status Passed for this course element. For more detailed information, refer to the section Assessment>Certificates.

Bewertungsformular_Zertifikate_en.png

Peer Review

For a course element Task, the option Activate Peer Review is additionally available. The peer review enables participants to anonymously review each other. An overall rating is created based on those reviews. For more detailed information on the peer review process and the configuration options, refer to the section Assessment>Peer review.

Bewertungsformular_PeerReview_en.png

Publish your course to complete the configuration and to make the resource available to participants.  

For general information on the assessment, assessment tool, and use of performance results, refer to the section Assessments.

Learning paths and associated activities

Depending on the learner's result, the course element Assessment can influence the visibility of and access to other course elements. Adaptive - as well as performance-based - learning paths are thus possible.

Please note

To be able to assess users in the assessment tool, they must be enrolled in a group. While the course element Enrolment can be used for this purpose, you can also register users for a course internal group via the Group management.

In the course view

In the course view of an assessment element, authors have access to the following editing options:

Submit assessment for a user

  1. To perform assessments for this course element, switch to the assessment tool of the course.

Kurs-Bewertungswerkzeug öffnen_en.png

2. Use one of the provided navigation aids (group, course structure, or user) to get to the desired course element and thus to the assessment form of a user.

How to do that? ...

To perform assessments for a course element, proceed as follows:

  1. Go to the assessment tool. In the upper left pane, you will find the entries As per group , As per course structure , and As per user . Click on As per course structure .
  2. It opens a list with all assessable course elements. Select the link Select participants next to the course element Assessment .
  3. You can see an overview of all groups or users to which you can assign an assessment for the selected course element. Continue navigating until you get to the assessment form of an individual user.

    You can only see users who are enrolled in a group of the course.

3. Fill in the assessment form and confirm the assessment with Save 

 Bewertungswerkzeug-Bewertungsformular leer_en.png

If you want to assess multiple users, the assessment tool provides the advanced function Bulk assessment . For further information on this function, see the page Assessment tool.

If you also want to allow other users to perform assessments, you can do so by means of a right group with the right to the assessment tool.