Test Configuration
This section describes the functions of the Test configuration tab of a test or self-test course element.
For general information on the user view of the course element and on configuration options of other tabs of this element, see the Test help page.
Assign test
Here you can assign a test resource to your test course element. To do this, you can choose from the following options:
- Select test (option 1)
- Create test (option 2)
- Import test (option 3)
Start the configuration for all three variants as follows ...
1 | Open the course editor of the test course element and switch to the Test configuration tab. Click on Choose test. |
| ||||||
2 | A page with functions to select, create, and import a test resource will open. Choose one of the three options ...
|
| ||||||
3 | The resource will now be displayed in the Test configuration tab next to Current choice. |
|


Functions after adding a test resource ...
Replace and edit test
An integrated test resource can be changed or extended at any time. However, if results of users are already available for the course element, it must be ensured for the evaluation that these results and their test version always match. Therefore, various options for making changes are available. For more information, see the section Replace test version.

Use test output variables
Open this link in the Test configuration tab to view the test output variables (outcomes) of the selected ONYX test. These can be used for visibility and access rules (expert syntax). Examples on how to use them can be found on the Expert rule application examples help page. Besides, test output variables can also be used as placeholders in certificate templates.

|
|
Add information text
You can provide the learner with an information text for the test. This text will be displayed in the course view above the Start test button.

Add information text ...
|
|

A window with functions for creating or selecting an HTML page as well as for uploading an HTML file opens. Decide on one of the following options:

Create a new HTML page online (option 1) ...
1 | Enter the name of the new file in the appropriate text field, select a different character set if necessary, and then click the Create button. |
|
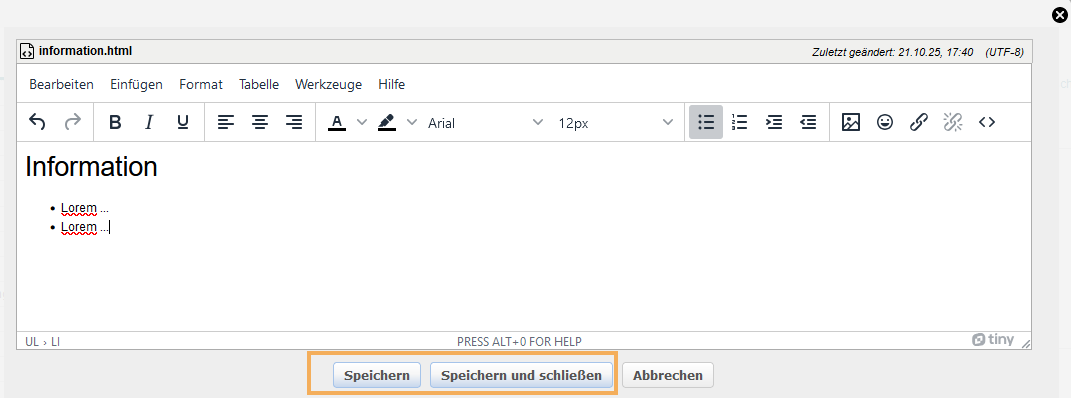
2 | The editor window for creating a new HTML page opens. Alternatively, you can also open the editor window manually by clicking the Open page in editor button. Enter the desired content. You can also use the numerous formatting options in the Text editor. Then click on Save. |
|

Select existing content from course storage folder (option 2) ...
1 | Click on the button Select page. |
|
2 | An overview of all HTML pages available in the storage folder opens. Mark the desired file by clicking on its title and confirm your selection with Select. |
|


Upload content (option 3) ...
|
|
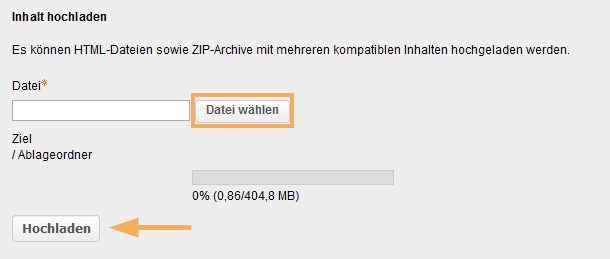
The selected file will be uploaded to the storage folder, automatically linked, and displayed under Selected page.
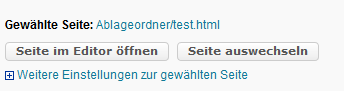
After adding an HTML page, you have the following options:

- Open page in editor: Click on this button to make changes to your HTML page.
- Delete page: If the HTML page has been added to a course element as an information page, you can remove this assignment completely by using the Delete Page button.
- Replace page: Click on this button to create, select or upload a new HTML page. Follow the steps outlined above.
Configure test procedure
After adding a test, you have the option to configure various settings for running the test.
Choose from the following options ...
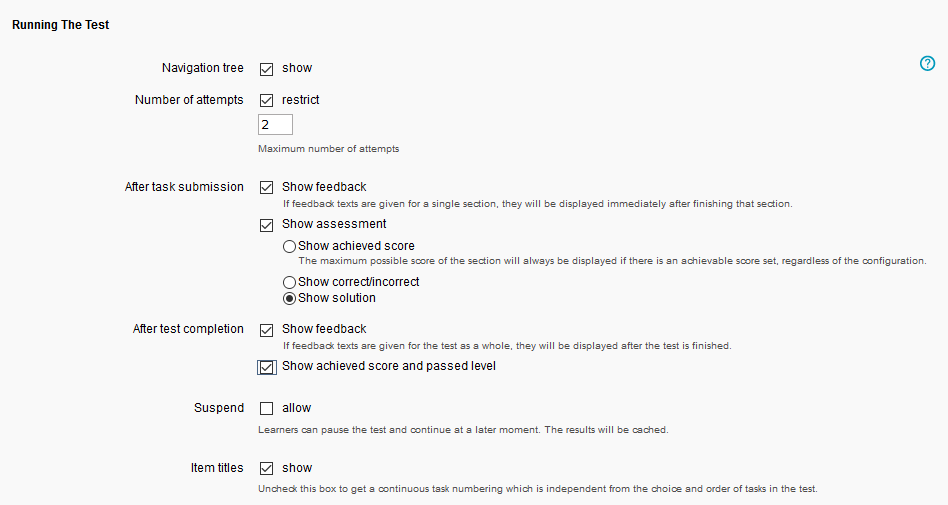
Show navigation tree | This checkbox is enabled by default. Disable the option to hide the navigation tree with the question titles during the test. |
|---|---|
Show item titles | This checkbox is enabled by default. Its function displays the question titles in the same way as they are stored in the test resource. Disable this checkbox if you prefer neutral question titles instead. The original question titles will then be replaced with neutral ones such as "Question 1”, "Question 2", etc. and numbered continuously. |
Restrict number of attempts | Enable this checkbox to limit the number of possible attempts at a solution to a number you have specified. Enter this number in the appropriate form field. If this option is not enabled, the test can be repeated indefinitely. |
After question submission | Decide whether you wish to show feedback or an assessment by enabling the corresponding checkbox. If you enable the Show feedback option, the user will be given feedback after submitting a question. If you enable the Show assessment option, the user will be shown whether their answer is correct or incorrect right after submitting a question. You can choose whether only the maximum score and the achieved score or also the correct and incorrect answers or even the solution should be shown to the user. To do this, select the appropriate options. For more information and a user view example of the individual options, see the Test procedure configuration help page in the ONYX documentation area. |
After test submission | Decide whether you wish to show feedback or an assessment by enabling the corresponding checkbox. If you enable the option Show feedback, the user will be given feedback after submitting the test. If you enable the Show achieved score and passed level option, the user will be shown whether their answers have been correct or incorrect after completing the test. |
Allow suspend | If this checkbox is enabled, participants will be able to pause the test. In this case, all given answers will be saved, and the participant will be able to continue the test later. This function is not available if exam settings have been made for the test |
After test completion | You can control the user's navigation after test completion and decide on the course element to which they should jump to. To do this, enable the checkbox and choose the desired course element. With this configuration, the user automatically jumps to the selected course element after submitting and successfully saving the test attempt. However, this does not apply to test attempts that are cancelled, interrupted or conducted in the exam mode. |
Confirm your configuration with Save.
Exam settings
You can run tests in an exam mode. This mode offers additional options and accompanying functions to conduct tests. For more configuration information, see the Exam mode help page.
Correction mode and new test version
The integrated test resource itself can also be modified or enhanced. However, if there are already user results for the resource stored in the system, it must be ensured for the evaluation that these results match the test version. Therefore, the following options are available for making changes:
Both options will be displayed when opening a resource with existing user results for editing. If the correction mode option is used, no further changes are necessary, and the course element does not need to be published. The corrected version will immediately be accessible to users starting a new test attempt. However, if a new test version is created, the old test version must be actively replaced in order for the new one to be displayed to the user. Otherwise, the user will still see the older version when opening the resource.
More workflows for authors and tutors
The following sections explain typical or frequently requested workflows used in the course element Test: