01 Inhalte in einem Kurs für registrierte Nutzer bereitstellen
Step 1
Kurs erstellen ...
Inhalt
Create course
With the release of OPAL 11.1, the course creation is available in the new user interface. How to create courses in the old user interface is explained in the section Create courses in the old user interface below.
To create a course, proceed as follows:
1 | Open the tab Teach & Learn. In the left navigation area, click on the entry Overview and quick access. Here you will find the function box Create course. Alternative options ...A button for creating courses and individual learning content can also be found after opening the menu items My courses and My resources. Depending on the system configuration and user rights, this box is also available in the First steps portlet on the home page. |
|
2 | In the Create course dialogue, you can now enter a title and description for your course. Optionally, you can also add an image and assign metadata or a semester. |
|
3 | To complete the course creation, choose between the following options:
|
Step 2
Kursbaustein Ordner einfügen ...
To integrate a course element into your course, proceed as follows:
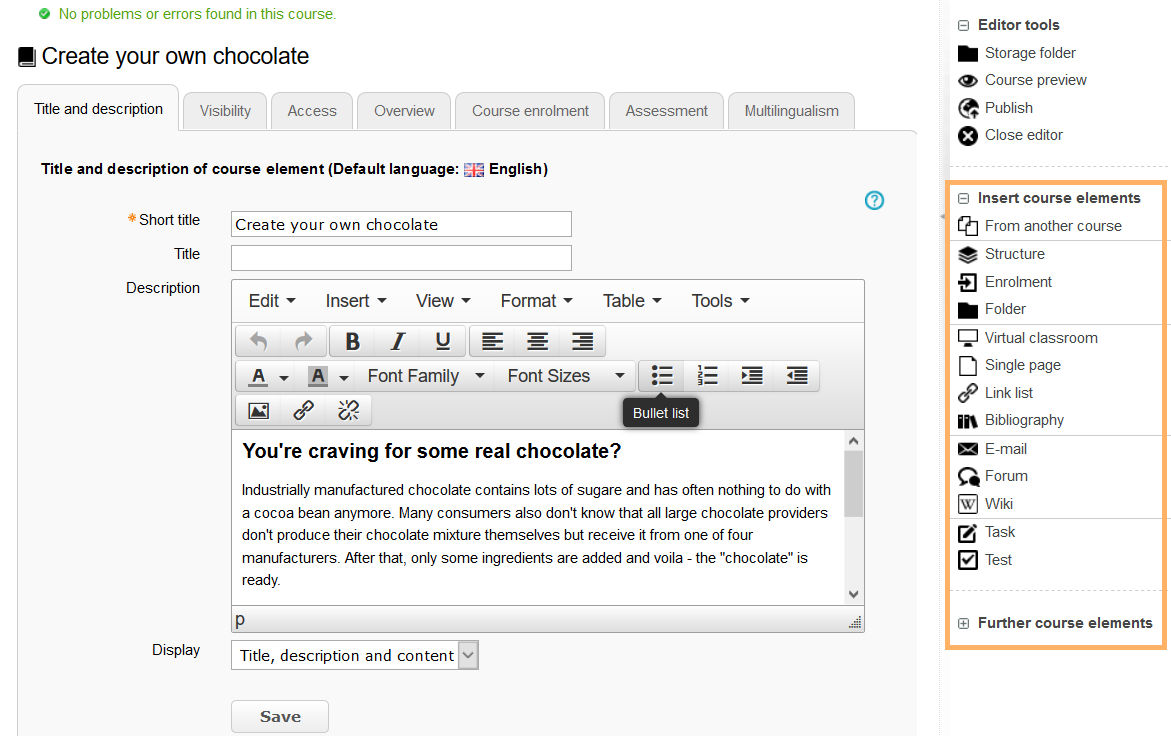
1 | Open the course you want to edit. Use the pencil icon at the top of the page to open the editing mode. |
|
2 | Select a course element from the menu on the right. |
|
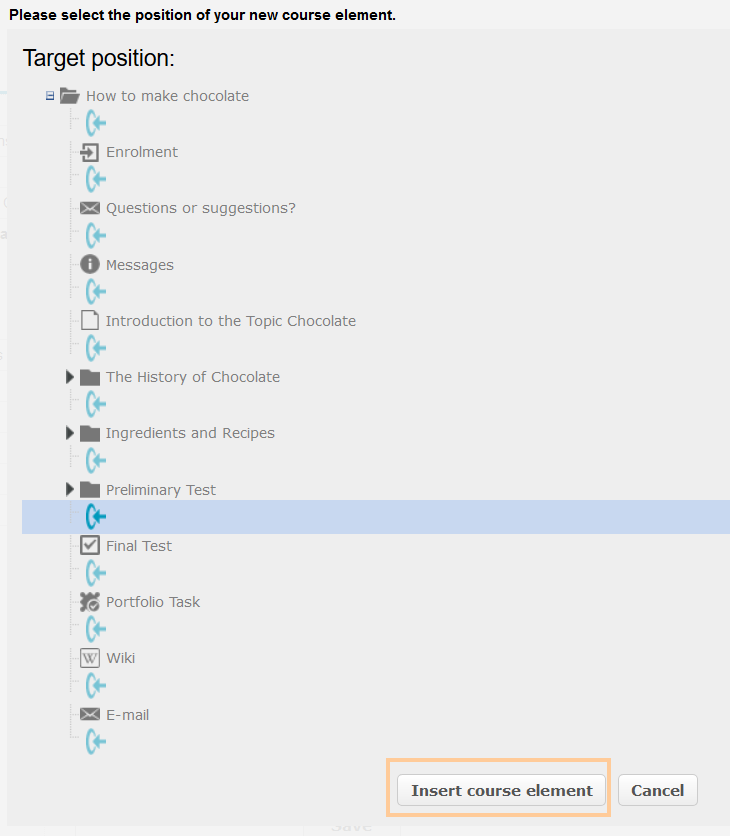
3 | In the new window, you can define the position of the new course element within your course structure (left navigation pane). The available positions are marked with an insert icon. To insert the new course element into an existing substructure, you need to open the substructure by clicking on the small triangle symbol next to its title. The area will open and you will again see insert icons at the positions which are available. Click on the insert icon at the desired position within the structure. The selected area will be highlighted. Confirm your choice with Insert course element. |
|
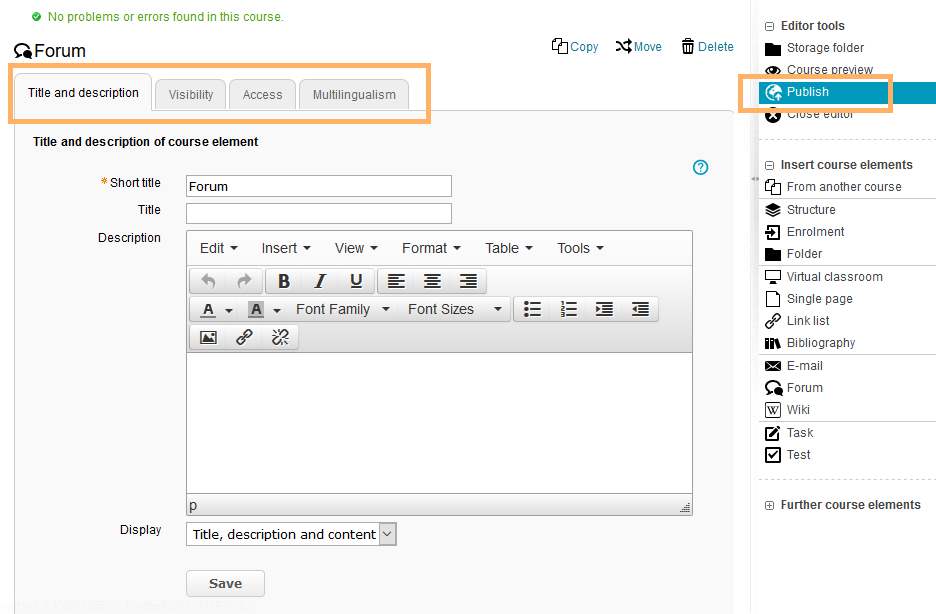
4 | The element will be inserted into the course structure at the selected position. Depending on the course element, you have to make additional configurations or add content in order to complete the configuration. For these changes to take effect, you must publish the course. The course element will then also become available in the course view. |
|
Step 3
Kurs publizieren ...
Ein neu angelegter Kurs wird für andere Nutzer erst sichtbar, wenn er publiziert, also veröffentlicht wurde. Gleiches gilt, wenn Sie zentrale Änderungen (Konfigurationen, neue Bausteine u.ä,) an einem Kurs vornehmen.
Wo befinden Sie sich gerade?
In der Kursansicht (Kursrun) ...
Publizieren in der Kursansicht
Um den Kurs für Lernende sichbar zu machen führen Sie bitte folgende Schritte durch:
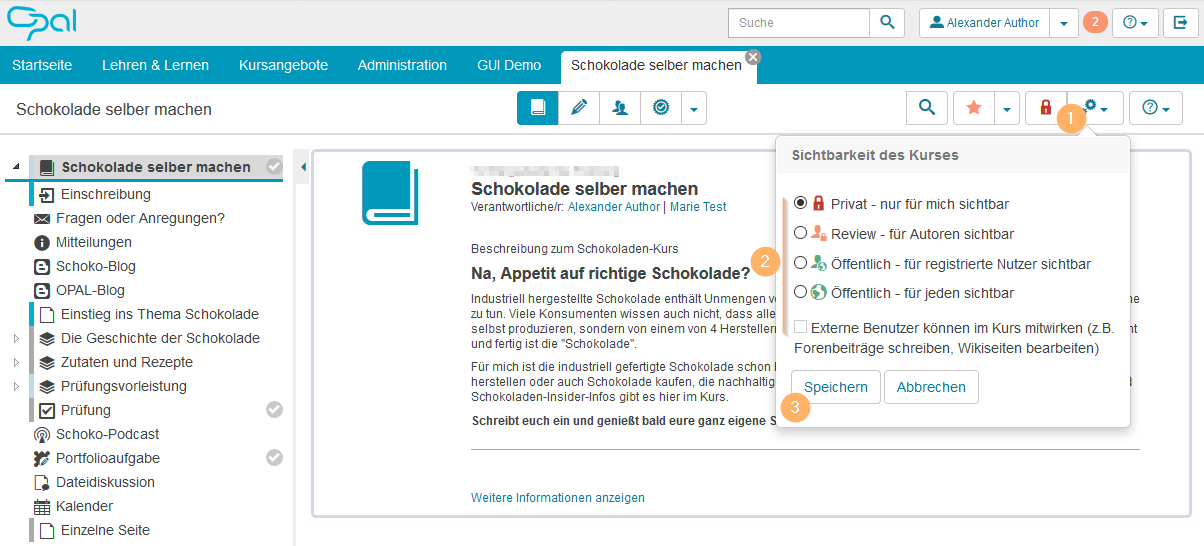
1 | Klicken Sie auf das Icon zur Sichtbarkeit. Ein neuer, noch nie publizierter Kurs zeigt das rote Schloss-Icon und ist damit für andere Autoren oder Lernende nicht sichtbar. Weitere Icons finden Sie im unteren Abschnitt Übersicht der Icons zum Publikationsstatus. |
|
2 | Wählen Sie die Option Öffentlich - für registierte Nutzer sichtbar aus. | |
3 | Bestätigen Sie Ihre Wahl mit Klick auf die Schaltfläche Speichern. | |
4 | Der Kurs ist nun für alle Nutzer mit einem Nutzerkonto auf dieser Instanz sichtbar und in der Suche auffindbar. Sie können diese Sichtbarkeit jederzeit wieder beschränken oder auch den Zugang individuell einschränken. Ausführliche Informationen bietet der Abschnitt Freigabe von Kursen und Kursinhalten. |
In der Bearbeitungsansicht des Kurses (Kurseditor) ...
Publizieren im Kurseditor
Um den Kurs für Lernende sichtbar zu machen, führen Sie bitte folgende Schritte durch:
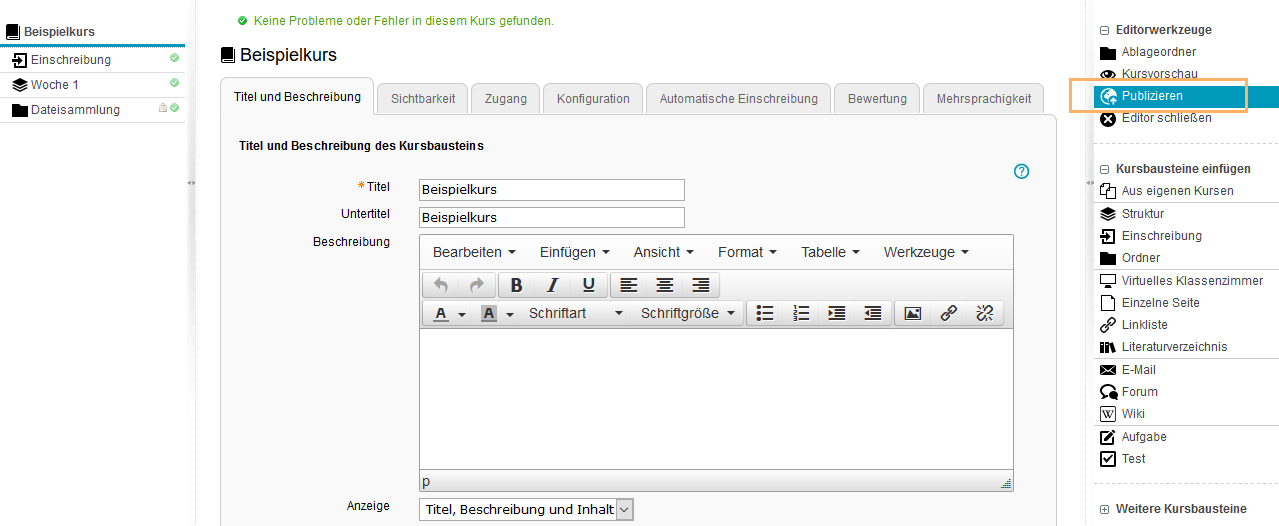
1 | Mit Klick auf den Eintrag Publizieren im Menü Editorwerkzeuge starten Sie den Assistenten.
|
|
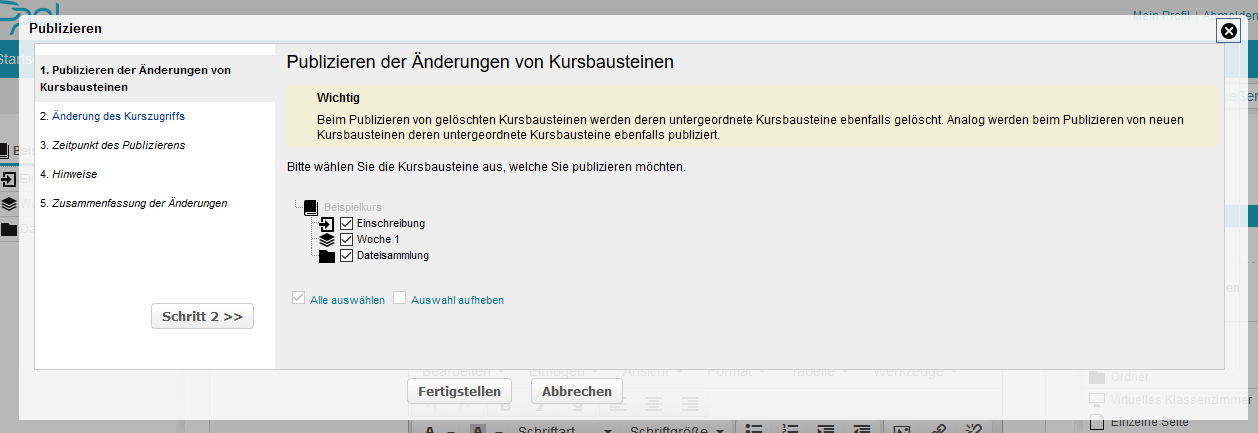
2 | Der 1. Schritt zeigt eine Übersicht der enthaltenen Kurselemente. Neue oder geänderte Kurselemente sind automatisch mit einem Häkchen markiert und werden in den weiteren Schritten publiziert. Wollen Sie einzelne Kurselemente noch nicht veröffentlichen, so entfernen Sie die Markierung in der entsprechenden Checkbox. Setzen Sie den Assistenten mit Klick auf den Button Schritt 2 >>> fort. |
|
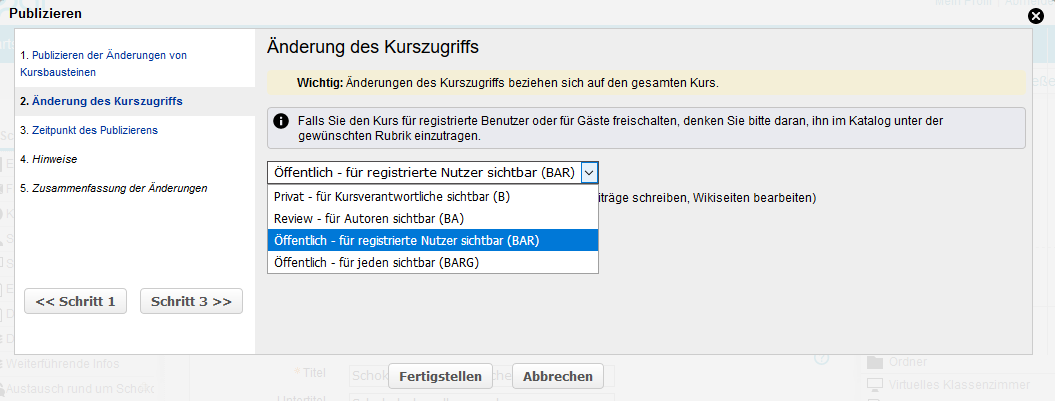
3 | Im 2. Schritt wählen Sie die Option Öffentlich - für registrierte Nutzer sichtbar aus. |
|
4 | Folgen Sie den weiteren Schritten des Assistenten und schließen Sie Ihre Einstellungen mit Klick auf den Button Fertigstellen ab. |
|
Weitere und ausführlicherer Informationen Zur Publikation bietet der Abschnitt Freigabe von Kursen und Kursinhalten.
Ich weiß nicht welche Ansicht ich gerade offen habe ...
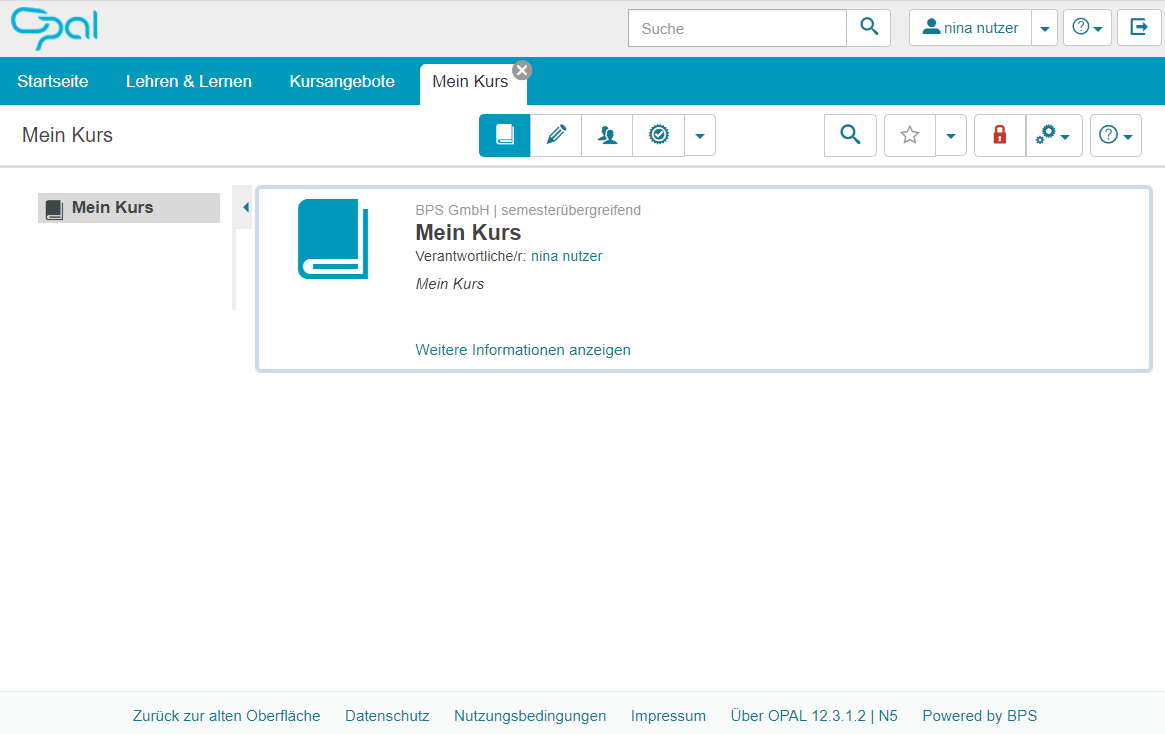
Entscheiden Sie anhand dieser Beispielansichten:
Kursansicht (Kursrun) | Bearbeitungsansicht (Kurseditor) |
|---|---|
|
|
Übersicht der Icons zum Publikationsstatus
Übersicht der Icons zum Publikationsstatus ...
General access to courses and learning resources is controlled via the publication status. Depending on this status, the content in the system will be visible to different user groups.
To adjust the general access, assign the following status labels:
| Publication status | Short description | Access for the following user groups |
|---|---|---|---|
| Private - only visible to you | B | Only owners of the learning resource |
| Review - visible to other authors | BA | Owners and anyone who has author rights in the system |
| Public - visible to registered users | BAR | Anyone who can log on to the system |
| Public - visible to registered and external users | BAR | E |
|
| Public - visible to everyone | BARG | Worldwide publication, access is also granted to anonymous users |
| Public - visible to everyone and external users | BARG | E |
|
Initial access When a course or learning resource is created, the access is initially restricted to the owner of the learning resource (![]() or B), and the first publication of a course must be done using the course editor.
or B), and the first publication of a course must be done using the course editor.
Step 4
Inhalte im Ordner ablegen ...
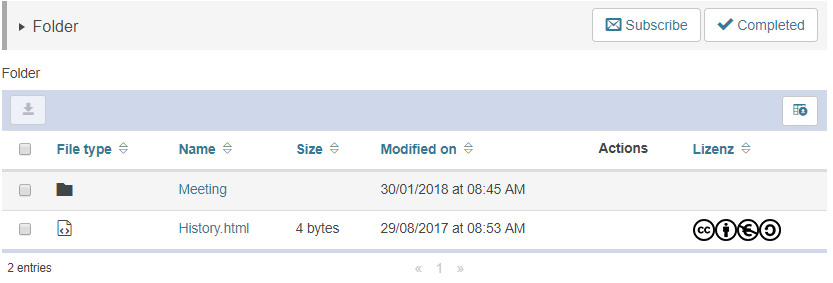
![]() The course element Folder allows you to display, download, upload or create files and subfolders to structure your course or group materials. The existing subfolders and files are displayed in a tabular overview. In addition to the file name, information about the file type, the file size and the modification date are included.
The course element Folder allows you to display, download, upload or create files and subfolders to structure your course or group materials. The existing subfolders and files are displayed in a tabular overview. In addition to the file name, information about the file type, the file size and the modification date are included.
Usage: Learners' View
Overview
After opening the course element Folder, you will see a tabular overview of the files and subfolders contained in this folder. This table lists information on the stored content. This includes, for example:
Information The course supervisor can assign various rights for a folder. The available functions depend on these settings. |
|
Functions for users
The following functions are available to users within a course element Folder:
| Subscribe to changes in the folder | You can subscribe to course elements to get automatically informed about changes. How to do that?To subscribe to a course element, proceed as follows:
For further information about the general configuration options for receiving notifications, refer to the page Subscriptions and notifications. | |||||
| Course progress | Information Manual progress If the course progress indicator is activated for a course, the course element can be marked as done by clicking on Completed. Subsequently, the element gets a corresponding colour marking in the course menu as well as in the details area before the element's title. | |||||
| Download file | You can download single files by clicking on the file name. Download multiple files ...To download multiple files, select the desired content by ticking the checkbox next to it. Then click on the download file icon. This will start the automatic download and save the selected content as a .zip archive to your computer.
| |||||
| Send print job | This is an optional function. Whether it is available or not depends on the file type and whether it has been configured for your institution. Click on the icon to start the wizard to create a print job for the print service. Further information is provided in the dialogue of the wizard. |
You can be assigned extended rights by a course supervisor. These rights will make additional functions, such as creating and editing folders or content, available to you. For further information about these functions, refer to the help section Functions in the course view .
Configuration: Authors' View
In the course editor
The following functions are available to you in the course editor:
Add a course element folder | Click to open instructions on how to add a course element ...To integrate a course element into your course, proceed as follows:
| ||||||||||||||||||||||||
General configuration settings | In the course editor, you will find the following configuration tabs:
| ||||||||||||||||||||||||
Special configuration settings | In the tab Folder configuration, you have the following options:
Information Users with extended rights may also configure the size of the storage space for a folder (quota).
|
Functions in the course view
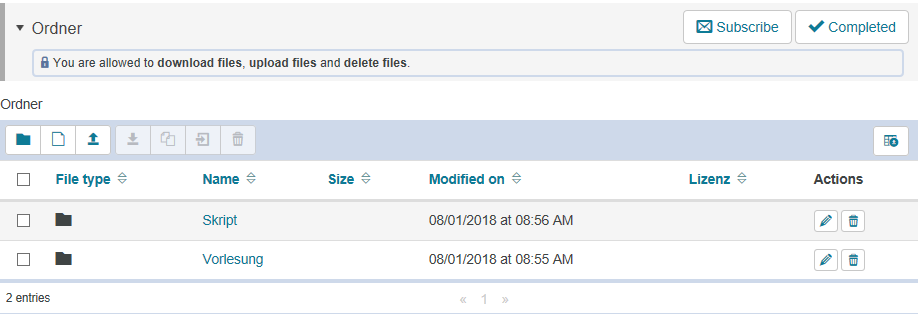
In the course view of a course element Folder, you have access to all editing options available to users. Moreover, all of the functions you need to add and manage folder content will be available to you. |
|
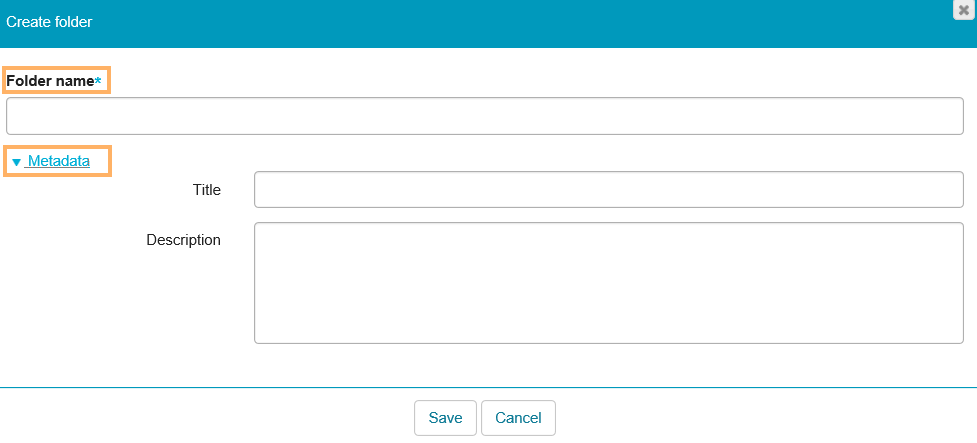
| Create folder | Click on this button to create a new folder. How to do that?
| ||||||||
| New file | This option allows you to add a new file. How to do that?
| ||||||||
| Upload file | This option allows you to upload a file from your computer. How to do that?
| ||||||||
| Download selected files as a ZIP archive | This option allows you to download selected files as a ZIP archive. How to do that?
| ||||||||
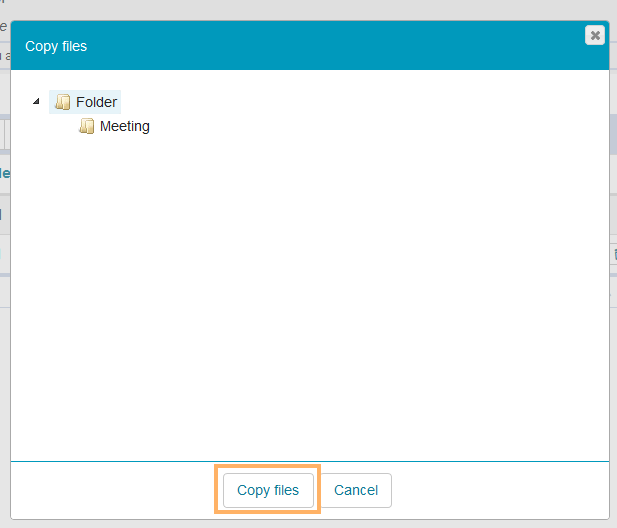
| Copy content | Click on this button to copy content. How to do that?
| ||||||||
| Move content | This function allows you to move content within the existing structure of the folder element. How to do that?
| ||||||||
| Delete content | Click on this button to delete content. How to do that?
| ||||||||
| Edit folder | This option allows you to edit content. How to do that?
| ||||||||
| Download table | Export table content as a file. The file format you have selected within your System settings will be used as the default format. |
You can also authorise other users to add and manage folder content via the Access rights to the course element.
Step 5
Informieren Sie Ihre Nutzer über den Kurs. Dazu stehen verschiedene Optionen zur Verfügung:
Nutzer per Direktlink informieren ...
Wo finde ich den Direktlink zum Kurs? ...
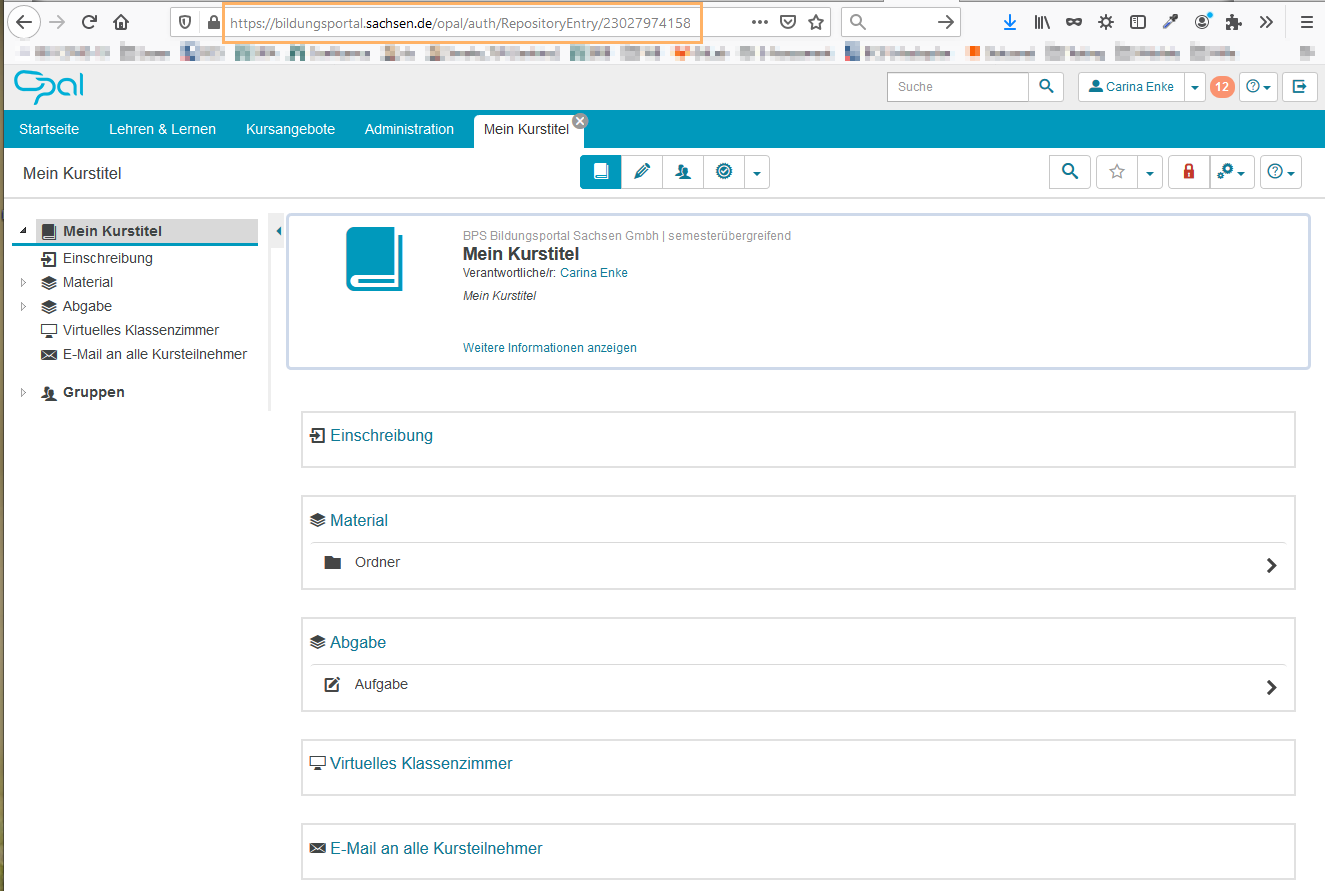
Kopieren Sie die angezeigte URL aus der Adresszeile Ihres Browsers und teilen Sie diesen Link den Lernenden mit. Alternativ reicht es auch, den genauen Titel des Kurses oder die ID des Kurses (= mehrstellige Zahl in der URL, im Beispiel 23027974158) mitzuteilen. Mit diesen Informationen wird der Kurs innerhalb der Suchfunktion ebenfalls gefunden. |
|
Nutzer einer Lerngruppe zuordnen ...
Neue Lerngruppe erstellen
Um eine Lerngruppe im Gruppenmanagement zu erstellen, gehen Sie wie folgt vor ...
Um eine Lerngruppe im Gruppenmanagement zu erstellen, gehen Sie wie folgt vor:
1 | Öffnen Sie den Kurs und wechseln Sie über das obere Funktionsmenü in das Gruppenmanagement des Kurses. |
|
2 | 2. Es öffnet sich im mittleren Bereich die Übersicht Gruppen im Kurs . In der linken Kursnavigation wird der Bereich Gruppen aufgeklappt und farbig aktiv hinterlegt. Die Kursnavigation dagegen wird inaktiv dargestellt. Die Gruppenübersicht im mittleren Bildbereich zeigt alle für Sie zugänglichen Lerngruppen des Kurses an.
|
|
3 | Im Kopfbereich der Gruppenübersicht sehen Sie alle für Sie verfügbaren Managementfunktionen. Um eine neue Lerngruppe im Kurs zu erstellen, wählen Sie die Schaltfläche Neue Gruppe. |
|
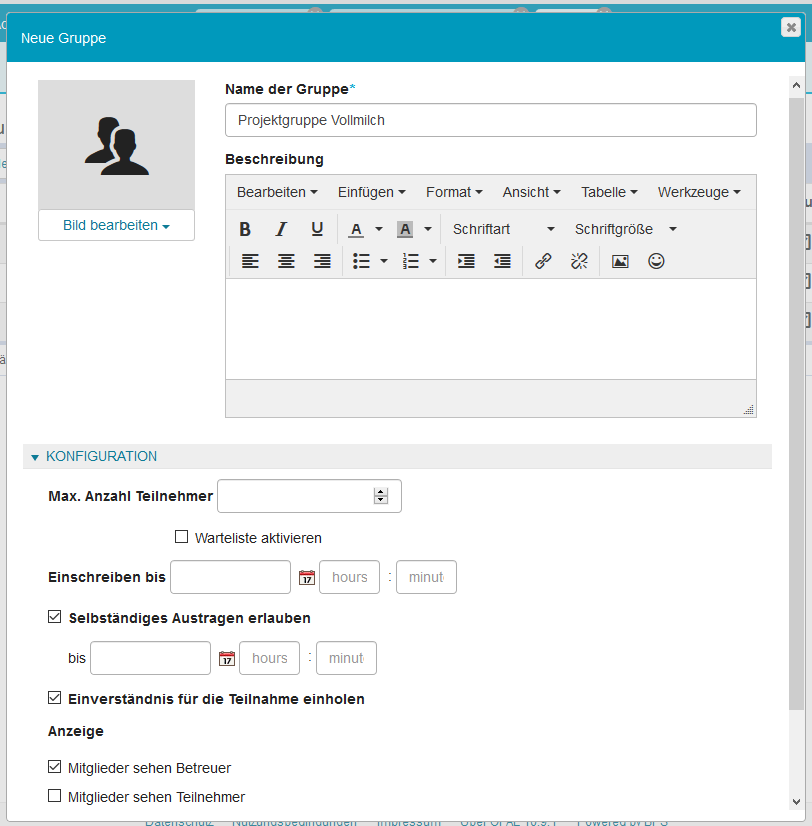
4 | Im sich öffnenden Fenster Neue Gruppe vergeben Sie Titel und optional Beschreibung und Bild zur Gruppe. Information Innerhalb eines Kurses muss der Titel der Lerngruppe eindeutig sein. Das bedeutet, Sie können keine weitere Gruppe mit dem gleichen Titel anlegen. Success Durch Eingabe von mehreren mit einem Komma getrennten Gruppennamen werden mehrere Gruppen gleichzeitig erstellt (Beispiel: Gruppe 1, Gruppe 2, Gruppe 3). Weitere Grundeinstellungen können Sie im Abschnitt Konfiguration angeben. Mit Klick auf die Schaltfläche Fertigstellen schließen Sie den Erstellvorgang ab. |
|
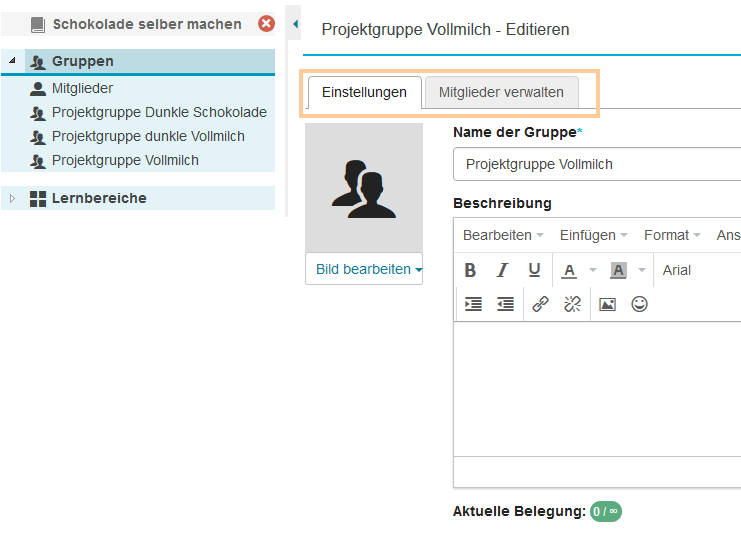
5 | Es öffnet sich die neu erstellte Gruppe in der Editieransicht. Sie können im Reiter Einstellungen Änderungen der bestehenden Konfiguration vornehmen und gruppeninterne Werkzeuge zur Verfügung stellen. Im Reiter Mitglieder verwalten können Sie Nutzer der Gruppe hinzufügen oder entfernen.
|
|
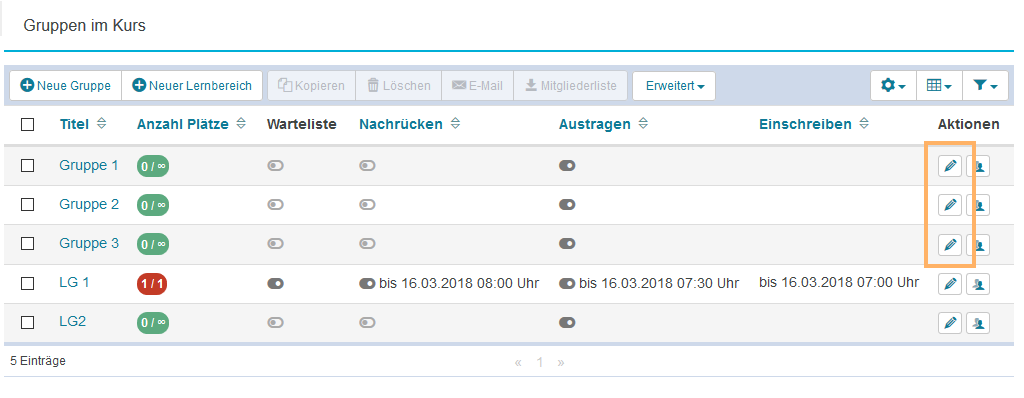
6 | Wurden mehrere Gruppen erstellt, sehen Sie die Gruppenübersicht. Um weitere Änderungen an einzelnen Gruppen vorzunehmen, öffnen Sie die gewünschte Gruppe durch Klick auf den Gruppennamen oder den Editieren-Button. |
|
Nutzer in die Gruppe eintragen
Um Nutzer in eine Lerngruppe einzutragen, gehen Sie wie folgt vor ...
Um Nutzer einer Gruppe hinzuzufügen, gehen Sie wie folgt vor:
Öffnen Sie die Gruppe und wechseln Sie in die Editieransicht. |
|
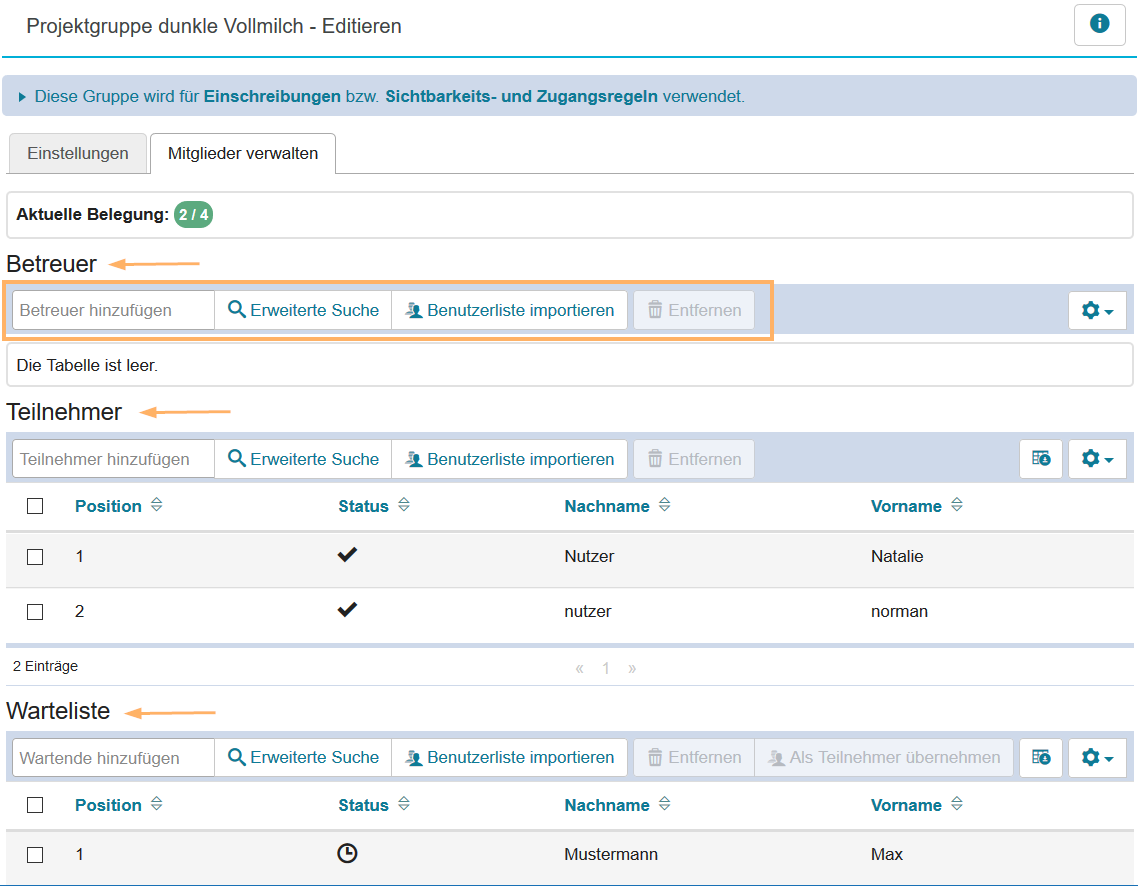
Im Tab Mitglieder verwalten befinden sich entsprechend der Zuordnung verschiedene Nutzerlisten mit den Teilnehmern der Gruppe. Die Listen Betreuer und Teilnehmer sind in dieser Editieransicht immer vorhanden. Die Listen Eingeladen und Warteliste werden je nach Konfiguration der Gruppe angezeigt. Alle Listen sind gleich aufgebaut. Im Kopfbereich der Liste befinden sich verschiedene Schaltflächen, mit denen einzelne Funktionen zur Verwaltung gestartet werden können, sowie die Standardschaltfläche zur Konfiguration der angezeigten Tabellenspalten. |
|
Um Nutzer einer der Listen hinzuzufügen oder zu entfernen haben Sie folgende Möglichkeiten:
| Teilnehmer hinzufügen | Nutzen Sie dieses Feld, um einzelne Nutzer Ihrer Institution einer Gruppenliste zuzuordnen. Tragen Sie mindestens drei Buchstaben zum Vor- oder Nachnamen der Person in das Textfeld ein. Wenn ein Nutzer im System gefunden wurde, den Sie aufgrund Ihrer Nutzerrechte eintragen dürfen, wird dieser in einer Popup-Auswahlliste angezeigt. Klicken Sie auf den gewünschten Namen und der Nutzer wird in die Liste eingetragen. Information Ist die Einstellung Einverständnis für die Teilnahme einholen für diese Gruppe aktiv, wird ein hinzugefügter Nutzer direkt der Liste Eingeladen zugeordnet. Sobald er der Einladung zur Gruppenteilnahme zustimmt, wird er automatisch in die Liste Teilnehmer überführt. |
| Erweiterte Suche | Über die erweiterte Suche können Sie nach spezifischen Nutzern suchen. Nutzen Sie diese Schaltfläche, wenn Sie mehrere Nutzer einer Liste hinzufügen wollen. Information In der Erweiterten Suche werden Ihnen nur Nutzer, die Ihrer und damit der gleichen Institution angehören, oder für die Sie durch spezielle Rechte verantwortlich sind (Benutzerverwalter), angezeigt. Die Funktion öffnet sich in einem neuen Fenster. Entsprechend Ihrer Nutzerrolle im System und den für Sie hinterlegten Rechten, stehen Ihnen hier verschiedene Datenfelder für die Suche zur Verfügung. Geben Sie beispielsweise den Vor- und Nachnamen oder die vollständige im System hinterlegte E-Mail-Adresse des gewünschten Nutzers ein. Starten Sie die Suche mit Klick auf die Schaltfläche Suchen . Das System zeigt die Suchergebnisse in einer Ergebnisliste an. Markieren Sie in dieser Liste die Checkboxen vor den Nutzereinträgen, die Sie in die Gruppe übernehmen wollen. Zusätzlich können Sie optional allen einzuschreibenden Nutzern eine E-Mail zur Einschreibung senden. Markieren Sie dazu die Checkbox E-Mail senden unter der Ergebnisliste. Es öffnet sich ein bereits mit Standardtexten gefülltes Mailformular. Passen Sie bei Bedarf diese Inhalte an. Mit Klick auf die Schaltfläche Nutzer hinzufügen bestätigen Sie die Nutzerauswahl und starten den optionalen Mailversand. Anschließend werden die Nutzer automatisch zur betreffenden Liste hinzugefügt. Ist für einen Nutzer diese Aktion nicht möglich, erhalten Sie eine entsprechende Hinweismeldung. |
| Benutzerliste importieren | Nutzen Sie diese Funktion, wenn Sie eine Liste mit mehreren Benutzernamen, vollständigen E-Mail-Adressen oder Matrikelnummern von Nutzern besitzen, die hinzugefügt werden sollen. Information Sie können über diese Funktion auch im System registrierte Nutzer anderer Institutionen oder sogenannte Externer Nutzer direkt in eine Gruppe eingeladen bzw. dieser zuordnen. Wählen Sie in der Auswahlliste eine der Optionen aus und tragen Sie anschließend die Nutzerliste in das Textfeld ein. Geben Sie dabei immer eine Suchtreffer werden in einer Ergebnisliste angezeigt. Dabei sind die Checkboxen vor den Einträgen bereits markiert. Zusätzlich können Sie optional allen einzuschreibenden Nutzern eine E-Mail zur Einschreibung senden. Markieren Sie dazu die Checkbox E-Mail senden unter der Ergebnisliste. Es öffnet sich ein bereits mit Standardtexten gefülltes Mailformular. Passen Sie bei Bedarf diese Inhalte an. Mit Klick auf die Schaltfläche Nutzer hinzufügen bestätigen Sie die Nutzerauswahl und starten den optionalen Mailversand. Anschließend werden die Nutzer automatisch zur betreffenden Liste hinzugefügt. Ist für einen Nutzer diese Aktion nicht möglich, erhalten Sie eine entsprechende Hinweismeldung. |
Alle weiteren verfügbaren Funktionen werden auf der Seite Lerngruppe bearbeiten und verwalten erläutert.
Selbsteinschreibung in den Kurs organisieren ...
Kursbaustein hinzufügen
Um Ihrem Kurs einen Einschreibebaustein hinzuzufügen, gehen Sie wie folgt vor:
1 | Öffnen Sie den Kurs, den Sie bearbeiten möchten, in der Editieransicht. Nutzen Sie dazu das Stift-Symbol im oberen Bereich des Kurses. |
|
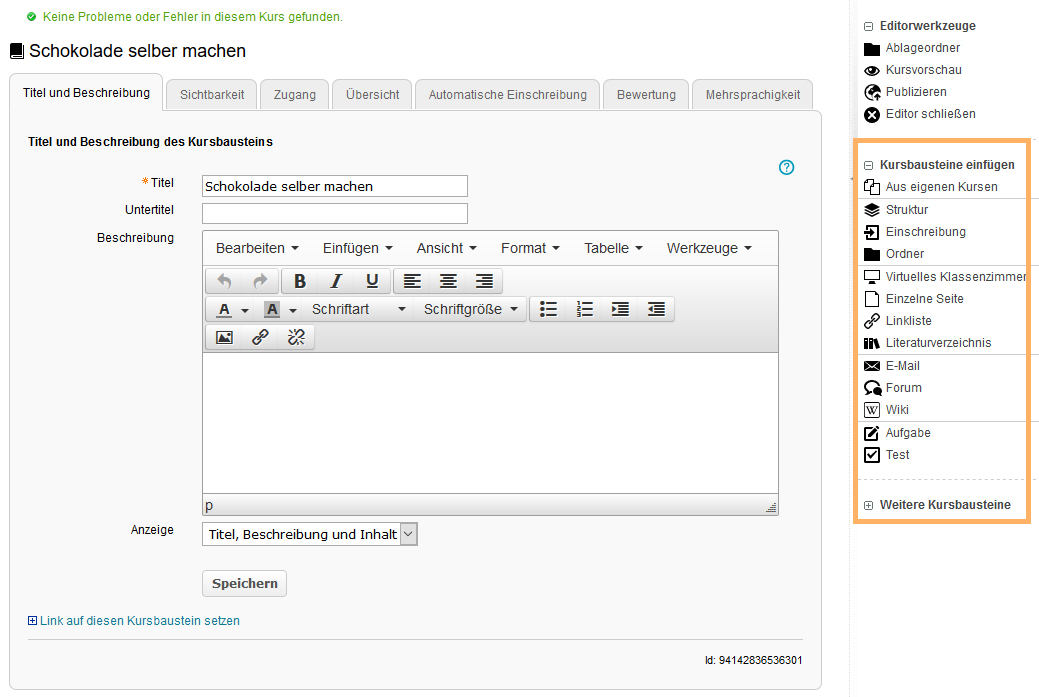
2 | Wählen Sie aus den angebotenen Kursbausteinen im Menü auf der rechten Seite mit einem Klick den Kursbaustein Einschreibung aus.
|
|
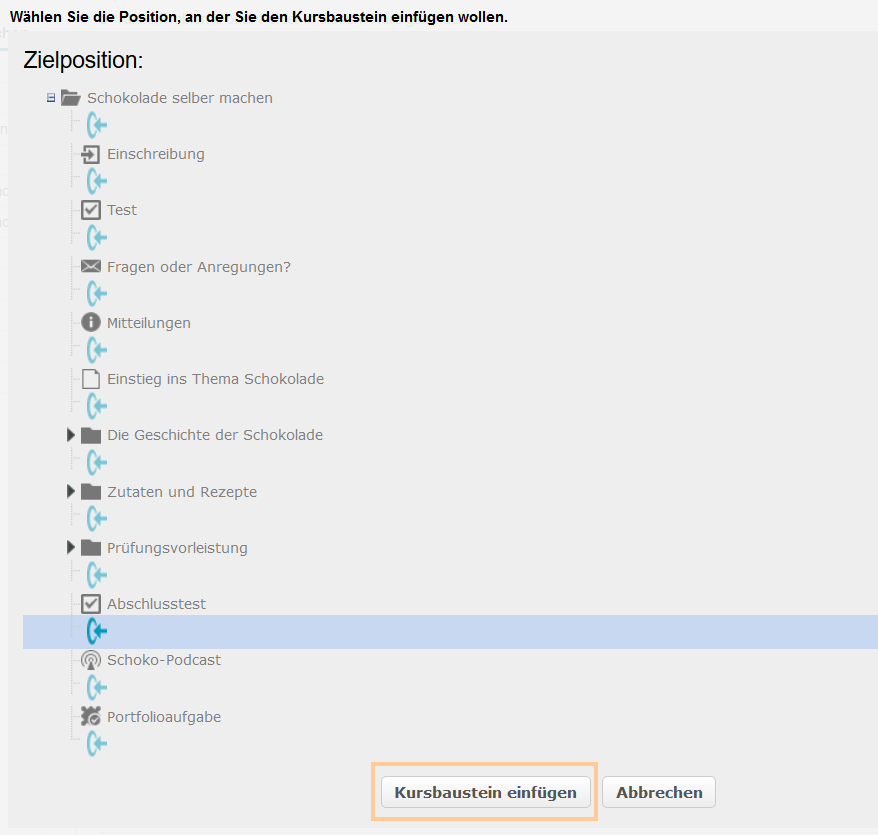
3 | Wenn noch keine Bausteine im Kurs existieren, wird der direkt eingefügt. Sind bereits andere Bausteine vorhanden, öffnet sich ein neuen Fenster, in dem Sie die Position des neuen Kursbausteins innerhalb der Kursstruktur festlegen können. Die dafür verfügbaren Positionen sind mit einem Einfügesymbol gekennzeichnet. Klicken Sie an der gewünschten Position für den neuen Baustein auf das Einfügesymbol. Der gewählte Bereich wird farbig hinterlegt. Bestätigen Sie Ihre Wahl mit Klick auf die Schaltfläche Kursbaustein einfügen. |
|
Kursbaustein konfigurieren
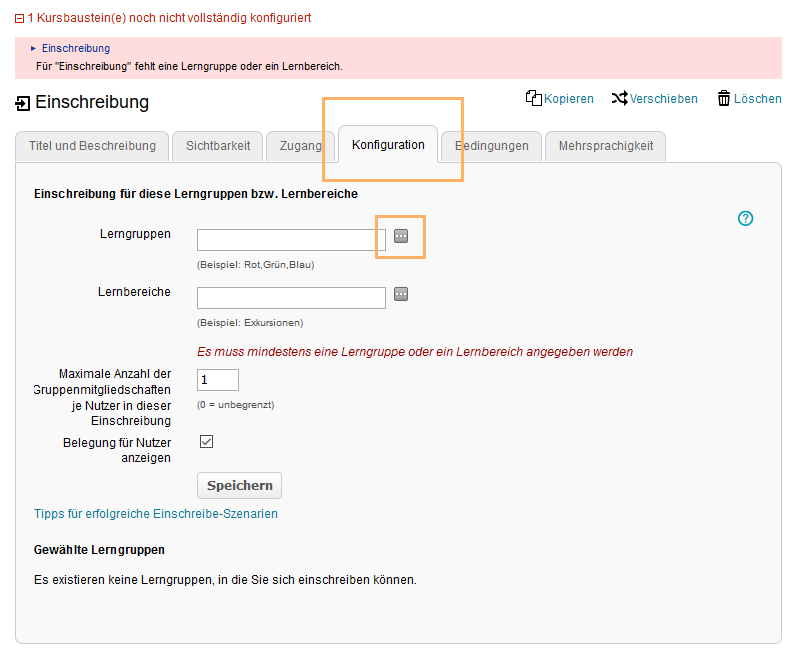
Im Konfigurationsbereich des Kursbausteins Einschreibung geben Sie die notwendigen Gruppen an.
1 | Geben Sie in das Textfeld Lerngruppen - durch Komma getrennt - die Namen der Lerngruppen ein oder wählen Sie die Schaltfläche mit den drei Punkten am Ende der Textzeile. Ist noch keine Lerngruppe im Kurs verfügbar, öffnet sich anschließend ein Fenster, mit dem eine neue Lerngruppe erzeugt werden kann. Sind bereits Lerngruppen im Kurs vorhanden, werden diese in einer Liste angezeigt und können ausgewählt werden. Zusätzlich gibt es auch in dieser Ansicht mit dem Button Erstellen die Möglichkeit weitere Lerngruppen anzulegen. |
|
2 | Sie sehen hier den Erstell-Dialog. Bitte geben Sie einen Titel für die Gruppe an und wählen Sie Fertigstellen. |
|
3 | Die gewählten Gruppen für die Einschreibung werden anschließend im Textfeld und imKnfigurationsbereich angezeigt. |
|
Ausführliche Informationen zu zusätzlichen Optionen und Konfigurationsmöglichkeiten finden Sie auf der zentralen Dokumentationsseite zum Kursbaustein Einschreibung.
Kurs in den Katalog eintragen ...
Ausführliche Informationen enthält die Seite Kurs in den Katalog einfügen.


